background image


28 


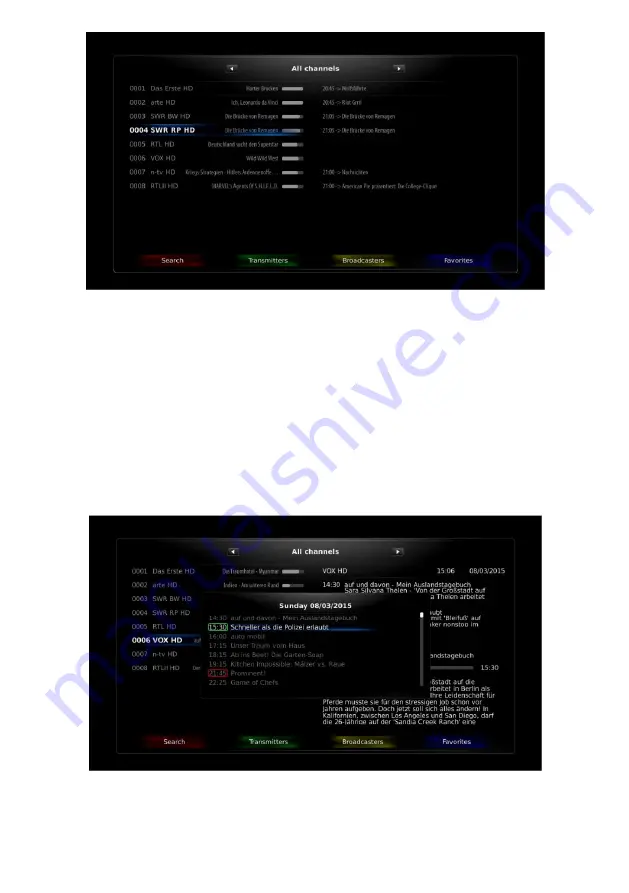
Fig. 39 Channel list optional view 

 
Right part of the window shows and follows the selected program information available. Press Info button and a pop-
up window appears showing the extended program guide information.


Press   

 / 



keys or blue button to select active favorite channel list instead of all channels. New favorite list is 

selected as current after channel change is switched. 
 
Press yellow button to select the channels of a selected broadcaster. Use green button to filter by Transmitters.  
Press Red button to search channel on channel list by name.  
To start


the


immediate record of play back screen (with no other menu opened), press 

REC

 button on the remote 

control media player section. To stop the immediate record, press stop button on the remote control media player 
section. 
If you have single LNB connection and recording schedule run at the same time, you can switch the channel only on 
the same satellite/polarization/band. Not accessible channels are dark in the channel list. 


Fig. 40 Channel list, GUIDE pop up 

Содержание Jaxster 3D HD

Страница 1: ......

Страница 2: ...ichannel Audio System 9 6 1 5 Connecting to the Network 11 7 Receiver setting up 13 7 1 Switching on 13 7 2 Main menu 13 7 3 Channel search 13 7 4 Channel editor 16 7 5 Favorite manager 17 7 6 Electronic program guide 18 7 7 Media player 20 7 8 Recordings 20 7 8 1 Schedule 20 7 8 2 Records 21 7 9 System settings 22 7 9 1 Language 22 7 9 2 Record options 23 7 9 3 CI CAS 23 7 9 4 Parent menu 23 7 9 ...

Страница 3: ... blocked or covered Also avoid using the receiver on a bed sofa rug or other soft surface This can block the ventilation openings in the bottom of the cabinet If you put the receiver in a bookcase or some other enclosed space be sure an adequate ventilation is provided Do not expose the digital receiver to extreme temperature conditions or to extreme humidity conditions Avoid drips and splashes Be...

Страница 4: ... used pls use two RF cables to connect A B inputs with the satellite dish In case single LNB configuration is required pls use one RF cable connected to LNB A input LNB A input signal is provided for both A B inputs Fully protected 14 18v LNB supply and DISEq commands are provided separately for LNB A LNB B inputs 2 Terrestrial RF IN Terrestrial RF antenna input It is used to receive RF signal fro...

Страница 5: ...ode the channels encoded by the DWCrypt system 2 The channel cards are to be inserted into the card reader with the contact chip placed down 5 4 CI interface 1 CI interface slot is integrated into the receiver and enables to decode the channels using external CI module 2 The CI module is to be inserted into CI slot ...

Страница 6: ...channels to be selected 13 Press to enter navigate on time shift mode When menu function is active press for left right line movement 14 MENU Press to open one step back the menu tree 15 EXIT Press to exit from the menu Changes are not saved 16 info Press to display relevant information about the current channel or program on the TV screen 17 VOL Press to increase decrease the volume 18 Channel Pr...

Страница 7: ... 6 1 Connecting receiver to Antenna TV Set Multichannel Audio System 6 1 1 Connecting to satellite and terrestrial antenna Fig 4 Connecting to antennas network and TV Skyter 3D HD is equipped with two independent DVB S S2 inputs LNB A and LNB B accordingly Depending on your satellite dish installation you can use single dual twin LNB cable or Unicable TM configuration In case you have twin LNB and...

Страница 8: ... on the check signal line and the STB starts tuning on the test transponder parameters Fig 6 Satellite LNB configuration check signal In case the signal was successfully locked you can quickly scan the programs on the selected frequency by pressing the blue button It helps to identify the satellite See Fig 6 The programs list is seen on the screen and is not saved As soon as you finish LNB configu...

Страница 9: ...sily check the signal and the list of channels available on the selected frequency by using menu s Test transponder section If a signal is successfully locked you can quickly scan programs from the selected transponder by pressing blue button It helps to identify the satellite See Fig 8 and Fig 9 No information is saved this time When the Satellite configuration is finished press yellow button to ...

Страница 10: ...SCART cable HDMI is more preferable as it gives you a possibility to get HD quality on a TV screen By default Skyter 3D HD reads EDID table of the supported formats from the connected TV set and install a TV mode accordingly You also can adjust the modes manually but be careful some modes can not be supported by your TV set and no picture is available In this case connect a TV set with SCART cable...

Страница 11: ...sed by the receiver as the initial setting mode only If AUTO EDID option is selected OFF a resolution and a frame rate selected are used by receiver permanently In some cases eg TV projector EDID connected monitor has 1080p format but doesn t have 1080i In most cases if a TV set supports 1080p it usually supports 1080i as well If Forced to 1080i for interlaced is selected ON the system sets HDMI f...

Страница 12: ...trol the equipment connected via HDMI cable TV or AV receiver supports CEC If CEC is selected ON the receiver switches ON TV and AV receiver connected via HDMI If an option Force TV stand by is selected the receiver switches off all connected equipment as well Pls note that Control TV volume option is not mandatory for most TV sets and is usually supported only by AV receiver Option Convert 4 3 SD...

Страница 13: ... port the PPP modem line appears on the network list Pls note that a modem can be connected only to rear USB ports due to power requirement Both rear USB ports can supply 1Amp current and Front USB port can supply only 0 5Amp By selecting PPP connection you can also scan connect and change the available option for 3G GSM connection Pls note that not all types of modems are supported by the system ...

Страница 14: ...ection The selected line is highlighted Press OK to enter the selected menu line window Press MENU to return back to the previous menu window Press EXIT to exit from the main menu To enter the settings and recordings sub menu select relevant line and press right button Fig 17 Main menu 7 3 Channel search After a new satellite is added you can search programs on it For automatic satellite search ME...

Страница 15: ...ransponders as well If you select search style update the system adds new found channels Alternatively if you select complete search the system deletes all channels from the selected satellite and replace them with the newly scanned If you select style full the system updates all channels only from the scanned transponders You can also set up various filters Filters help to mark scanned channels f...

Страница 16: ...y by channel frequency or automatically by all terrestrial band search Fig 21 Terrestrial search As soon as channels search is finished the list of the programs is displayed in the programs extract window See Fig 22 Filters set up in the search window make the system sort the channels in the list Press OK to select programs in the list See check box on this screen Only selected programs are saved ...

Страница 17: ...ttings Chanel search IPTV setup add a new provider and set it up You can select various types of IPTV Meddleware or just load a play list from the file The list of created IPTV operators is available in the menu You can temporary activate or desactivate any of them 7 4 Channel editor Select the MENU Settings Channel editor You may move sort rename or lock the channels you consider as inappropriate...

Страница 18: ...g the receiver and changing the password refer to chapter 7 9 4 Parent menu There is the option to rename programs As soon as programs search is finished the programs are presented in the channel list under the names transmitted by a broadcaster If you want to give your own name for a selected program press the yellow button Rename Keyboard window and the line for entering the desired name of a pr...

Страница 19: ...s OK Now the News list is selected as the current one and is displayed on the left side of the window You can move to the left of the window select ProSiben HD press OK to switch to this channel then press red Delete button ProSiben HD channel is now deleted from the News list only Pls note that if you delete any channel from All Channel list this means you delete this channel completly The channe...

Страница 20: ...tch to right left part of the window Press buttons to navigate inside the programs schedule Press REC button to select the program scheduled for recording see section 8 2 1 Press TIMER button to select the program scheduled as reminder Receiver switches to the selected channel at the time when the program starts Press Info button to see the Information about the program selected Fig 27 Electronic ...

Страница 21: ...le window In case you schedule the records in GUIDE menu they are displayed as new record tasks in the recordings schedule window You can delete edit or add new recording tasks Use green button to sort the tasks in the list Program title The record task is scheduled according to the channel name and program name criteria Date time The record task is scheduled according to first start time and date...

Страница 22: ...ewed means recorded and viewed at least one second of video has been played archive means archived to keep this video for future play back locked means password is requested for future play back At the bottom of the window the selected records program title extension is provided Press Info to see complete program title information for the selected record Press blue button to select records for fut...

Страница 23: ...d provides adequate sound title and text languages All languages can be selected separately Choosing each language you can select an additional alternative language in case the language selected by you is not available In case a broadcaster fails to transmit the languages selected audio title and text language will be the original language of broadcaster s transition System scans the program and s...

Страница 24: ... the records database and delete records with played status older than selected in this option If you want to save records for long you can change their status to archived Press yellow button to confirm and save all the changes made in this menu Fig 34 Record options 7 9 3 CI CAS MENU System settings CI CAS This menu gives you an access to CI module menu and DWCrypt conditional access system CI me...

Страница 25: ...older Attach it to system Select this menu option and the system scans USB flash drive and shows the available software Pls note that any attempts to update the system with any not official software cause No Warranty case Backup channel database You can save and download you setting and channel base back into system We recommend you to save you channel database each time before the system software...

Страница 26: ...aults are restored and installation guide appears on the TV screen System reboot Select this option to reboot system any time needed Fan speed mode You can select fan speed three options Auto means that fan speed depends on the system temperature Format HDD HDD is factory format If you change HDD use this option to format it again Media server setup Skyter media server can be found in your home ne...

Страница 27: ...am of the next broadcasting if a broadcaster has provided such information 5 Name of the cannel list which is on 6 Transmitter s name 7 Provider s name 8 Current time 9 Program progress bar the current program time position 10 Status icon DVB signal and signal power 11 Info icon IPTV buffering low Indicate low data flow from server 12 Status icon Mute 13 Info icon Archive available Indicate that c...

Страница 28: ...e time delay length press INFO The search line appeas on the screen Use keys to move inside the time shifted video Press keys to jump 1 min back forward Press I I keys to jump 5 min back forward Press stop to return to real time mode 8 4 Selection of audio track and subtitles You can quickly select an audio track in the desired language by pressing LANG LANGUAGE button The window with all availabl...

Страница 29: ...ect the channels of a selected broadcaster Use green button to filter by Transmitters Press Red button to search channel on channel list by name To start the immediate record of play back screen with no other menu opened press REC button on the remote control media player section To stop the immediate record press stop button on the remote control media player section If you have single LNB connec...

Страница 30: ...k select it by cursor and press OK Press STOP to stop archive and go back to real time mode Use keys to search within archived videos 8 8 Playback window During playback playback window press button to select and switch within last 10 channels viewed If only one channel is available as viewed button switches directly to this channel with no pop up window open The archive program in the channel lis...

Страница 31: ...ns sleep timer pop up window Fig 42 Playback window pop up TV R TV R button opens IP DVB easy switch pop up window Press OPT button to open system set up window Aspect Ratio button only functions if you play 4 3 video You can adjust aspect conversion This set up is stored for currently viewed channel ...

Страница 32: ...dulator DVB S S2 Frequency Range 950 MHz 2150 MHz Demodulation QPSK 8PSK DiSEQ control and 22Khz Video Decoding MPEG 2 MP ML ISO IEC 13818 2 High Profile level 4 1 H 264 30fps Video Resolution 720x576 PAL 720p 1080i 1080p Aspect Ratio 4 3 16 9 Audio Decoding MPEG layer II III Dolby Digital Plus Power supply 176 264VAC 10 50Hz internal Power Consumption max 50 W stby 1W passive mode Input Output Co...

Отзывы: