background image

DYON RAPTOR 

20 

EN 

11 Record Setting 

11.1 PVR Setting 

You can press 

VOL+/ VOL- 

button to see the selected partition information of USB HDD or memory stick. 

If you are connecting 2 USB device, then press CH+/CH- to change USB device.


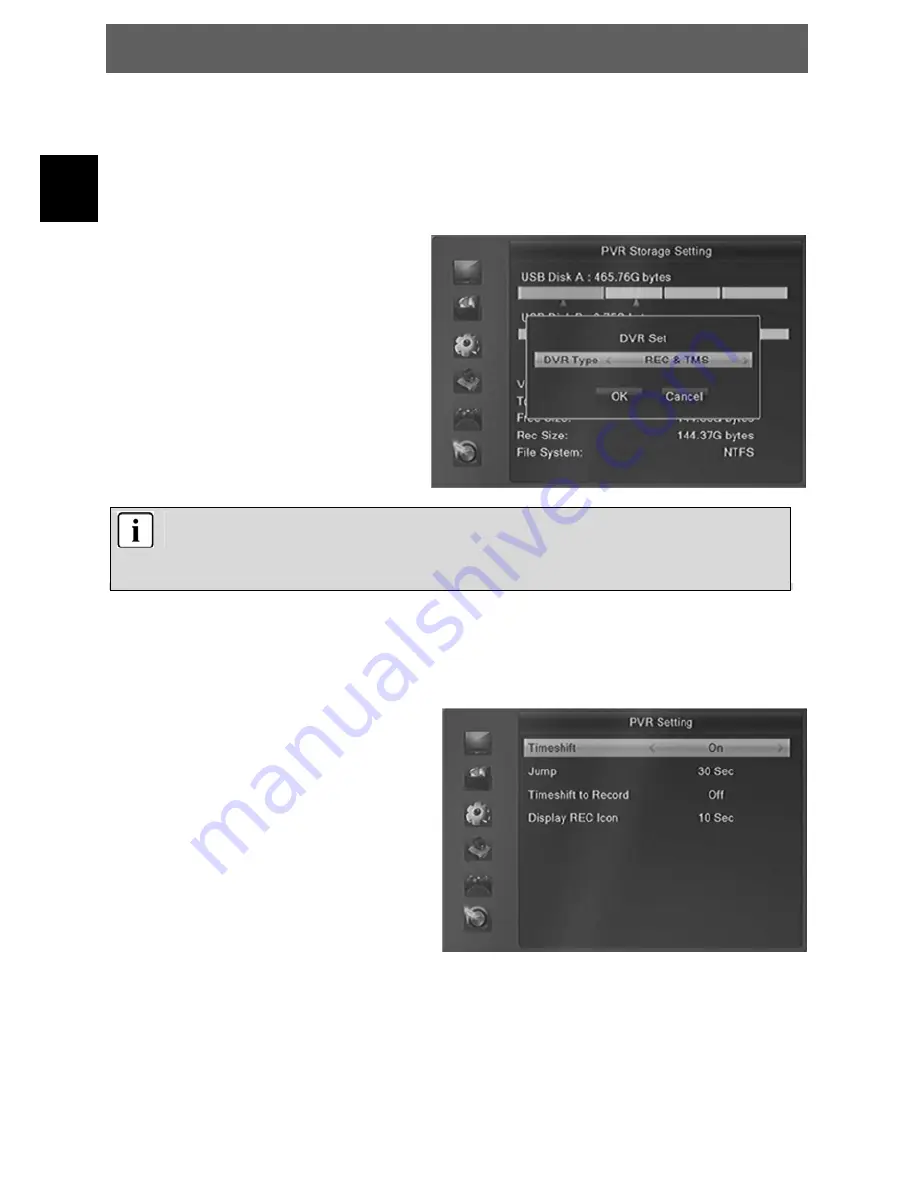
DVR Set


Press BLUE button to set the DVR type. 
There are three options of DVR Type, REC 
& TMS, REC and TMS. 

REC & TMS

: Both for recording and 

Timeshift in current partition  

REC

: Only for recording in current partition  

TMS

: Only for timeshift in current partition.


Note

:  

There are two icons display under the partition. The red icon means recording, the green 
icon means timeshift.


11.2 PVR Setting 

The PVR settings contain relevant options for the inclusion or time-shift function. These are Timeshift, 
Jump, Timeshift to Record and display REC icon. 

1. 

Timeshift  

With this function you can turn off Time 
shifting or activate. 

Note:If you select “On” , it will remain 
maximum size of 20G for timeshift. 

2. 

Jump 

You can set the jump time.  
3. 

Time-shift to Record 

It allows you to whether add the content of 
auto timeshifted into recorded file or not. 

4. 

Display REC Icon


You can set the display time of REC icon 
when recording.


Содержание DYON RAPTOR

Страница 1: ...11 6 1 2 Lock unlock channels 12 6 1 3 Skip channels 12 6 1 4 Move channels 12 6 1 5 Delete channels 12 6 1 6 Rename channels 12 6 1 7 Sort channels A Z Z A u s w 12 7 Installation 13 7 1 Quick Search...

Страница 2: ...2 Timeshift 21 12 1 3 Recording List 22 12 2 MedienPlayer 22 12 2 1 Record 22 12 2 2 Music 22 12 2 3 Bilder 23 12 2 4 Video 23 13 General functions 24 13 1 OK List 24 13 2 Favorite List 24 13 3 EPG El...

Страница 3: ...er supply cord or plug is damaged liquid has been spilled or objects have fallen into the apparatus the apparatus has been exposed to rain or moisture does not operate normally or has been dropped 14...

Страница 4: ...normal household waste Please take the batteries to your local retail or community collection point for recycling The following may be an indication of a discharged battery The device cannot be switch...

Страница 5: ...his is not possible use only USB extension cables not exceeding 25 cm 2 Rear panel 1 AV Video Output This socket outputs analog audio L R video signal 2 RF Input Used to connect the cable to receive t...

Страница 6: ...15 CH Navigates through the Menus Selects the previous Channel 16 OK Confirm 17 P Page up 18 P Page down 19 RECALL Switch to the previous viewed channel 20 ZOOM Picture zooming function 21 FAVOURITE D...

Страница 7: ...form or modify batteries 3 3 Using the Remote Control To use the remote control point it towards the front of the digital set top box The remote control has a range of up to 7 metres from the set top...

Страница 8: ...tingwith the receiver To prevent the risk ofelectric shock do not open the cover or the back of the receiver Note When connecting the receiverto other equipment e g TV VCR and amplifier make sure to r...

Страница 9: ...DYON RAPTOR 9 EN 4 2 Connecting the Cable Connect the antenna cable as shown above Note You can only use a DVB C cable connection to receive...

Страница 10: ...red to Factory Default the Main Menu will appear on your TV screen 1 Select OSD Language and press to switch your choice 2 Select first audio language 3 Select second audio language 4 Select teletext...

Страница 11: ...e or delete open TV Channel List or Radio Channel List menu As shown on the right side Press Vol to switch between the program lists 6 1 1 Favorites Use the CH CH keys to select the channel then press...

Страница 12: ...er of the position that you want to move to and press the OK button 6 1 5 Delete channels Press the BLUE to edit the channels You can mark multiple channels with BLUE button Then exit the edit window...

Страница 13: ...ce Symbol rate Input the symbal rate value QAM Input the QAM value Network Search Select Networkscan to add transponder from program providers to your transponderpool 7 2 Auto Search Auto Search allow...

Страница 14: ...e the native resolution of your TV To do this follow the specifications of your TV equipment E g 720p for HD Ready TV sets or 1080i 1080p for FULL HD TV sets 2 Aspect Mode With this menu you can chang...

Страница 15: ...View or Record Timer here Select a timer and press OK button Timer Mode Once only one time Daily Repeat every day Off Close this timer Timer Service Channel Will switch to the channel when the timer i...

Страница 16: ...sword the highlight will auto skip to Confirm Password and ask you to input the new password again If the password is correct the screen will show up a message of Saving Data Please wait After finish...

Страница 17: ...rite You can rename the favourite group s name in this menu Press Ok to input the name over the software keyboard Press Red to delete Press Yellow for capslock Press Blue to save 8 9 Other Channel Pla...

Страница 18: ...r the recording list directly Press the CH CH to highlight the PVR file you want to play press the OK button to play And you can watch the PVR file while recording CI module authenticate If you insert...

Страница 19: ...the update file in the root directory You can select Upgrade or Save Upgrade Upgrading a new software version Save Saving the data of current software version or the program list 9 5 USB Media Player...

Страница 20: ...urrent partition Note There are two icons display under the partition The red icon means recording the green icon means timeshift 11 2 PVR Setting The PVR settings contain relevant options for the inc...

Страница 21: ...TP 4 Other Operations while Recording While the recording channel is current channel press the INFO button can display the channel information And press the DVR INFO button can display the recording t...

Страница 22: ...ge Video Record Music 12 2 1 Record CH Ok Red Green Yellow Exit Move to the previous or next recording or folder Starts playback of the file or open the folder Rename the selected file Lock the select...

Страница 23: ...ist Edit Rename Delete Copy Add Folder Switch to the other USB device Sort the files by Name Time Size Favourite Set menu with the options for the slide show time and slide show repeat Display all ima...

Страница 24: ...rogram have multifeed channels press Green Key to open the select menu Press Up Down to select the multifeed channel and confirm with Ok 13 2 Favourite List If you have set several favorite lists pres...

Страница 25: ...revious 2 hours Go to the EPG of next 2 hours Go to the EPG of previous day Go to the EPG of previous day Press the GREEN button to enter Timer Setup menu After setup press the OK button can add the h...

Страница 26: ...the current program is available in multiple audio languages 1 Press the AUDIO button 2 Press the OK button to select the audio language you prefer 3 Select audio direction Left Right Stereo using th...

Страница 27: ...g off sound OSD On screen display Menu control displayed on the screen Symbol rate Speed of the digital transmission Receiver Receiver unit which converts signals from the antenna into video and audio...

Страница 28: ...TV RADIO key to shift into TV mode Select an alternative channel Scrambled channel message Channel is scrambled Input Cam module Forgotten channel lock code Re install channels to cancel channel lock...

Страница 29: ...nsport Stream and 25 Mbps for DV streams Aspect Ratio 4 3 16 9 Video Resolution 576i 576p 480i 480p 720p50 720p60 1080i 1080p Audio Decoding MPEG 2 layer I and II Music cam MPEG4 AAC and MPEG4 AAC HE...

Страница 30: ...following directives and standards European Directive 2004 108 EC EN 55013 2001 A1 2003 A2 2006 EN 55020 2007 EN61000 3 2 2006 EN61000 3 3 1995 A1 A2 European Directive 2006 95 EC EN 60065 2002 A1 20...

Страница 31: ...oduct that is sent in cannot be repaired within a reasonable time or at reasonable cost The product can also be exchanged for a different model of the same value Requests cannot be made for repairs to...

Страница 32: ...and clearly legible 3 You must enclose a copy of the sales slip as proof of purchase 4 Once AXDIA has received the product it will meet its warranty obligations in accordance with the warranty conditi...

Отзывы: