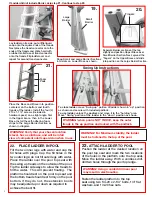
22. PLACE LADDER IN POOL
Fill the two inner legs with water and cap the
fill holes with plugs. Cap the fill holes in the
two outer legs; do not fill outer legs with water.
Place the ladder over the pool top seat with
the swing up treads on the outside of the pool.
Tip the ladder sideways to allow the treads to
fill the water. This will prevent floating. The
platform should rest on the pool top seat and
the bottom tread should rest firmly on the pool
bottom. If they do not, the extension boots
may be adjusted up or down as required to
achieve the best fit.
5
ATTACH LADDER TO POOL
Postion the ladder at the desired location on
the pool top seat and mark the two locations
of the holes in the platform onto the top seat.
Move the ladder away. With a cordless drill,
drill two holes through the pool top ledge.
Fasten the ladder platform to the top
seat using two 1/4-20 x 2-1/4” bolts, 1/4” flat
washers, and 1/4-20 hex nuts.
23.
WARNING! Using a corded drill near pool
may result in electrocution.
WARNING! Verify that your chosen location
is level, has a solid base, and will be in full
view of competent adult supervision when in use.
WARNING! For Maximum stability, the ladder
must be fastened to the top of the pool.
Separate Barrier sections at the top
slightly and position Upper Brace over
Small Barrier Section. Next, spread the
“fingers” on the Upper Brace and slide
into position on the Large Barrier Section.
19.
20.
Place the Base and Brace into position,
centered, on the bottom and fourth
treads of the ladder. Install the four (4)
#10 x 1-1/4” screws (included in
hardware pack) on a slight angle, first
in the Upper brace, then in the Lower
Base. Install the self-adhering foam
strips to the Large Barrier Section as
shown in diagram.
21.
Foam
Pads
Screws
Large
Barrier
Small
Barrier
If Ladder
did not
include Barrier, skip step 21. Continue to step 22.
18.
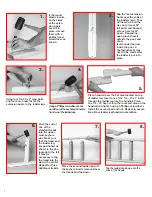
Lay ladder on its side, put a little liquid
soap onto the square ends of the treads.
Next place the tread connector onto the
ends of the treads and strike hard with
a rubber mallet to seat tread connector
onto the treads. Flip ladder over and
repeat for second tread connector.
Snap Small and Large Barrier Sections
into slots on Lower Base as shown.
WARNING! when pool is NOT IN USE, keep the outer
treads in the up position and locked with the padlock.
To close ladder:
move “Swing up” portion of ladder shown in “up” position
as shown and secure with included padlock.
To use ladder:
unlock the padlock and move it to the “holding” area.
Move “Swing” portion of the ladder to the “down” position as shown.
Swing Up Instructions
Fingers


