


Hardware Pack
4 - 1/4 - 20 x 2” Bolt
4 - 1/4 - 20 Acorn Nut
2 - #10 x 1-1/4” Screw
2 - 1/4 - 20 x 2-1/4” Bolt
2 - 1/4” Flat Washer
10 - 1/4 - 20 Hex Nut
4 - Plug
1 - Padlock
8 - 1/4 - 20 x 1” Bolt
Tools Needed for Assembly
* - Hammer or mallet
* - Phillips Screwdriver
* - Adjustable wrench
* - Liquid soap or lubricant
* - Battery operated drill
* - 5/16” Drill bit
Barrier Parts List (if included)
(Included in Hardware Pack)
4 -
#10 x 1-1/4” screws
1 - Strip of 4 Foam Pads
1 - Large Barrier Section
1 - Small Barrier Section
1 - Upper Brace
1 - Lower Base
Parts List
4 - Ladder Legs
2 - Tread Connectors
4 - “Swing Up” Treads
6 - Standard Treads
4 - Extension Boots
1 - Platform
4 - Handrails
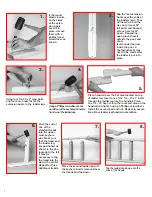
Use a little liquid soap to
help with ladder assembly.
Model #7100X
A-FRAME LADDER
Ladder must be attached to pool frame -
DO NOT USE
with inflatable pools
If missing parts call - Toll free U.S./Canada - 800-635-3213 or www.conferladders.com
Safe Installation
To reduce the risk of electrocution, drowning, entrapment, falls, or other
serious injury or death:
Check building codes/permitting.
Consult your local Building Department before installation of your pool and
equipment. Pool/equipment installation must comply with the codes of the authority having jurisdiction and
may require permits (e.g., building, plumbing, electrical, zoning, etc.).
Use for intended purpose only
• Use only as a swimming pool ladder.
• This ladder is designed and manufactured for a specific pool wall height and/or deck of the pool - check
product specification and the height of your pool.
Check that you have all required parts.
Check the contents of the carton with the Parts List for this ladder.
All parts and hardware are required. If any parts are missing,
DO NOT attempt to assemble or install
the ladder.
Instead, call Toll Free U.S. - 800-635-3213 or visit our web site at www.conferladders.com for
assistance.
Select an appropriate location
- The ladder must be located on a level, solid base and in a location that will
be in full view of competent adult supervision when in use.
Follow all instructions
• For stable, correct assembly and installation, all instructions must be followed completely and in the
sequence shown.
• Follow the manufacturer’s recommendations for the safe use of all hand tools and equipment used during
installation.
Cordless drill only - no corded drills near pool.
Use a cordless drill for assembly and installation. To reduce
the risk of electrocution, NEVER use a corded drill in or around a pool.
Lift safely.
When lifting awkward or heavy loads, have another person help you.
Double check after installation
• Before using the product, after assembly and installation, go over the instructions and procedures again to
make sure nothing has been overlooked.
• Make sure that safety labels are installed and legible.
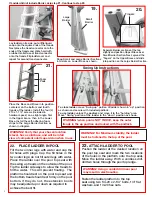
OPTIONAL CONVERSION KIT
To easily convert your A-frame ladder to a deck/inpool ladder order
our #CK7100-X conversion kit. The kit includes all parts and
hardware needed.
Deck cannot be higher than the pool top ledge.
IMPORTANT: LADDER ADAPTER KIT
LAK
kit fits Confer A-frame ladders for use with non-traditional
metal framed swimming pools with a wall height of 48” - 54”.
Use with models: 7100b, 7100x, 7000x, 7000b, 7200 and 8100x.
Not for use with inflatable pools.
LAK KIT
2
Platform
Handrails
Tread
Connector
Swing Up
Tread
Upper Brace
Ladder Leg
Standard
Tread
Extension
Boot
Small
Barrier
Lower
Base
Large
Barrier


