background image

17

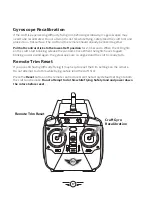
Remote Trim Reset

Craft Gyro 

Recalibration

Gyroscope Recalibration

If the craft is experiencing difficulty flying or is behaving erratically, it’s gyroscopes may 
need to be recalibrated. Do not attempt to do this while flying, safely land the craft first and 
place it on a flat surface. The craft and the remote should already be linked together.

Pull both control sticks to the lowest left position

 for 2-3 seconds. When the LED lights 

on the craft start blinking, release the controls sticks. When the lights have stopped 
blinking and are solid again, the gyroscopes are re-aligned and the craft is ready to fly.

Remote Trim Reset

If you are still having difficulty flying, it may help to reset the trim settings on the remote. 
Do not attempt to do this while flying, safely land the craft first.

Press the 

Reset

 button on the remote control to restore the factory default settings to both 

the craft and remote. 

Do not attempt to do this while flying. Safely land and power down 

the rotors before reset.

Содержание DRW876

Страница 1: ...User s Guide for Model DRW876 v1562 04...

Страница 2: ...ipment does cause harmful interference to radio or television reception which can be determined by turning the equipment off and on the user is encouraged to try to correct the interference by one or...

Страница 3: ...tment 15 Setting Trim Countering Drift Gyroscope Recalibration Remote Trim Reset Flying Tips Features 18 Tips for Safe Operation Speed Setting Altitude Hold Hover Auto Reverse Headless Mode Flips Tric...

Страница 4: ...nd must be registered with the Registration Number permanently affixed to the craft Who Can Register Anyone 13 years of age or older A person who does not meet this age requirement must have their UAS...

Страница 5: ...r feature but extra care needs to be taken to reduce the risk of injury or damage DO NOT POWER OFF THE REMOTE WHILE THE CRAFT IS ON AND THE ROTORS ARE SPINNING This will not immediately stop the rotor...

Страница 6: ...Fi camera Operating time 6 8 min Charge time approximately 150 min Includes Remote control requires 4 AA batteries not included 1 rechargeable lithium polymer battery AC DC power charger for battery...

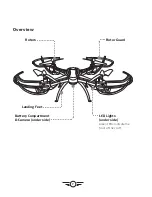
Страница 7: ...7 Overview Rotor Guard Landing Feet Battery Compartment Camera under side Rotors LED Lights under side Green LEDs indicate the front of the craft...

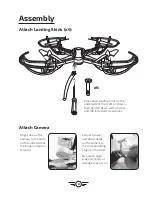
Страница 8: ...rside of the body and push forward Connect power and data cables on the camera to the corresponding plugs on the craft Be sure to align plugs correctly or damage may occur Place each landing strut on...

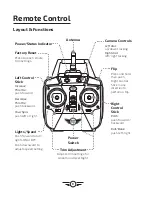
Страница 9: ...ward backward Roll Bank push left right Flip Press and hold then push Right Control Stick in any direction to perform a flip Camera Controls Left dial up down tracking Right dial left right tacking Li...

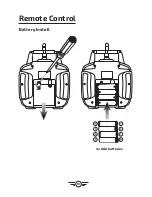
Страница 10: ...10 Battery Install Remote Control 4x AAA batteries...

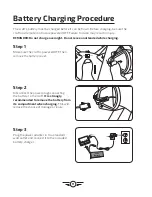
Страница 11: ...attended while charging Step 1 Make sure the craft is powered OFF then remove the battery cover Step 3 Plug the power adapter in to a standard wall outlet and connect it to the included battery charge...

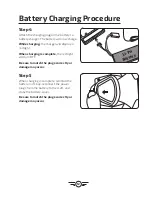
Страница 12: ...e sure to match the plugs correctly or damage may occur Step 4 Attach the charging plug on the battery to battery charger The battery will now charge While charging the charger will display a red ligh...

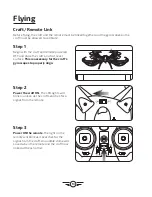
Страница 13: ...nison as the craft searches for a signal from the remote Step 1 Begin with the craft and remote powered OFF and place the craft on a flat level surface This is necessary for the craft s gyroscopes to...

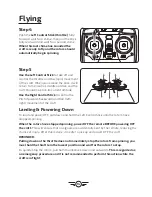
Страница 14: ...nsure that no signals are accidentally sent by the remote reducing the chance of injury After this is done it is safe to pick up and power OFF the craft REMINDER Pulling down on the throttle does not...

Страница 15: ...control the craft To avoid potential damage adjust the trim while attempting a stable hover Try to avoid making any exaggerated movements with the flight controls Adjust one trim setting at a time to...

Страница 16: ...16 Craft pitches angles forward or backward Craft rolls banks left or right Adjust Pitch Trim Adjust Roll Trim Trim Adjustment...

Страница 17: ...n for 2 3 seconds When the LED lights on the craft start blinking release the controls sticks When the lights have stopped blinking and are solid again the gyroscopes are re aligned and the craft is r...

Страница 18: ...ar the obstruction Check for possible damage before flying again Speed Setting Press the Speed button on the remote control once to set the craft s speed The remote will chime to indicate the speed se...

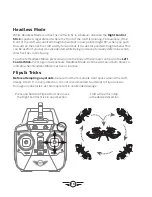
Страница 19: ...y determine which direction the craft is facing To activate Headless Mode press down into the body of the remote control on the Left Control Stick Press again to deactivate Headless Mode A chime will...

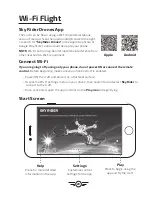
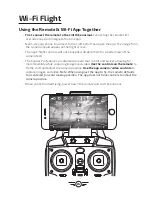
Страница 20: ...going to fly using only your phone do not power ON or connect the remote control Before beginning make sure your phone s Wi Fi is enabled Power ON the craft and place it on a flat level surface Acces...

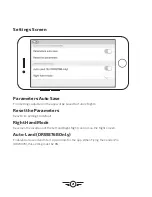
Страница 21: ...ure flights Reset the Parameters Reset trim settings to default Right Hand Mode Reverses the locations of the Left and Right flight controls on the flight screen Auto Land DRW876B Only Enables Auto La...

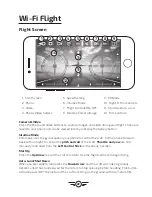
Страница 22: ...phone s screen Start Up Press the Up Arrow to start the craft s motors Use the flight controls to begin flying Auto Land Shut Down When you are ready to land press the Down Arrow and the craft will ma...

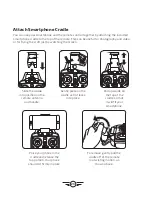
Страница 23: ...g the craft just by watching the screen Slide the cradle into position on the remote antenna and handle Gently press on the cradle until it locks into place Pull upwards on the top of the cradle so th...

Страница 24: ...or a better view of the camera feed The Condor Pro features a motorized camera that can tilt and swivel allowing for more flexibility while capturing images and video Use the controls on the remote to...

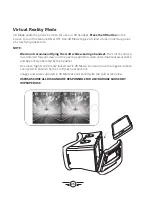
Страница 25: ...while wearing a headset The craft s camera has a limited forward view and the user s peripheral vision and situational awareness will be entirely obscured by the headset On screen flight controls are...

Страница 26: ...es with replacement rotors if the originals are broken or badly damaged To replace a rotor use a small Phillips head screwdriver included to remove the screws connecting the rotor to the motor shaft T...

Страница 27: ...ure the remote has an unobstructed line of sight to the craft Remain within the remote s 300 ft range Craft is difficult to control or flies erratically Gyroscopes may be misaligned Recalibrate gyrosc...

Страница 28: ...s des questions fr quemment pos es consultez la rubrique d assistance sur www gpx com Contact Information Website www gpx com Email Support prodinfo dpiinc com Email Parts partsinfo dpiinc com Phone S...

Отзывы: