background image

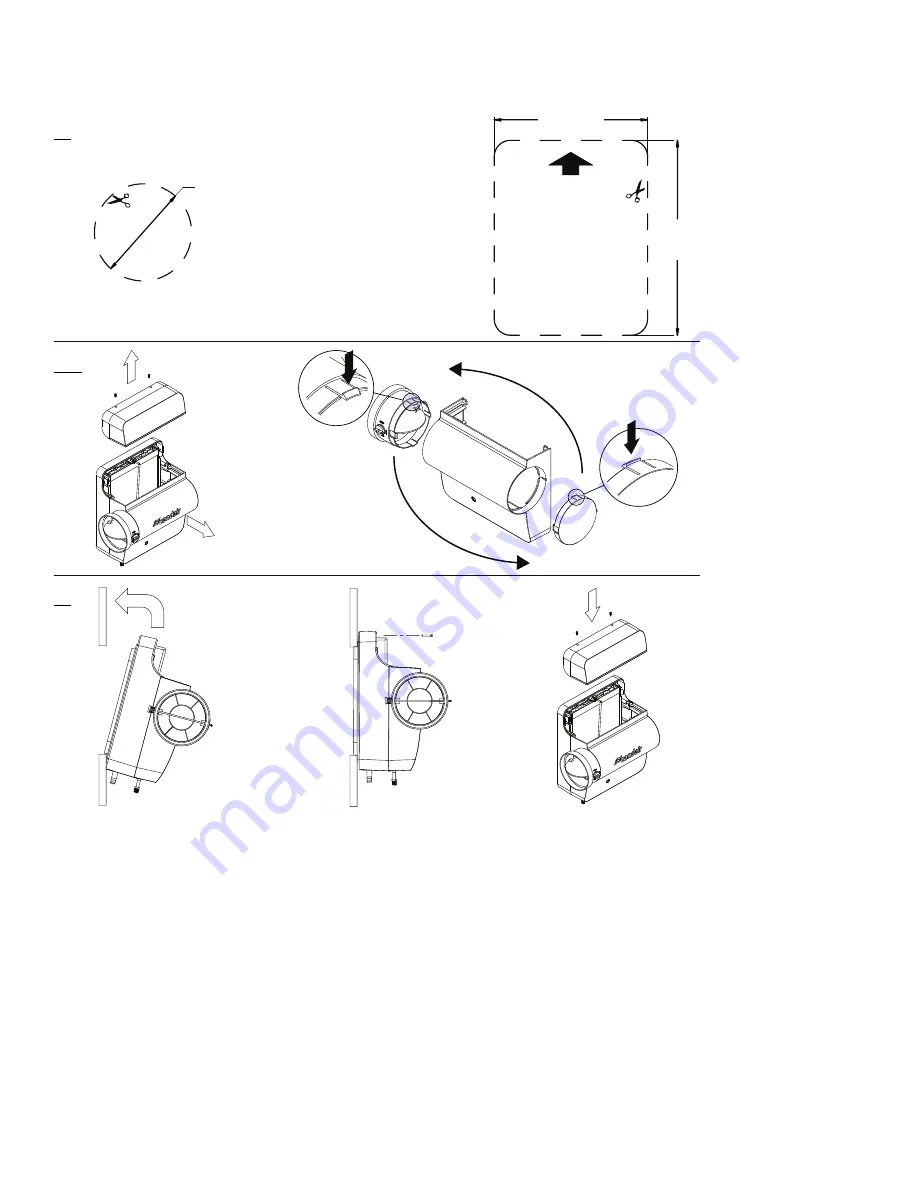
Mounting Your Humidifier

6

2598380_B_EN_2005_Condair-RE_SIOM

1

2

Ø  6 in

    152 mm

12 in

305 mm

9.45 in

240 mm

x4

x4

1. Use the templates (supplied) to cut holes in the ducts. Refer to the installation manual for more information.

a. Cut a rectangle into the air duct (return or supply). This hole will be for the humidifier body.

b. Cut a round hole into the other duct. This hole will be for the bypass duct.

2. (* If required) Change the orientation of the bypass opening.

a. Remove the top cover, then the bottom cover of the humidifier.

b. Push in the tabs and push out the end cap and bypass opening. Switch their positions.

c. Reinstall the bypass opening/damper and end cap, then reinstall the bottom cover.

3. Mount the humidifier.

a. Secure the support hooks on the humidifier to the bottom lip of the rectangular hole.

b. Push the top of the humidifier back against the duct and fasten the humidifier to the duct by using two

self-drilling sheet metal screws (provided).

c. Reinstall the top cover at the end of the installation.

1

2*

3

Содержание HumiLife RE Series

Страница 1: ...Quick Start Guide Condair HumiLife The economic solution for forced air heating Condair RE READ AND SAVE THESE INSTRUCTIONS 2598380_B_EN_2005_Condair RE_SIOM Humidification and Evaporative Cooling...

Страница 2: ...r choosing Condair What s in the box l Condair HumiLife RE Humidifier l 24 VDC power supply l Mounting template l Saddle valve l Inlet hose l Drain hose l Clip for drain hose l Quick connector l Self...

Страница 3: ...2598380_B_EN_2005_Condair RE_SIOM 3 Product Overview Hose Ceramic media LEDs Control board Top cover Damper Damper switch Bottom cover Solenoid valve Water supply Drain...

Страница 4: ...4 2598380_B_EN_2005_Condair RE_SIOM Installation Overview 24 VDC 120 VAC Air duct Condair HumiLife RE Bypass duct Water supply Power supply 24 VDC Furnace Humidity sensor Drain...

Страница 5: ...ON ON DUCT CUT METAL DUCT ALONG OUTLINE ADHERE TEMPLATE TO DESIRED POSITION ON DUCT CUT METAL DUCT ALONG OUTLINE ENSURE ARROW UP 12 in 305 mm 9 45 in 240 mm 6 in 150 mm 6 in 150 mm 6 in 150 mm 6 in 15...

Страница 6: ...ired Change the orientation of the bypass opening a Remove the top cover then the bottom cover of the humidifier b Push in the tabs and push out the end cap and bypass opening Switch their positions c...

Страница 7: ...installed l For the plastic water line supplied from the saddle valve to the humidifier a Place the brass compression nut over one end of the plastic water line Ensure the wider opening of the nut fa...

Страница 8: ...addle valve to allow water to enter the new line Connecting the Drain Line 1 Connect the drain line to the spout on the humidifier and secure the hose with hose clamps 2 Route the drain hose to a suit...

Страница 9: ...5V GND Signal 1AT PB1 Sig 0 10 V 0 20 mA Power 24VDC Inlet Valve Controls Safety Chain Sensors 1 and 2 IMPORTANT Unit accepts 24 VDC only Adhere to all local and regional electrical codes 1 Ensure ext...

Страница 10: ...ress Add Device Follow on screen instructions Press and hold the power button on the humidifier for 5 seconds the WiFi LED will start flashing Once the connection is established follow the on screen i...

Страница 11: ...lled in accordance with local plumbing codes by a licensed plumber Condair does not accept any liability for installations of humidity equipment installed by unqualified personnel or the use of parts...

Страница 12: ...in writing signed by an officer of THE COMPANY THE COMPANY s parts or materials that are considered consumables including but not limited to cylinders filters nozzles membranes media gaskets O rings...

Отзывы: