background image

Writer: Beth Snowberger  -  Saved by: Fleur  -  Saved date: 08/16/99 11:59 PM

File name: Wombat_RefGuide_final_0810

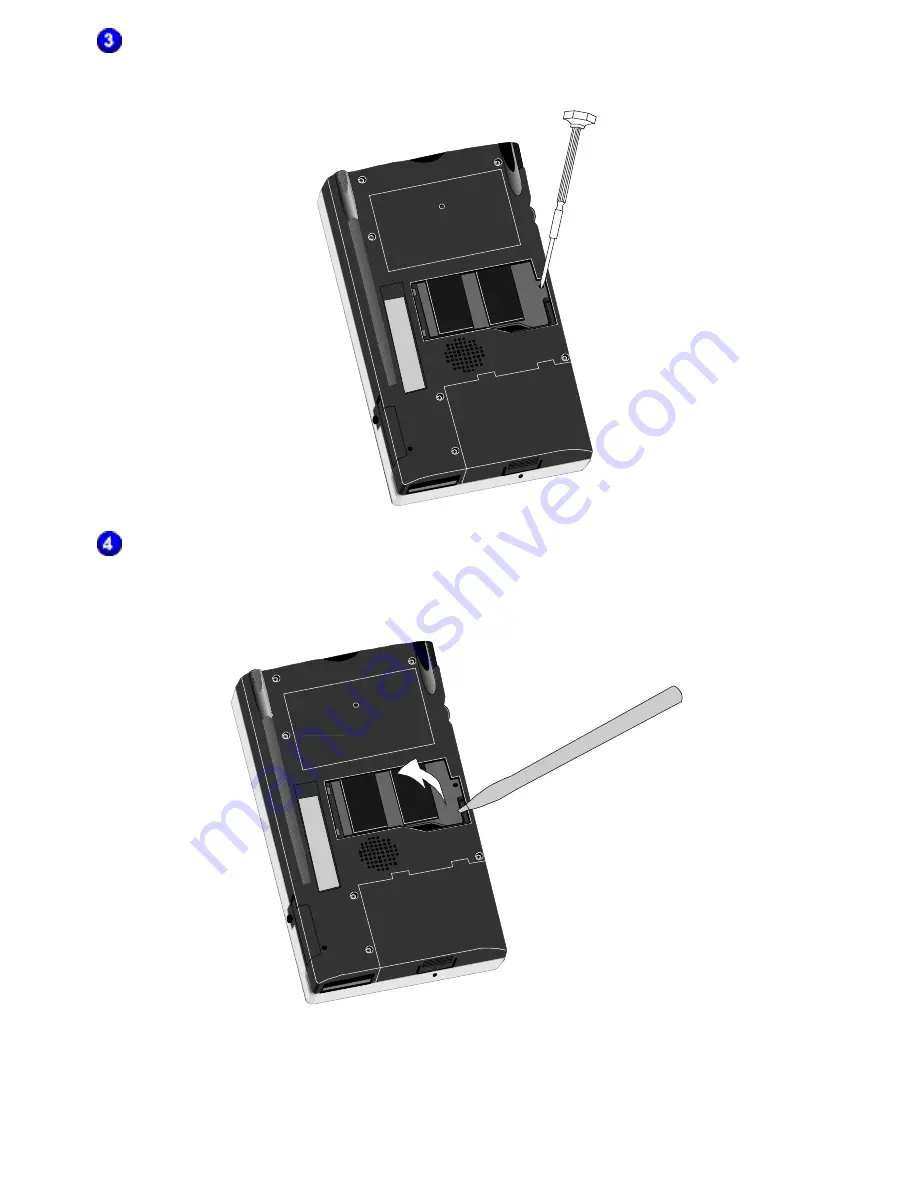
If a memory module is already installed, loosen it by using a small
Phillips-head screwdriver 

Ë

.

Remove the memory module by levering the right side of the module
with the stylus 

Ì

 and gently pulling the module out of the

compartment.

Removing the Memory Module

Ë

Содержание Aero 1500 Series

Страница 1: ...Aero 1500 Series Palm size PC Reference Guide ...

Страница 2: ...o are registered in the U S Patent and Trademark Office Microsoft MS ActiveSync Active Desktop Outlook Windows Windows NT and the Windows CE logo are either registered trademarks or trademarks of Microsoft Corporation in the United States and or other countries Microsoft products are licensed to OEMs by Microsoft Licensing Inc a wholly owned subsidiary of Microsoft Corporation The software describ...

Страница 3: ...e Recorder chapter 8 Note Taker chapter 9 Picture Viewer chapter 10 AudiblePlayer chapter 11 Infrared Feature chapter 12 CompactFlash Cards chapter 13 ActiveSync chapter 14 Channels chapter 15 Getting Connected Remotely chapter 16 Upgrading the Memory Module chapter 17 Using Jot Character Recognizer chapter 18 Tips Troubleshooting appendix A Hardware Specifications appendix B Icon Reference append...

Страница 4: ...re provided as printed materials and as online information that is accessible from your desktop computer and your Aero 1500 In addition to this guide the following references come with your Aero 1500 Quick Start Guide Pocket Reference Guide Accessories Information Accessories Business Card Important Safety Information Register Now Card North America only For Help warranty and service information P...

Страница 5: ...à àHelp Microsoft ActiveSync Help On your desktop computer Install the Microsoft ActiveSync software Next click on the Microsoft ActiveSync icon on your desktop then click Helpà àActiveSync Help Microsoft Palm size PC Home Page www microsoft com windowsce ppc Compaq Aero 1500 Home Page www compaq com products ...

Страница 6: ...C Help The booklet accompanying the Microsoft ActiveSync CD Toolbar buttons and dialog box items Tap and hold on a toolbar button or dialog box item to see its name or a short description Drag off the toolbar button or item before lifting to avoid activating it Information on this release of Windows CE and ActiveSync Read Me files located in the ActiveSync folder on your desktop computer Informati...

Страница 7: ...de of North America use the Compaq Info Messenger service to obtain Internet and e mail access to the latest software updates and service documentation for your device Once you register with this free service at www compaq com infomessenger and build your profile s Info Messenger searches the Compaq Web site and collects information specific to your Compaq Aero 1500 environment Info Messenger then...

Страница 8: ... select in succession for example tap Startà àSettingsà àOwner WARNING Text set off in this manner indicates that failure to follow directions could result in bodily harm or loss of life CAUTION Text set off in this manner indicates that failure to follow directions could result in damage to equipment or loss of information NOTE Text set off in this manner presents commentary sidelights or interes...

Страница 9: ... access and organize important information such as your contacts schedule and task list wherever you go The Aero 1500 features a crisp high resolution display that greatly enhances the clarity of text and graphics so that you can view more information at a glance Because its Windows CE interface closely emulates the Windows interface on your PC the Compaq Aero 1500 Series is the most intuitive way...

Страница 10: ...the top of the device serves as both a battery charge indicator and a visual alarm indicator Flashing green Notification alarm signal Flashing amber Battery is charging Solid amber Battery is fully charged For more information see Charging the Battery Pack in Chapter 3 and Setting Notification Alarms in Chapter 4 Continued ...

Страница 11: ... application Ë Program Buttons Opens the Note Taker application Ì Power and Backlight Button The Power and Backlight button is used to turn on and off your device and the screen backlight Press and release the button to turn on or off the device Press and hold the button for one second to toggle on or off the backlight Í Display The Aero 1500 Series features a crisp high resolution STN type monoch...

Страница 12: ...Side Components Continued Item Component Function Î Microphone The two small holes at the top of the device are the microphone for the built in Voice Recorder For more information see Chapter 7 Voice Recorder ...

Страница 13: ...Button This is a wheel with three functions Rotate the dial up to cause an upward scrolling action while you are using an application Rotate the dial down to cause a downward scrolling action while you are using an application Press the center of the dial to use it as an action button much like the Enter key on a full sized PC keyboard Ì Exit Button Press this button to exit a window within an app...

Страница 14: ...to maintain data when the main battery pack is low or unavailable Open the cover of the backup battery compartment to access the backup battery For more information see Backup Battery in Chapter 3 Ë DC Jack The DC jack allows you to connect to external power with the supplied AC adapter For more information see Using AC Power in Chapter 3 ...

Страница 15: ... jack lets you connect an earplug to your Compaq Aero 1500 Ì CompactFlash Card Slot The CompactFlash slot is protected by a removable cover The slot supports Type I CompactFlash cards For more information see Chapter 12 CompactFlash Cards Í Stylus and Stylus Compartment The stylus compartment stores the stylus when it s not in use Pull the stylus up to release it from the compartment When you are ...

Страница 16: ...You can connect the Aero 1500 to a PC by using a cradle or an auto sync cable For information on using the communications port to establish a connection to a PC see ActiveSync Help on your desktop computer Ë Battery Cover Release Button This button allows you to access the main battery Press the recessed button with your stylus to open the battery compartment cover Ê Ë ...

Страница 17: ...Compartment The battery compartment holds the rechargeable battery pack For more information see Rechargeable Battery Pack in Chapter 3 Ì Backup Battery Cover Release Button The Backup Battery Cover Release button is recessed inside the case of the device This button allows you to access the backup battery To pop open the backup battery compartment cover on the adjacent edge use the tip of the sty...

Страница 18: ...ssed inside the case of the device Occasionally some hardware or software malfunctions can prevent the device from responding To get the device working again use the tip of the stylus to press the Reset button For more information see Resetting Your Device in Chapter 3 Î Reset Button CAUTION When you use the Reset button you will lose any data that has not been saved ...

Страница 19: ...d a desktop computer Ê Ì Cradle Item Component Function Ê Cradle The cradle links your Aero 1500 to your desktop computer You can also recharge the main unit s battery by docking the main unit in the cradle while the cradle is attached to external power Ë Stylus Holder The stylus holder acts as a convenient storing place for your stylus when you are using your Aero 1500 with your cradle Continued ...

Страница 20: ...s with the desktop PC You must install ActiveSync on the desktop PC first For more information see ActiveSync Help on your desktop PC Using the Cradle Item Component Function Í AC Adapter The AC adapter connects the cradle to external power For more information see Using AC Power in Chapter 3 Î DC Jack The DC jack allows you to connect to external power via the supplied AC adapter Í Î ...

Страница 21: ...to sync Cable Item Component Function Ï Auto sync Cable Accessory The auto sync cable allows you to make a direct connection from the communications port on your device to the serial port on your desktop PC Ï ...

Страница 22: ... operations described can be found elsewhere in this reference guide This chapter describes the following features using the stylus programs Active Desktop start menu and taskbar command bar typing and writing on your device finding information on your device viewing information on your device customizing your device adjusting the backlight ...

Страница 23: ...ment located at the top edge of your device Pull up the stylus to free it from the stylus compartment When you are finished using the stylus reinsert it into the compartment and gently press it down Using the Stylus CAUTION Do not touch the screen with sharp objects or any other type of writing instrument It can damage the screen The stylus tip can also be used to open the battery compartment cove...

Страница 24: ...pointments CF Backup Restore Allows you to backup and restore data with a CompactFlash card Channels Downloads data to your device Connections Connects to other computers or the Internet Contacts Keeps track of your friends and colleagues Diagnostics Allows you to test various functions of your Aero 1500 File Explorer Lets you manage and navigate among your files Game Keys Converts the application...

Страница 25: ...d a memo You don t have to close programs on your device Simply switch to another program you want to use To switch between open programs tap the Q icon on the taskbar then the desired program from the program list NOTE The pre installed programs on your device are stored in ROM read only memory and cannot be removed or lost You can install additional software that will be placed in RAM random acc...

Страница 26: ...ACTIVE DESKTOP Use the Active Desktop to display important information such as today s appointments and tasks Active Desktop Screen ...

Страница 27: ...To select the type of information you want to display on the desktop tap Startà àSettingsà àDisplayà àDisplay Active Desktop Display Properties Screen ...

Страница 28: ...START MENU AND TASKBAR Use the Start menu on the taskbar to open programs adjust settings find information and view Help for the current program Start Menu On the taskbar you can also do the following ...

Страница 29: ... also displayed on your screen For information on optimizing battery life see Conserving Battery Power in Chapter 3 You can change what you see on the Start menu and taskbar by tapping Startà àSettingsà àTaskbar COMMAND BAR The command bar at the top of the device screen includes both menu names and toolbar buttons You can decide which you want to display Command Bar ...

Страница 30: ...s that you attach to entries in Calendar Contacts and Tasks you can use your stylus to write on the screen You can enter information in any program on your device by typing with the keyboard or writing using character recognition First select the input method you want to use in your device s input panel Tap the Input Method arrow to see your choices Type with the keyboard To type tap the Input Met...

Страница 31: ...haracter by swiping across the keyboard from right to left Enter a carriage return by swiping the keyboard from top to bottom Enter the character in uppercase by starting on a key and swiping up Write using character recognition You can write using the character recognition software CIC Jot Tap the Input Method arrow and select Jot Character Recognizer When you write a letter in the box your handw...

Страница 32: ...recognized To see how to write letters tap the Help button for an online demonstration or see Chapter 17 Using Jot Character Recognizer NOTE Drag your stylus across the panel horizontally from right to left to delete a character Drag from left to right to type a space ...

Страница 33: ...put panel When you tap the displayed word it is inserted into your text at the insertion point The more you use your device the more words it learns to anticipate Using the Word Completion Function To customize the suggested words tap Startà àSettingsà àInput Panel and select the Word Completion tab ...

Страница 34: ... items or files you ve already created in that program You can display the list in the manner that s most helpful for you You can sort the list on a particular column by tapping the column heading In Calendar Contacts and Tasks you can assign entries to particular categories then filter the list to show a specific category In Note Taker Voice Recorder and Inbox you can place files or messages in f...

Страница 35: ...erns Display Adjust Active Desktop and backlight settings Input Panel Customize the input method and set word completion settings Owner Enter contact information in case your device is misplaced Password Limit access to your device Power Maximize battery life Regional Settings Customize the appearance of numbers currency values times and dates Remove Programs Uninstall a program Stylus Recalibrate...

Страница 36: ... in Chapter 4 For information on a particular setting you can do either of the following Open the setting tap Startà àHelp Open the setting then tap and hold on the label of the item on which you want more information Display Properties Screen ...

Страница 37: ...ulb icon on the taskbar and using the Q Menu Using the Power and Backlight Button You can use the Power and Backlight button on the front of your device to turn the backlight on and off Press and hold the Power and Backlight button for one second to toggle on or off the backlight Using the Light Bulb Icon You can use the light bulb icon on the taskbar to turn on or off the backlight Tap the icon t...

Страница 38: ...the following actions Tap On to turn on the backlight Tap Off to turn off the backlight Tap Disable to turn off the backlight and remove the light bulb icon from the taskbar Tap Reverse to toggle on and off reverse backlight mode In reverse backlight mode when the backlight is turned on the device will display dark text on a white back ground in dimly lit environments and white text on a dark back...

Страница 39: ... down menus to set the amount of idle time before the backlight turns off when the device is using battery power or external power Setting the Backlight Timeout After the timeout has turned off the backlight any screen tap or button activation will turn the backlight on again ...

Страница 40: ...ed or while you are changing one battery pack for another battery pack The battery pack can be recharged by connecting the device to a power outlet with the supplied AC adapter You can also recharge the battery pack by placing the device in the cradle while the cradle is connected to a power outlet with the supplied AC adapter This chapter describes the following features rechargeable battery pack...

Страница 41: ...verify that the coin sized backup battery is installed in the device and has a rating of Low to Good CAUTION The backup battery maintains the data held in your Aero 1500 Series whenever the battery is low or if the battery pack is removed The backup battery is not rechargeable so when you change battery packs do not cause an unnecessary drain on the backup battery by leaving the device without a b...

Страница 42: ...y into the compartment Ì as indicated by the icon inside the compartment Inserting the Battery Pack Reinsert the battery cover at a 45 degree angle to engage its two tabs into the latches at the top of the compartment then press down to snap it into place Ê Ì Ë ...

Страница 43: ... your Aero 1500 Series and using battery power you can monitor the charge held in the battery pack by using the Power Properties window To display the Power Properties window Tap Startà àSettingsà àPower or Qà àPower Tap Startà àQLaunch to make the Q icon appear on the taskbar If the battery pack is low on charge the battery icon appears on the taskbar You can display the Power Properties window b...

Страница 44: ...ars in the taskbar The battery icon gives a graphic representation of the amount of charge remaining in the battery pack Icon Meaning Main battery is low Main battery is very low External AC power source is connected and or main battery is charging Note that when the charge level in the battery pack gets very low an exclamation mark appears beside the battery icon Shortly after the battery icon ex...

Страница 45: ...to restart the device until you have connected to a power outlet using the AC adapter or you have replaced the discharged battery pack with a fully charged battery pack CHARGING THE BATTERY PACK You can recharge the Aero 1500 Series battery pack by Connecting the AC adapter directly to your device Connecting the AC adapter to the cradle and docking the device into the cradle NOTE There is no requi...

Страница 46: ...ng the AC adapter Ë You can connect the DC connector Ì from the AC adapter directly to the device Charging the Battery Using the AC Adapter Directly or you can connect it to the desktop cradle and dock the device into the cradle Charging the Battery Using the Cradle Ê Ë Ì ...

Страница 47: ...l receive a full charge in 2 to 3 hours If you have turned on your device while the battery is charging it might take up to 4 hours for the battery to receive a full charge Battery Charge Light When the battery pack is fully charged the battery charging light stops flashing and the amber LED remains on Useful Battery Life The removable battery pack is rated to remain useful for at least 300 cycles...

Страница 48: ...ity where the metals are recycled Batteries battery packs and accumulators should not be disposed of together with the general household waste In order to forward them to recycling or proper disposal please use the public collection system or return them to Compaq your authorized Compaq partners or their agents Some important points to remember are There is a danger of explosion and risk of person...

Страница 49: ...uidelines below to maintain the backup battery Whenever the main battery pack is fully discharged recharge it at the earliest opportunity If you have two main battery packs try to always keep a charged battery inside your Compaq Palm size PC When you exchange the battery packs make sure the device is without a main battery pack for just a short period of time If you will not be using your device f...

Страница 50: ...ge obtain a new backup battery CR2032 at your earliest convenience In the interim period be sure to make a full backup of the data held in your Aero 1500 and take steps to make sure that you avoid fully discharging the main battery pack Changing the Backup Battery Change the backup battery in your Aero 1500 Series as follows Verify that the device is installed with a main battery pack with a charg...

Страница 51: ...nsert the new battery Ì into the compartment taking care that you correctly replace the battery The positive terminal of the battery faces upward i e toward the back of the device as shown on the diagram inside the compartment Inserting a Backup Battery Close the battery compartment and restart your device Ê Ë Ì Ì ...

Страница 52: ...creen backlight and CompactFlash cards use more power than others When running your system on battery power turn off or refrain from using those features that use a lot of energy unless necessary Backlight If you use the backlight program the device to turn off the backlight whenever the system is idle for a short time To learn how to set the backlight timer see Adjusting the Backlight in Chapter ...

Страница 53: ...ve Synchronization Synchronizing the data on your Aero 1500 Series with your desktop computer consumes power Whenever possible arrange your synchronization routine so that it is transmitted through the cradle while your system is powered by the AC adapter Automatic Power Off You can program your Aero 1500 Series to automatically power off whenever it is idle for a short period If you are running o...

Страница 54: ...the Power Off Timeout NOTE If you are playing an audio file on your Aero 1500 under battery power the display will automatically turn off after 1 minute if there has been no input to the device The display will turn back on once the audio file has finished playing This power saving feature is not adjustable ...

Страница 55: ...ing status When the AC adapter is connected to the cradle the cradle can act as a power source for your Aero 1500 Series and charge the battery It is not necessary to turn off your Aero 1500 Series before connecting to AC power The device automatically switches to AC power without interrupting operation See Charging the Battery Pack earlier in this chapter for information on how to connect your Ae...

Страница 56: ... does not affect data that has been saved in memory A full reset erases memory contents and settings Resetting your device does not affect the operating system Performing a Normal Reset A normal reset restarts your device much like pressing Ctrl Alt Del restarts a computer To perform a normal reset Save all work IMPORTANT Do not turn off the device as the device must remain on in order to reset Tu...

Страница 57: ...ure NOTE If you have saved your data using one of the backup procedures it is possible to restore your saved data after performing a full reset To perform a full reset Disconnect the device from the AC Adapter if using external power Turn over the device Remove both the main battery and the backup battery Wait at least 1 minute then replace the batteries Turn over the device then press the power b...

Страница 58: ... RAM For instructions on installing applications refer to ActiveSync Help on your desktop computer For help using the preinstalled applications read this section or refer to the online Help supplied with the applications This chapter describes the following features using the Asset Viewer using the QUtilities and Q Menu using the owner properties window setting notification alarms setting a passwo...

Страница 59: ... technical support call and to give system administrators the data needed to understand their inventory To use the Asset Viewer tap Startà àSettingsà àAsset Viewer A screen appears similar to the one below By selecting a topic from the drop down menu you can quickly review the current setup of your device Asset Viewer Screen The drop down menu has the following 5 categories Identity Memory Version...

Страница 60: ... Q Menu also lets you switch between or close open applications The QUtilities are located on the Q Menu Tap the Q icon on the taskbar to access the Q Menu If you want to remove the Q icon from your taskbar tap Qà àExit To restore the Q icon tap Startà àQLaunch To change which items appear on the Q Menu tap Qà àQUtilities and select the Q Menu tab Any items that you select will appear on the Q Men...

Страница 61: ...e the program that is currently active tap Close active task To close all the open programs on your device tap Close all tasks NOTE When you close a task all unsaved data in that task is lost Below these two options is a list of running tasks To switch among running tasks tap the name of the task you want to go to Q Menu ...

Страница 62: ...e Slider Power The Power utility on the Q Menu includes both a battery gauge and a timer allowing you to power off the device when it is idle To access it tap Qà àPower On the Battery tab you can check on the status of your main and backup batteries The gauges indicate the charge level of the main battery and backup battery The main battery icon indicates whether the device is connected to externa...

Страница 63: ...eout click on the check box to uncheck it For more information see Conserving Battery Power in Chapter 3 File Explorer The File Explorer on the Q Menu lets you navigate and organize your files as well as browse shared network resources and connect to those resources To access the File Explorer tap Qà àFile Explorer For more information see Using File Explorer later this chapter Contrast The Contra...

Страница 64: ...erformance To change this setting Save all unsaved data Tap Qà àContrast Select Higher picture quality or Higher contrast then tap OK Tap Reset for the new setting to take effect Contrast Tab Backlight You can turn on and off the backlight set the backlight mode and adjust the backlight timeout setting using the Backlight option on the Q Menu To access it tap Qà àBacklight For more information see...

Страница 65: ...g automatically as soon as the card is inserted You can disable this function by tapping Qà àQUtilitiesà àAuto Runà àDisable then tapping OK You can also manually run a specialized program stored on an inserted CF card On the Auto Run tab tap Restart For more information see Chapter 12 CompactFlash Cards Auto Run Tab ...

Страница 66: ...ll open programs by tapping Qà àClose all tasks If you have enabled password protection at power on disable this by tapping Startà àSettingsà àPassword Enter your password then deselect the Enable password check box If you have enabled display owner identification at power on disable this by tapping Startà àSettingsà àOwner Deselect the Display owner identification check box Tap Qà àQUtilitiesà àD...

Страница 67: ... Reset your password and owner identification settings To read the Diagnostics log file on your Compaq Aero 1500 Series follow these steps In Note Taker tap Toolsà àOptionsà àFile tab Select Show all file types Tap OK Double tap on the DIAGNOSTICS file To read the diagnostics log file on your desktop PC follow these steps Connect your device to your desktop PC then use ActiveSync to copy the file ...

Страница 68: ...ithin a game To use the program buttons as directional controls tap Qà àQUtilities select the Game Keys tab then select Enable There is no need to reset your device after enabling or disabling the Game Keys feature When the Game Keys are enabled an arrow icon appears on the taskbar You can quickly disable the Game Keys by tapping the arrow icon then tapping Disable The buttons are reprogrammed as ...

Страница 69: ...ion by tapping on this welcome screen SETTING NOTIFICATION ALARMS You can set up notification alarms on your Aero 1500 Series The device alerts you of important appointments or reminders with the following alarms Flashing green alarm light on the top of the device Pop up message on the display Audio alarm You can choose the manner to be notified for each particular appointment or reminder When you...

Страница 70: ...y you want to be reminded of and set the alarm by checking the Remind me box You can set the alarm properties by tapping on the alarm icon then tapping the Reminder Options button For more information on setting an alarm through the Calendar see the Help installed on the device Appointment Screen ...

Страница 71: ...t a general alarm tap Startà àSettingsà àWorld Clock then tap the Alarms tab Use the drop down menus to set the alarm then tap the Alarm Clock icon on the right side of the menu to set the Notification Options World Clock Alarms Tab Screen ...

Страница 72: ...uch as your data files and your system settings To set your login password follow these steps On your device tap Startà àSettingsà àPassword If a password has been previously set the Enter Password dialog appears Enter the password and tap the OK button This gives you access to the rest of the Password application This step is necessary only if a password has been previously set To set a new passw...

Страница 73: ...kbar tap Startà àQLaunch A split screen will appear The top half of the screen contains a complete hierarchical list of all the folders on your device The bottom half of the screen contains a list of the items contained within the folder that is selected in the top half of the screen File Explorer Screen To make either half of the screen larger use your stylus to tap and drag the divider up or dow...

Страница 74: ...nts in the bottom half of the screen Tap the minus sign to the left of the folder s name to close the folder In the bottom half of the screen you can double tap a folder s name to view its contents Double tap a file s name to open that file Organizing Your Files Use the File and Edit menus to organize the folders and files on your device In the File menu you can Create a new folder or shortcut Ope...

Страница 75: ...llow RAS clients to access the entire network For more information see Connecting to a Network in Chapter 15 and ActiveSync Help on your desktop PC To browse the network use Network Neighborhood in the top pane You can use the Tools menu to configure map or disconnect your network connection or to find an individual computer on the network To map a network connection tap Toolsà àMap Network Connec...

Страница 76: ... connect to your Palm size PC For more information see ActiveSync Help on your desktop PC CF Backup Restore This utility preinstalled on your Aero 1500 Series lets you back up and restore your entire Palm size PC memory contents to a CompactFlash storage card purchased separately You can then carry a CompactFlash card based copy of your data with you at all times for quick retrieval NOTE To avoid ...

Страница 77: ...lier included in the shipping box For a list of other Compaq tested CompactFlash cards visit the Compaq Aero 1500 Series home page at www compaq com products BACKING UP DATA TO A CF CARD Each time you use the CF Backup utility your data files databases preferences Windows CE system data and applications are copied to the CompactFlash storage card The subdirectories on your Aero 1500 Series are als...

Страница 78: ...ze that is saved to the CompactFlash storage card CF Backup Restore Utility Backup Tab Screen Tap the Start button to begin the backup process A status bar reports the data activity until the function is complete When backup is complete remove the CompactFlash storage card and keep it close for easy retrieval ...

Страница 79: ...ose all active programs before proceeding Tap Qà àClose all tasks Tap Qà àQUtilitiesà àCF Backup tab Tap Restore Tap the Start button to begin the restore process A status bar reports the data activity until the function is complete When the restore process is complete press the reset button to restart your device CF Backup Restore Utility Restore Tab Screen ...

Страница 80: ...ew and a list view The card view is where you enter or view the details for each entry The list view is where you view all entries With Inbox you can send and receive e mail messages through synchronization with either Outlook or Exchange on your desktop computer or by connecting directly to your mail server through an ISP or network account You can switch to these programs at any time by tapping ...

Страница 81: ...This chapter describes the following features program buttons Calendar application Contacts Tasks Inbox using Inbox with a remote connection ...

Страница 82: ... the application without selecting from the Start menu NOTE When a program button shortcuts to an application that has a list view and a card view such as Contacts or Calendar you can create a new card by holding the program button down for a few seconds Icons are inscribed beside the program buttons Ê to indicate the application that can be started by each of the buttons Program Buttons Ê ...

Страница 83: ... Highlight the button that you want to change by tapping with the stylus Use the icons to identify the buttons numbered 1 to 5 Note that you can also change the shortcut of the Voice Recorder button In the Button Assignment drop down menu select the new application that you want to be associated with the highlighted button by tapping it with the stylus Tap the OK button to close the Button Propert...

Страница 84: ...al views Day Week Month Year and Agenda Switch among the views by tapping the corresponding command bar button NOTE You can display current appointments on your Active Desktop Tap Startà àSettingsà àDisplayà àActive Desktop then select Appointments Calendar Screen Enter the details for an appointment on the appointment card ...

Страница 85: ...eeting When attendees receive a meeting request they can accept or decline the meeting If they accept the meeting is automatically added to their schedule In addition their response is automatically sent back to you and your calendar is updated the next time you connect to your mail server or synchronize with your desktop computer Before you can send a meeting request enter e mail addresses in Con...

Страница 86: ...ver or synchronize with your desktop computer NOTE Your device reminds you about your appointments and meetings by sounding an alarm flashing the notification light or displaying a message on the screen To change how you are notified tap Toolsà àOptions Tap the Alarm button then Reminder Options CONTACTS Contacts maintains a list of your friends and colleagues so that you can easily find the infor...

Страница 87: ...ter the details for a contact on the contact card You can enter both business and personal information NOTE To change the type of information that appears in your list tap Toolsà àCustomize Columns Contact Details Screen ...

Страница 88: ...ks you have to perform Overdue tasks are displayed in red Tasks Screen Enter the details for a task on the task card You can assign a task to a category and if you associate a date with a task you can set a reminder for it Task Details Screen ...

Страница 89: ...uring synchronization Messages are copied from the Inbox folder of Exchange or Outlook on your desktop computer to the Inbox folder on your device The messages on the two computers are linked so when you delete a message on your device it s deleted from your desktop computer as well the next time you synchronize Messages in the Outbox folder on your device are transferred to Exchange or Outlook th...

Страница 90: ...u also need to set up the remote connection on your device using the Connections program Set up remote mail You can use multiple mail services to receive your mail For each mail service you intend to use first set up and name the mail service If you use the same service to connect to different mailboxes set up and name each mailbox connection In Inbox on your device tap Composeà àOptions the Servi...

Страница 91: ...ked to your mail server rather than your desktop computer You can work online which means that you read and respond to messages while connected to the server Messages are sent as soon as you tap Send which saves space on your device You can also work offline Once you ve downloaded new message headers or partial messages you can disconnect from the server then decide which messages to download comp...

Страница 92: ...et mail service by default Inbox downloads only the first 100 lines of each new message to the Inbox folder No mail attachments are downloaded When you synchronize with your desktop computer only the first 50 lines of each new message are downloaded The original messages remain on the mail server or your desktop computer ...

Страница 93: ...Screen You specify your downloading preferences when you set up the service or select your synchronization options You can change them at any time To change Inbox delivery options for mail synchronization see ActiveSync Help on your desktop computer To change Inbox delivery options for remote mail in Inbox on your device tap Service then the service name Then tap Service again and tap Properties Y...

Страница 94: ...ose a new message tap the New Message button on the toolbar You can enter an e mail address in the To box or select a name from the Address Book All e mail addresses entered in the e mail fields in Contacts appear in the Address Book To send your message tap Fileà àSend Messages are placed in your Outbox folder on your device and are delivered to their destination in one of the following two ways ...

Страница 95: ...Inbox New Message Screen ...

Страница 96: ...ttons on your device or using the buttons on your screen NOTE More information on the procedures described in this topic as well as information on additional procedures can be found in online Help on the device Select Startà àHelp then the program on which you want information This chapter describes the following features using the hardware buttons using the screen buttons settings and organizatio...

Страница 97: ...tton to record Release to stop recording Ë Action button Press the Action button to play Press again to pause Press once more to resume Ê Ë Voice Recorder Hardware Buttons Make a recording To Do this Record Press and hold the Voice Recorder program button You ll hear one beep when it s ready to record Stop recording Release the Voice Recorder program button You ll hear two beeps when recording sto...

Страница 98: ...rn off after 1 minute if there has been no input to the device The display will turn back on once the audio file has finished playing Navigate To Do this Fast forward while playing Press and hold the Up Down control in the down position Mobile Voice files only Rewind while playing Press and hold the Up Down control in the up position Mobile Voice files only Scroll through the list of recordings Pr...

Страница 99: ... of a recording move the slider to any place in the recording before you play it If you play a recording that lasts longer than a minute the device will automatically turn off the screen display after one minute in order to conserve battery charge You can turn the screen display back on by tapping anywhere on the screen or by pressing any button other than the power button The display turns on aut...

Страница 100: ...st sound quality You can also use the alternative Mobile Voice codec which makes recordings 25 times smaller than the original size This enables you to store more recordings although the sound quality is less than optimal For the best sound quality use the default PCM format These files are larger than those stored in Mobile Voice format To switch formats tap Tools then Recording Format Organizing...

Страница 101: ...particular folder in the Voice Recorder window any new recordings you make while that folder is selected are placed in that folder They are given the folder name and an incremental number My Novel1 My Novel2 etc Organizing Recordings ...

Страница 102: ...and make lists quickly the way you re used to writing on paper but even better because you can edit and format what you ve written or drawn This chapter describes the following features entering information writing and drawing editing and formatting a note saving and organizing your notes ...

Страница 103: ...reating a Note ENTERING INFORMATION With Note Taker you can enter information in the way that s easiest for you You can use the input panel to type using the keyboard or you can write using the character recognizer as described in Chapter 17 Using Jot Character Recognizer You can also write and draw directly on the screen When you display the input panel you ll see the insertion point indicating w...

Страница 104: ...Entering Information Using Note Taker When you hide the input panel the insertion point disappears and you can write or draw anywhere on the screen ...

Страница 105: ...rawing on your first stroke cross three ruled lines A drawing box appears Subsequent strokes in or outside the border of the drawing box become part of the drawing NOTE You might want to switch to full screen display so that you can see as much as possible on the screen Tap View then Full Screen Tap Restore to see the command bar again ...

Страница 106: ... Instead of tapping the Select button you can press and hold the Action button as you drag the stylus Tap the Edit button to see your editing options The options available depend on what you ve selected text handwriting or a drawing Editing And Formatting a Note You can apply formatting to a selection or you can set default formatting that is applied to everything you then type write or draw You c...

Страница 107: ...e tap OK to save it and return to your list of notes Note Taker automatically names your note as follows The first 21 characters of the first line of typed text are used as the note name If no text is included in the note but the note has been assigned to a folder the notes are given the folder name and an incremental number Tradeshow1 Tradeshow2 etc If no text is included and no folder is assigne...

Страница 108: ...nizes with Microsoft Word files You have two additional choices for file formats Rich text format To import the file into a program that supports rich text save the note in rich text format rtf Handwritten words and drawings are lost Text only note To import the file into a program that does not support rich text save the note as a text only note txt Handwritten words and drawings and all formatti...

Страница 109: ...ck of your notes by renaming them and placing them in folders For example you can create a folder called My Novel and place all relevant notes in that folder All the notes in the selected folder appear in the list view Organizing Your Notes ...

Страница 110: ...mp or JPEG jpg image located on your Compaq Aero 1500 Series or stored on a CompactFlash storage card inside your Aero 1500 This chapter describes the following features using Picture Viewer getting images from a desktop computer viewing images stored on a CompactFlash card ...

Страница 111: ...storage card that is inserted in the device Picture Viewer Screen To view an image double tap it from the list or select it and tap Fileà àOpen To update the list of available pictures for viewing tap Viewà àRefresh To delete an image tap Fileà àDelete For optimum viewing quality set the Aero 1500 s Contrast in the QUtilities to Higher picture quality 16 gray scale To change this setting see Contr...

Страница 112: ...o transfer a bitmap or JPEG image file from a desktop computer to your Aero 1500 or a CompactFlash card inserted in the Aero 1500 follow these steps Connect your device to your desktop PC On your desktop computer use ActiveSync to copy the image file to the desired folder in the Explorer window for your device For more information see ActiveSync Help on your desktop computer Viewing Images Stored ...

Страница 113: ...ownloaded to your Compaq Aero 1500 Series Palm size PC from the Internet This chapter describes the following features using AudiblePlayer installing AudibleManager purchasing audio programs using the software buttons using the hardware buttons AudiblePlayer menus additional playback time ...

Страница 114: ... Startà àProgramsà àAudiblePlayer The AudiblePlayer screen appears AudiblePlayer Screen Installing AudibleManager Before you can use AudiblePlayer on your Aero 1500 Series you must first install AudibleManager on your desktop PC Download the AudibleManager installation file to your PC from the Compaq Aero 1500 Series Software and Reference Guide CD ROM or from www audible com audible software audi...

Страница 115: ...th batteries the AudiblePlayer data stored on the Aero 1500 is also erased In this situation use the backup file you created above to restore your data so that you can use AudiblePlayer again Otherwise contact Audible Customer Service for help Purchasing Audio Programs AudiblePlayer is part of the Audible MobileAudio System You can purchase programs from the Audible com store or download them from...

Страница 116: ...io program Fast Forward Moves audio ahead through the entire program to the end in 10 second increments Moves audio program ahead completely to the end Previous Section Reverses audio to a previous section within a multi section program or to the beginning of the program if it is the first section Reverses audio through the previous sections within a multi section program until the first section i...

Страница 117: ...on button instead of the software buttons for the following actions Press the Action button to start or stop audio playback Rotate the Dial upward to fast forward the audio Rotate the Dial downward to rewind the audio AudiblePlayer Menus The AudiblePlayer screen contains four menus for added functionality File The File menu contains the following options Select Audio Program lists available audio ...

Страница 118: ...Bookmark The bookmarks you create are listed in numerical order To go to a bookmarked point in an audio program tap the bookmark then tap the Play Start button Select The Select button lists all of the stored audio programs and allows you to select one Additional Playback Time Each hour of playback time requires approximately 2MB of memory You can use a CompactFlash storage card to increase the me...

Страница 119: ...m size PCs desktop and notebook computers printers or any other device that has a compatible IR feature In order to use your Aero 1500 Series infrared port you must set up the ports on both the sending and receiving devices This chapter describes the following features connecting to ActiveSync with infrared file transfer with another Palm size PC guidelines for using IR transfer ...

Страница 120: ...all the Windows 95 infrared driver For more information about infrared drivers see the Windows CE Web site at http www microsoft com windowsce On your computer go to the ActiveSync Help menu Refer to the topics on setting up the infrared feature on your computer for more information Setting up Infrared on the Palm size PC Turn on the device then tap Startà àSettingsà àCommunications then tap on th...

Страница 121: ...nable a file transfer between two Palm size PCs which are properly set up do the following NOTE You can only exchange data using the infrared feature between two Palm size PCs from within the following programs Voice Recorder Note Taker and Contacts Both Palm size PCs should have the same application enabled i e Voice Recorder Note Taker or Contacts On the sending Palm size PC select a file Next t...

Страница 122: ...evices are turned on and are running the proper IR software Make sure the ports are within a three foot distance of each other and the IR ports are facing each other directly without any object blocking the IR port Make sure to turn off any bright lights if you find them to interfere with IR operation NOTE For more information on transferring data through the infrared port see ActiveSync Help on y...

Страница 123: ...upports Type I CompactFlash cards The CompactFlash slot allows you to install storage cards for backup and storage of data and applications It also allows you to install communication devices such as a LAN adapter or a fax modem This chapter describes the following features software and operating guidelines inserting a CompactFlash card removing a CompactFlash card running a program stored on a Co...

Страница 124: ...information OPERATING GUIDELINES Some CompactFlash cards consume large amounts of power To avoid battery drainage when using a CompactFlash card connect your Aero 1500 Series to AC power wherever possible If the batteries are very low you should not attempt to save data to a CompactFlash card This may result in the loss of data First replace the batteries or connect to AC power Do not turn off you...

Страница 125: ...replaced only when the slot is empty Removing the CompactFlash Slot Cover The front side of a CompactFlash card is usually identified with a label Ë Position the card so that the label side of the card is closest to the screen of the device and insert the pin hole edge of the card into the slot Carefully press the card into the slot until you feel it dock with the connector inside the slot CAUTION...

Страница 126: ...ation beside the CompactFlash card opening to press the CompactFlash card out of the slot Replace the compartment cover Place your CompactFlash card in a protective casing to protect from dirt and moisture NOTE Data saved on a storage card remains intact after the card is removed from the device RUNNING A PROGRAM STORED ON A COMPACTFLASH CARD The Auto Run feature in QUtilities allows specialized p...

Страница 127: ... program The program will start running automatically To restart a program tap Qà àQUtilitiesà àAuto Run tab à àRestart NOTE The Aero 1500 s Auto Run feature is enabled by default To disable Auto Run tap Qà àQUtilitiesà àAuto Run tab à àDisable then tap OK ...

Страница 128: ...ample Keep Pocket Outlook data up to date by synchronizing your mobile device with your choice of Microsoft Outlook Microsoft Schedule or Microsoft Exchange on your desktop computer Synchronize Voice Recorder and Note Taker documents between your device and desktop computer Your files are automatically converted to the correct format With ActiveSync you can also Back up and restore your device dat...

Страница 129: ...asis such as updates from a news channel or on a one time basis such as movie listings from an entertainment channel Channels and automatic updates to them are managed on the desktop computer by Internet Explorer 4 0 or later Use Internet Explorer 4 0 or later on your desktop computer to subscribe to Mobile Channels A special Web site has been set up to help you get started using Channels For info...

Страница 130: ...d on your device and new content will replace older content To remove a channel and all of its content tap Fileà àChannels and clear the channel that you want to remove VIEWING CHANNEL CONTENT Whenever new content is available for one of your channels you ll see the Channel icon in the status area of the taskbar Double tap the icon to switch to Channels or tap Startà àChannels Channel Icon on the ...

Страница 131: ...Channels content for mobile desktop components is synchronized with the desktop computer For example a content provider might create a mobile desktop component that updates and displays key financial market indices during the day To display mobile desktop components on the Active Desktop tap Startà àSettingsà àDisplay then select the components you want to display ...

Страница 132: ...f this is the method you want to use see Connecting to an ISP Connect to the network at your company or organization Once connected you can send and receive e mail messages and access files on the network If this is the method you want to use see Connecting to a Network Connect to your computer to synchronize remotely Once connected you can synchronize information such as your Pocket Outlook data ...

Страница 133: ...ext Select your modem type You should not need to change any settings in the Configure or TCP IP Settings dialog boxes Most ISPs now use server assigned addresses If the ISP you are connecting to does not use server assigned addresses enter the addresses in the TCP IP Settings dialog box When finished select Next Enter the access phone number and select Finish Once you have created the dial up con...

Страница 134: ...tà àProgramsà àCommunicationà àConnections Double tap the Make New Connection icon Enter a name for the connection such as Corporate Dial Up Select Dial Up Connection then select Next Select your modem type You should not need to change settings in the Configure or TCP IP Settings dialog boxes When finished select Next Enter the access phone number and select Finish Once you have created the dial ...

Страница 135: ... ON CONNECTING REMOTELY More information can be found in the following locations Inbox in Chapter 6 Online Help on the device Select Startà àHelp then Inbox or Communications ActiveSync Help on the desktop computer ...

Страница 136: ...s to install a CompactFlash CF storage card in your Palm size PC s CF card slot These are available in many capacities While a CF storage card can be used to store many kinds of data it cannot be used for storing Pocket Outlook data In addition accessing a CF storage card is not as fast as accessing the device s memory module For CF storage card options contact your Compaq authorized dealer or res...

Страница 137: ...CAUTION Once you have removed the old memory module from the device it will lose all its data so you must perform a full backup before replacing memory Power on the device Connect the device to the computer using the cradle or auto sync cable and use ActiveSync to synchronize your desktop computer with your device Fully back up the data using the ActiveSync Backup Restore utility NOTE For more inf...

Страница 138: ...main battery pack as described in Rechargeable Battery Pack in Chapter 3 Remove the backup battery as described in Low Backup Battery in Chapter 3 Disconnect the AC adapter from the device CAUTION You must remove all batteries and disconnect from AC power before changing the memory module Otherwise you risk damaging the memory module ...

Страница 139: ...dule be sure you are discharged of static electricity by touching a grounded metal object Turn over the device Loosen the memory compartment screw by using a small Phillips head screwdriver The memory compartment screw is attached to the compartment cover and does not come out Remove the compartment cover Ê Removing the Memory Compartment Cover Ê ...

Страница 140: ... installed loosen it by using a small Phillips head screwdriver Ë Remove the memory module by levering the right side of the module with the stylus Ì and gently pulling the module out of the compartment Removing the Memory Module Ë ...

Страница 141: ...pansion module be sure you are discharged of static electricity by touching a grounded metal object Align the connector on the module with the connector Ê in the RAM slot Memory Module Connector Insert the module left side first into the compartment so that the left edge of the module Ë sits on the left edge inside the compartment Ê ...

Страница 142: ... screen reports the new memory size Follow the instructions on the screen to reconfigure the device Tap Startà àSettingsà àAsset Viewerà àMemory to check the memory size If it reports the correct memory size the upgrade has been successful NOTE If the memory size reported is incorrect the memory module may be damaged or it may not have been installed properly You can try to correct this problem by...

Страница 143: ...re information on using ActiveSync to restore data see ActiveSync Help on your desktop computer After restoring the data disconnect your Aero 1500 Series from the computer by removing it from the cradle Reset the device Use the stylus to push the reset button found inside the small hole on the back panel Your Aero 1500 Series is now ready to use NOTE If you used the CF Backup Restore Utility for b...

Страница 144: ... use the Jot character recognizer It also provides tables showing how and where to draw characters on the screen for each of the two character sets the Natural Character Set and the Simplified Uppercase Character Set Select character recognition as your input method by tapping the Input Method arrow on your taskbar and tapping Jot Character Recognizer Input Method Menu Using your stylus write a ch...

Страница 145: ...ing Jot Character Recognizer This chapter describes the following features areas of the input panel symbols help writing characters options the Natural Character Set the Simplified Uppercase Character Set ...

Страница 146: ...t appears in lowercase if you write it in the lowercase letter area abc of the input panel Lowercase Area of the Input Panel Uppercase Area of the Input Panel You can also write punctuation and editing marks and add or delete space in the letter areas abc and ABC of the input panel For example draw a horizontal line from left to right to add space and from right to left to backspace See the tables...

Страница 147: ...for details SYMBOLS Enter symbols such as or on the symbol input panel Display the symbol panel by tapping the Symb button on the input panel or by drawing a vertical line from bottom to top anywhere in the panel When you ve drawn the symbol wait and Jot displays the main panel again automatically or tap the Symb button to return to the main panel immediately See the Natural Character Set and Simp...

Страница 148: ...s One of your options is to use the Simplified Uppercase Character Set For more information about how and where to write characters using this character set see the topic Simplified Uppercase Character Set or select this character set in the Options dialog box then tap the Help button on the input panel NATURAL CHARACTER SET The tables in this section show how to use the Natural Character Set to w...

Страница 149: ...s You can enter letters punctuation and editing marks in the letter areas abc and ABC of the input panel Letters Character Stroke options Character Stroke options a n b o c p d q e r f s g t h u i v j 1 1 2 2 w k x l y m z ...

Страница 150: ...ptions Character Stroke options period at comma double quote apostrophe tab question space exclamation backspace ampersand Editing Character Stroke options Character Stroke options forward delete paste cut undo copy carriage return ...

Страница 151: ...ere the strokes begin strokes with no dots can be written in either direction Where appropriate the stroke sequence is numbered You can enter numbers punctuation and editing marks in the number area 123 of the input panel NOTE A horizontal line drawn from left to right is recognized as a space character in the letter area of the input panel and as a dash in the number area Numbers Character Stroke...

Страница 152: ...Punctuation Character Stroke options Character Stroke options period comma dash tilde backspace Editing Character Stroke options Character Stroke options cut undo copy tab paste ...

Страница 153: ...the tables show alternatives for writing the characters The dots indicate where the strokes begin strokes with no dots can be written in either direction Where appropriate the stroke sequence is numbered To write an accented letter write the letter in the letter area and the accent in the number area Accented letters Accent mark Stroke options Accent mark Stroke options à ã á ä â å ...

Страница 154: ...sing the Symbol Panel In the symbol panel you can enter symbols and characters that can t be entered in the standard input panel Char Stroke options Char Stroke options Char Stroke options _ x Continued ...

Страница 155: ...Using the Symbol Panel Continued Char Stroke options Char Stroke options Char Stroke options Æ æ Ç ç ª ƒ Continued ...

Страница 156: ...Using the Symbol Panel Continued Char Stroke options Char Stroke options Char Stroke options Š þ š Þ ˆ Ð ð Ø ø Œ ß œ µ ...

Страница 157: ...show how to use the Simplified Uppercase Character Set to write letters numbers punctuation marks editing marks and symbols For each character the tables show alternatives for writing the characters The dots indicate where the strokes begin strokes with no dots can be written in either direction Where appropriate the stroke sequence is numbered Using the letter areas You can enter letters punctuat...

Страница 158: ...ar Stroke options Char Stroke options Char Stroke options F P Z G Q Ç H R æ I S ß J T Editing Character Stroke options Character Stroke options space copy back delete backspace paste forward delete undo cut carriage return ...

Страница 159: ...here the strokes begin strokes with no dots can be written in either direction Where appropriate the stroke sequence is numbered In addition to numbers you can enter punctuation and editing marks in the number area 123 of the input panel NOTE A horizontal line drawn from left to right is recognized as a space character in the letter area of the input panel and as a dash in the number area Numbers ...

Страница 160: ...Punctuation Character Stroke options Character Stroke options Editing Character Stroke options Character Stroke options undo paste cut carriage return copy dash ...

Страница 161: ...acter the tables show alternatives for writing the characters The dots indicate where the strokes begin strokes with no dots can be written in either direction Where appropriate the stroke sequence is numbered To write an accented letter write the letter in the letter area and the accent in the number area Accented letters Accent mark Stroke options Accent mark Stroke options à ã á ä â å ...

Страница 162: ...dots indicate where the strokes begin strokes with no dots can be written in either direction Where appropriate the stroke sequence is numbered In the symbol panel you can enter symbols and characters that can t be entered in the standard input panel You can enter punctuation in the punctuation area punct and symbols in the symbol area symb Punctuation Character Stroke options Character Stroke opt...

Страница 163: ...Character Stroke options Character Stroke options TAB Symbols Char Stroke options Char Stroke options Char Stroke options Þ x Ð ð Ø ø ß µ Continued ...

Страница 164: ...Symbols Continued Char Stroke options Char Stroke options Char Stroke options Æ æ Ç ç ª þ ˆ Continued ...

Страница 165: ...Symbols Continued Char Stroke options Char Stroke options Char Stroke options Œ œ ƒ Š š ...

Страница 166: ...formation see Diagnostics in Chapter 4 If you can t solve a particular problem see Finding Information in the Preface The various documents and Web sites listed here may have the information you need to solve the problem If you encounter a problem that you cannot solve contact your Compaq authorized dealer reseller or service provider for assistance This chapter describes the following features in...

Страница 167: ...Can t transfer files using the infrared port The IR devices are not set up properly Position the infrared ports so that they line up and are less than one meter three feet but more than two inches apart Make sure that there is no object between the two ports that can block the transmission Adjust the room lighting Some types of light interfere with infrared communication Try moving to a different ...

Страница 168: ... For more information see ActiveSync Help on your desktop computer The receiving device is not compatible with the sending device Transfer files another way such as through the auto sync cable Can t transfer more than one file at a time using the IR port The device is designed to transfer one file or 25 Contact cards at a time when sending data to another device Transfer only the recommended numbe...

Страница 169: ...e Palm size PC and the computer The auto sync cable may be loose or defective Reconnect the auto sync cable Replace the defective cradle or cable There are problems with the serial communications configuration See ActiveSync Help on your desktop computer There is a compatibility problem with Microsoft Outlook on the computer See the online Help included with Microsoft Outlook for information on sy...

Страница 170: ...er is locked and all expansion slots are secured Reset the device Change the main batteries The screen is too dark Prolonged exposure to direct sunlight may cause your device screen to temporarily darken This is normal for LCD screens and is not permanent The screen recovers after a short time Screen is hard to read in low light conditions Need to turn on the backlight Hold the Power Button down f...

Страница 171: ... zoom percentage If you re having a hard time viewing Pocket Outlook data try enlarging the display font To do this within Calendar Tasks or Contacts tap Toolsà àOptions then select Use large font The stylus is not responding properly to your taps The screen is not calibrated correctly to interpret the screen taps You need to recalibrate the screen Turn the device on While holding down the Exit bu...

Страница 172: ... Solution The screen is not responding to double taps correctly Tap on Startà àSettingsà à Stylus then tap the Double Tap tab Double tap on the Grid icon to set the sensitivity and timing of a double tap Double tap on the Clapperboard icon to test the system response ...

Страница 173: ... of program memory or storage memory Memory allocation in the Aero 1500 is composed of storage memory and program memory You may want to increase the amount of storage memory if you do not have enough space for files You may want to increase the amount of program memory if your device is running too slowly To increase the storage or program memory 1 Delete any unnecessary files 2 Close any open ap...

Страница 174: ...ay to access your programs is to perform a full reset Unfortunately this results in the loss of all data you ve entered on your device If you ve used ActiveSync or CF Backup Restore to create a backup file all of your program data can be restored Your Windows CE password is removed and you can set a new password Cannot get sound from the device Volume is muted or too low Tap Startà àSettings à àVo...

Страница 175: ...formation There is an unstable connection between the memory module and the device Remove the memory module clean the edge connector with a soft dry cloth and reinstall the module See Chapter 16 Upgrading the Memory Module for more information Insufficient memory error occurs during an operation Device ran out of program memory for the application Close all open applications and delete unused file...

Страница 176: ...ram memory Upgrade memory if needed Not enough space to save my work Device ran out of storage memory Adjust the available program memory 1 Delete any unnecessary files 2 Close any open applications 3 Tap Startà àSettingsà à System then tap the Memory tab 4 Adjust the memory slider to the desired amount of storage or program memory ...

Страница 177: ...end after thirty minutes of inactivity when running on AC power To change the auto suspend defaults tap Startà àSettingsà à Power then tap the Power Off tab Use the drop down menus to change the auto suspend defaults for battery power and AC power Press the power button to resume operation of the device Device won t turn on when not connected to AC power Batteries are too low to run the device Con...

Страница 178: ...recharge the main battery or connect the device to AC power Turn on the device The device shuts down when a CompactFlash card is in use The CompactFlash card drains too much power from the main battery Remove the CompactFlash card Connect the device to AC power and reinsert the CompactFlash card For more information on using CompactFlash cards see Chapter 12 CompactFlash Cards Battery life is very...

Страница 179: ...operly Check that the AC adapter is connected to external power and that it is inserted correctly into the device or the cradle The main battery has been incorrectly inserted Remove the main battery from the device Insert the battery as shown on the label inside the battery compartment Battery has malfunctioned Remove the main battery from the device and replace it with a new Compaq approved batte...

Страница 180: ...ature extremes Do not expose the device to liquids or precipitation To prevent damage to the screen do not place anything on top of the device Store the device in a protective case when not in use To clean the device wipe the screen and the exterior with a soft damp cloth moistened only with water CAUTION To reduce the risk of electrical shock or damage to the internal components do not spray liqu...

Страница 181: ... machines magnetic detectors the device you walk through and security magnetic wands You can send your device through airport X ray machines However Compaq recommends that you do not send the device through magnetic detectors or expose it to security magnetic wands Check with the airline if you plan to use the device on the plane In flight use of electronic devices is at the discretion of the airl...

Страница 182: ... is not exposed to electrical or magnetic impulses while stored or in transit Be sure the CompactFlash card slot is empty Turn off the device and disconnect all external devices Pack the device and all external devices such as the cradle cords and cables in their original packing boxes or in similar packaging with sufficient packing material to protect them Remove the batteries main battery and ba...

Страница 183: ... screen STN type Software controlled 4 16 gray scale Display Software controlled contrast Backlight Hardware and software controlled backlight on off Backup One CR 2032 lithium battery Battery Main One rechargeable Li Ion battery pack Microphone and back mounted speaker Audio 3 5mm earphone jack Infrared IrDA rate up to 115 2Kb per second Communications Serial port CompactFlash card slot Infrared ...

Страница 184: ...tric Height 5 1 in 13 cm Width 3 1 in 7 9 cm Depth 0 49 in 1 25 cm Weight including battery 4 9 oz 140 g OPERATING ENVIRONMENT Operating Environment U S Metric Operating 32 to 104 F 0 to 40 C Temperature Nonoperating 4 to 140 F 20 to 60 C Operating 20 to 90 20 to 90 Relative humidity non condensing Nonoperating 20 to 90 20 to 90 Operating 15 000 ft 4 572 m Maximum altitude un pressurized Nonoperat...

Страница 185: ...t may appear in the status area of your device taskbar Each icon has a brief description of the status it represents More information on related topics can be found elsewhere in this manual This chapter describes the following features battery icons connection icons other icons ...

Страница 186: ... battery is low Backup battery is very low Main batteries are low Main batteries are very low External AC power source is connected and or main battery is charging CONNECTION ICONS The following icons may appear in the status area of your device taskbar They indicate connection status with your computer Icon Meaning Dial up connection Direct connection ...

Страница 187: ...ere are some other icons that may appear in the status area of the taskbar on your device Icon Meaning Backlight is turned on Backlight is turned off Game Keys arrow keys are enabled Q Menu and QUtilities are enabled ...

Страница 188: ...llowing accessories have been evaluated for use with your device These Compaq approved accessories can be identified by their assigned series numbers listed below To ensure continued reliable and safe operation of your Palm size PC use only the accessories listed below with your PE2020 Palm size PC Accessories Series Number Palm size PC PE2020 Cradle PE2025 Rechargeable Li Ion battery PE2021 Inten...

Страница 189: ...e determined by turning the equipment off and on the user is encouraged to try to correct the interference by one or more of the following measures Reorient or relocate the receiving antenna Increase the separation between the equipment and receiver Connect the equipment into an outlet on a circuit different from that to which the receiver is connected Consult the dealer or an experienced radio or...

Страница 190: ...692000 Mail Stop 530113 Houston Texas 77269 2000 Or call 1 800 652 6672 1 800 OK COMPAQ For questions regarding this FCC declaration contact Compaq Computer Corporation P O Box 692000 Mail Stop 510101 Houston Texas 77269 2000 Or call 281 514 3333 To identify this product refer to the Part Series or Model number found on the product CANADIAN NOTICE This Class B digital apparatus meets all requireme...

Страница 191: ...guidelines for energy efficiency The ENERGY STAR Computers Program was created by the EPA to promote energy efficiency and reduce air pollution through more energy efficient equipment in homes offices and factories Compaq products achieve this by reducing power consumption when not being used Using the power saving features will reduce energy use and maximize battery life BATTERY WARNING WARNING Y...

Страница 192: ...plosion and risk of personal injury if the battery is incorrectly replaced or mistreated Do not attempt to recharge the battery disassemble it or immerse it in water or dispose of it in fire Replace only with the battery designated for this product Discard used batteries according to the manufacturer s instructions ...

Отзывы: