background image

Page 4

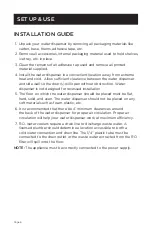
11.  The water dispenser should not be recessed or built-in to an enclosed 

cabinet. It is designed for freestanding installation only.

12. Do not operate in the presence of explosive fumes.
13. All repair or maintenance should be done by a qualified professional.
14. The 1/4” plastic tube must be connected to the drain outlet or the waste 

water extracted from the RO filter will spill onto the floor.  This could 
cause damage to the floor.

15. Do not immerse the appliance or the power cord in water or other 

liquids.

16. Do not use any detergents, glass or household cleaner, furniture polish, 

gasoline, paint thinner or other solvent to clean any part of the water 
dispenser.

17. Do not let cord touch any hot surface and make sure that it does not 

hang over a table edge or counter.

18. After the water dispenser is turned OFF, wait at least 3 minutes before 

turning the unit on again.

19. Do not use outdoors

SAFETY INFORMATION

SAVE THESE INSTRUCTIONS

HOUSEHOLD USE ONLY

20.  

WARNING:

 BURN HAZARD: The product heats water tio a 

temperature of approximately 95˚C/203˚F. Water temperatures 
above 52˚C/125˚F can cause severe burns or death from scalding. 
Children should be supervised by an adult when using this product.

21.  

WARNING:

 FIRE HAZARD: Do not store or use gasoline or other 

flammable vapors and liquids in the vicinity of this or any other 
appliance. Do not operate the dispenser with a damaged cord. Do 
not use with an under rated extension cord or an extension cord 
without a ground.

22.  Never turn the product upside down or tilt more than 45 degrees. 

If the unit has been resting on its side or upside down for a long 
period of time, the unit must be put in the upright position for 
approximately 12 hours before turning it on.

23.  Never use this dispenser with water that is unsafe to drink or is from 

an unknown source.

24.  Never use any other liquids in this dispenser other than tap water.
25.  Install this water dispenser in a dry place away from direct sunlight. 

For indoor use only.

WARNING:

  The water supply to this water dispenser must be from a 

cold water supply. Do not connect to a hot water supply. 

Содержание CCDC02

Страница 1: ...Keep them for further reference 2 Record in the space below the SERIAL NO found on the nameplate on your water dispenser and retain this information for future reference SERIAL NO Please save sales receipt for warranty User Manual Direct Connect Water Dispenser With R O System MODEL CCDC02 ...

Страница 2: ...____________________________ Model number _____________________________ Serial number _____________________________ Date of purchase CONTENTS PRODUCT REGISTRATION SAFETY INFORMATION Important Safety Instructions 3 4 Grounding Instructions 5 SET UP USE Installation Guide 6 Parts Features 7 Before Using Your Water Dispenser 8 Installation 9 13 Operating Instructions 14 16 Cleaning and Maintenance 17...

Страница 3: ...ce to avoid tipping 8 Close supervision is necessary when any appliance is used by or near children Not recommended for use by children 9 The water dispenser dispenses hot water which can cause severe burns or scalding 10 Avoid exposure to direct sunlight and always keep it at least 4 inches away from walls Do not place near heat sources such as stoves radiators etc NOTE If the water dispenser has...

Страница 4: ...SEHOLD USE ONLY 20 WARNING BURN HAZARD The product heats water tio a temperature of approximately 95 C 203 F Water temperatures above 52 C 125 F can cause severe burns or death from scalding Children should be supervised by an adult when using this product 21 WARNING FIRE HAZARD Do not store or use gasoline or other flammable vapors and liquids in the vicinity of this or any other appliance Do not...

Страница 5: ...You have any questions about the grounding or electrical instructions POWER SUPPLY CORD 1 Avoid the use of an extension cord because of potential safety hazards under certain conditions Have a qualified electrician or serviceman to install an outlet near the appliance 2 If it is absolutely necessary to use longer cord sets or an extension cord extreme care must be exercised a Use only a grounding ...

Страница 6: ...lation 5 The floor on which the water dispenser should be placed must be flat hard solid and even The water dispenser should not be placed on any soft material such as foam plastic etc 6 It is recommended that there be 4 minimum clearances around the back of the water dispenser for proper air circulation Proper air circulation will help your water dispenser work at maximum efficiency 7 R O water c...

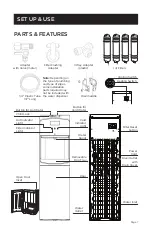
Страница 7: ...ld Water 3 Way Adapter plastic 4 Filters Heating Switch Filter Reset button Power Cord Drain Outlet with Drain Cover Water Inlet Water Outlet Cold Indicator Light Water Spout Removeble Drip Tray Door Cooling Switch 1 4 Plastic Tube 137 Long Note Depending on the type of plumbing and type of pipes some installation parts required may not be included with the water dispenser Drain Saddle Filter Rese...

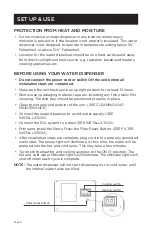
Страница 8: ...ny thin plastic film covering The drip tray should be positioned properly in place Clean the interior and exterior of the unit SEE CLEANING AND MAINTENANCE Connect the water dispenser to a cold water supply SEE INSTALLATION Connect the R O system to a drain SEE INSTALLATION Prime and install the filters Press the Filter Reset Button SEE FILTER INSTALLATION After installation steps are complete plu...

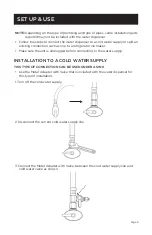
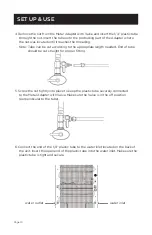
Страница 9: ...o a refrigerator ice maker Make sure the unit is unplugged before connecting to the water supply INSTALLATION TO A COLD WATER SUPPLY THIS TYPE OF CONNECTION CAN BE USED UNDER A SINK Use the Metal Adapter with Valve that is included with the water dispenser for this type of installation 1 Turn off the cold water supply 2 Disconnect the current cold water supply line 3 Connect the Metal Adapter with...

Страница 10: ...iate length needed End of tube should be cut straight for proper fitting 5 Screw the nut tightly into place to keep the plastic tube securely connected to the Metal Adapter with Valve Make sure the Valve is in the off position perpendicular to the tube 6 Connect the end of the 1 4 plastic tube to the water inlet located on the back of the unit Insert the open end of the plastic tube into the water...

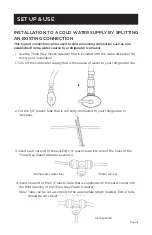
Страница 11: ...he source of water to your refrigerator line 2 Cut the 1 4 plastic tube that is currently connected to your refrigerator or icemaker 3 Insert each cut end of the existing 1 4 plastic tube into one of the holes of the Three Way Plastic Adapter as shown 4 Insert one end of the 1 4 plastic tube that is supplied with the water cooler into the third opening of the Three Way Plastic Adapter Note Tube ca...

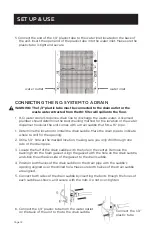
Страница 12: ...ain saddle Mark the drain pipe to indicate where to drill for the opening 2 Drill a 1 4 hole at the marked location making sure you only drill through one side of the drain pipe 3 Locate the half of the drain saddle with the hole in the center Remove the backing from the foam gasket Align the gasket with the hole on the drain saddle and stick the adhesive side of the gasket to the drain saddle 4 P...

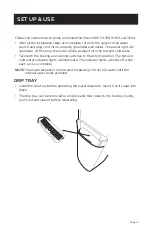
Страница 13: ...n both the heating and cooling switches to the ON I position The hot and cold water indicator lights will illuminate The indicator lights will shut off when each cycle is complete NOTE The water dispenser will not start dispensing hot or cold water until the internal water tanks are filled DRIP TRAY Install the drip tray before operating the water dispenser Insert it so it snaps into place The dri...

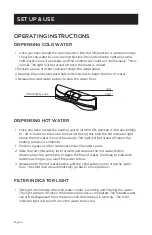
Страница 14: ...p During this time the hot indicator light above the hot water icon will be steady The light will be turned off when the heating process is complete 1 Position a glass or other container under the water spout 2 Slide the red child safety lock forward and depress the hot water button downward at the same time to begin the flow of water Continue to hold both buttons as long as you want the water to ...

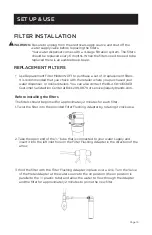
Страница 15: ...e BLACK DECKER Customer Satisfaction Center at 844 299 0879 or service equitybrands com Before installing the filters The filters should be primed for approximately 2 minutes for each filter 1 Twist the filter into the provided Filter Flushing Adapter by rotating it clockwise 2 Take the open end of the tube that is connected to your water supply and insert it into the left inlet hole on the Filter...

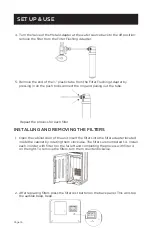
Страница 16: ... Repeat the process for each filter INSTALLING AND REMOVING THE FILTERS 1 Open the cabinet door of the unit Insert the filters into the filter adapter located inside the cabinet by rotating them clockwise The filters are numbered 1 4 Install each in order with filter 1 on the far left and completing the process with filter 4 on the right To remove the filters turn them counterclockwise 2 After rep...

Страница 17: ...er by lifting at an angle and pull off Remove the white cold water tank cover and the separator which will allow access to the cold water tank 2 Mix approximately one gallon of clean water with a nontoxic cleaner such as baking soda or vinegar Pour the solution into the cold water tank Make sure it can flow out of the water spout by pressing the hot water button NOTE You can use a non abrasive cle...

Страница 18: ...r tank 2 Pour 0 6 gallons of clean water into the cold water tank 3 Place a large bucket beneath the drain outlet located on the back of the unit Remove the drain cover and allow the water to drain from the unit Water will start flowing as soon as the drain cover is removed 4 Once water is completely drained replace the drain cover Reinstall the separator and the cold water tank cover Replace the ...

Страница 19: ...A QUALIFIED TECHNICIAN DO NOT TRY TO ADJUST OR REPAIR THE WATER DISPENSER YOURSELF IMPORTANT DO NOT RETURN THIS PRODUCT TO THE STORE If you have a problem with this product please contact the W Appliance Co Customer Satisfaction Center at 1 855 855 0294 DATED PROOF OF PURCHASE MODEL AND SERIAL REQUIRED FOR WARRANTY SERVICE BEFORE YOU CALL FOR SERVICE CUSTOMER SERVICE IMPORTANT DO NOT RETURN THIS P...

Страница 20: ...and the water dispenser was in extreme conditions A Press the buttons down completely If the hot water is not coming out of the spout make sure the child lock is pushed forward at the same time the button is depressed B Shut off the heating and cooling switches Unplug the water dispenser and check all connections to make sure water valves are open and there are no obstructions C The water dispense...

Страница 21: ...rvice repair or replacement 14 Service calls to instruct you how to use your product 15 Service calls to repair or replace the house fuse reset the circuit breaker or correct the wiring in the house REPAIR OR REPLACEMENT AS PROVIDED UNDER THIS WARRANTY IS THE EXCLUSIVE REMEDY OF THE CUSTOMER W Appliance Co SHALL NOT BE LIABLE FOR ANY INCIDENTAL OR CONSEQUENTIAL DAMAGES FOR BREACH OF ANY EXPRESS OR...

Страница 22: ... 2020 W Appliance Company All Rights Reserved September 2020 ...

Отзывы: