background image

8

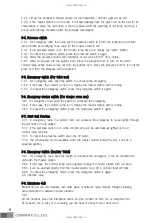
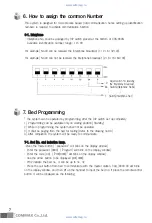
- If press 

“1" button, ADDR>XXXX-XX will blink in the display window, input the number and press 

the remote-control button. 
- If press 

“2" button, GROUP>-XX will blink on the display window, input the number and press the 

remote-control button. 
- If press 

“3" button, LAMP>-XX will blink on the display window, input the number and press the 

remote-control button. 
(No.1: Bed no., No.2: Special Group (Surgery, Labor, etc.), No.3: Induction lamp Group) 

77--22.. IInnppuutt D

DS

SS

S nnuum

mb

beerr 

- DIP switch No.2 places on and Under speaker phone status, press the room No. and BED button
more than 1 second, you can input the DDS No. after finishing speaker phone status.
- Input more the No.49, press the speaker phone button, DSS button, room No. and BED button then
press the remote-control button. DIP switch No.2 places OFF again when this process is completely
done.

88--11.. S

Suum

mm

ma

arryy 

Describe the method of installation for a proper operation of this system and a safety of end user. 
8-1-1. The system classify into three parts. 
1) Master station and DSS for system operation 
2) PCB Board and Control Circuit classified by power function 
3) Bed to be installed ion a patient room 
8-1-2. All wires shall be connected individually 
8-1-3. Each bed can be complied with presence switch, emergency switch, emergency shower 
switch, and two colored corridor light. 
8-1-4. Corridor toilet can be connected up to 16ea. 
8-1-5. Interphone shall be wired by piece and installed up to 90ea. 

88--22.. W

Woorrkk C

Coonnddiittiioonn 

The system consists of the various electronic components, while its installation. 
8-2-1. Cable to be connected in master station shall be installed at a proper place for the 
installation work and kept away from the direct rays of the sun. 
8-2-2. Operation temperature shall be kept from 0

 to 30

, Humidity shall be kept from 50% to 

60%. 
8-2-3. Power source shall be supplied at a convenient place for grounding and maintenance. 
8-2-4. The system shall be installed to keep away from the electronic devices such as monitor, 
computer, etc. 

8. Installation Work 

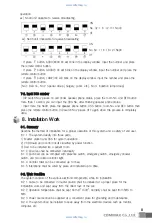
operation
ex) No.43 unit arailable to receive broadcasting

ex) No.90 unit impossible to receive broadcasting

ON

No. 32 + 8 +2+1=No.43

OF

ON

No. 64 + 16 +8+2=No.90

OF

www.safemag.ru

www.safemag.ru

Содержание JNS-4CM

Страница 1: ...n particular precautions for safety before using a product and follow instructions to use a product exactly The company is not responsible for any safety accidents caused by abnormal operation of the...

Страница 2: ...System Specification 3 System Feature 4 Signals Lamp Specification 5 Functions Operation 6 How to assign the common number 7 Bed Programming 8 Installation 9 NURSE CALL System Drawing 3 3 3 4 4 7 7 8...

Страница 3: ...em m D Di im me en ns si io on n Master Station 240 L x 220 W x 90 H DDS 240 L x 129 W x 70 H 2 2 3 3 P Po ow we er r R Re eq qu ui ir re em me en nt t Power Source 220V Input Frequency 57Hz 63Hz Powe...

Страница 4: ...turn on and Call xxxx Bed No will be displayed 5 5 2 2 S Su ub b S St ta at ti io on n F Fu un nc ct ti io on n 5 2 1 Communication with master and sub station Press the call button in sub station to...

Страница 5: ...or r s sh ho ow we er r r ro oo om m u us se e 5 6 1 For emergency case push the switch to announce the emergency 5 6 2 If that case the corridor Lamp is on Display the master station with red lamp 5...

Страница 6: ...one Lift up the handset press the Interphone button and DIAL button 00 All master stations and Interphones receive the broadcasting The master station on the phone with BED can not receive the broadca...

Страница 7: ...erated 3 It shall be paging from the bed for testing Refer to the drawing no 9 4 4 After completion the system will be ready to communicate 7 7 1 1 B Be ed d N No o a an nd d I In nd du uc ct ti io on...

Страница 8: ...Master station and DSS for system operation 2 PCB Board and Control Circuit classified by power function 3 Bed to be installed ion a patient room 8 1 2 All wires shall be connected individually 8 1 3...

Страница 9: ...8 5 3 Emergency Switch Shower Room Connection It shall be connected at the closest sub station connected in 2P connector CN8 8 5 4 Presence Switch Connection It shall be connected at the closest sub s...

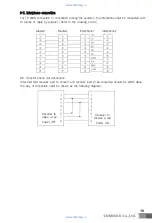
Страница 10: ...able by parallel Refer to the drawing no 9 4 8 8 Transfer phone call Connection Total bed that receiver bed to convert and receiver bed to be converted should be within 48ea The way of connection shal...

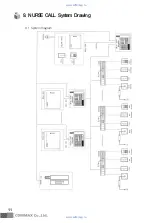
Страница 11: ...9 1 System Diagram 9 NURSE CALL System Drawing 11 www safemag ru www safemag ru...

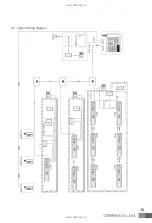
Страница 12: ...9 2 System Wiring Diagram 12 www safemag ru www safemag ru...

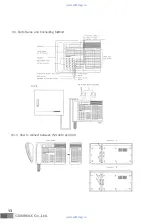
Страница 13: ...13 9 3 Parts Name and Connecting Method 9 3 3 How to connect between JNS 4CM and DSS www safemag ru www safemag ru...

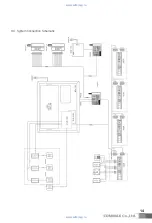
Страница 14: ...9 4 System Connection Schematic 14 www safemag ru www safemag ru...

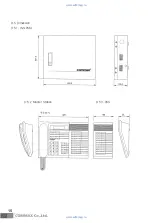
Страница 15: ...9 5 Dimension 9 5 1 JNS PSM 9 5 2 Master Station 9 5 3 DSS 15 www safemag ru www safemag ru...

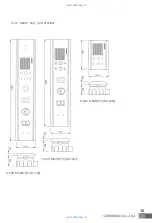
Страница 16: ...16 9 5 6 NURSE CALL SUB STATION FLUSH MOUNTED JNS 102 FLUSH MOUNTED JNS 1000 FLUSH MOUNTED JNS 2000 www safemag ru www safemag ru...

Страница 17: ...17 www safemag ru www safemag ru...

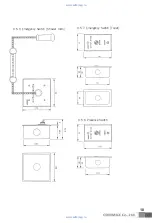
Страница 18: ...18 9 5 7 Emergency Switch Toilet 9 5 8 Presence Switch 9 5 9 Emergency Switch Shower room www safemag ru www safemag ru...

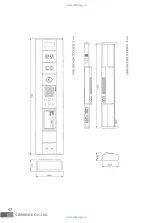
Страница 19: ...19 9 5 10 Emergency Switch Toilet Pulling style 9 5 11 Corridor Light 9 5 12 Interphone www safemag ru www safemag ru...

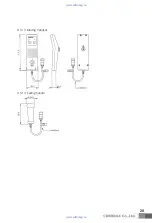
Страница 20: ...9 5 13 Moving Handset 9 5 14 Calling handle 20 www safemag ru www safemag ru...

Страница 21: ...21 Memo www safemag ru www safemag ru...

Страница 22: ...3 11 Sangdaewon dong Jungwon gu Seongnam si Gyeonggi do Korea Int l Business Dept Tel 82 31 7393 540 550 Fax 82 31 745 2133 Web site www commax com Printed In Korea 2009 11 www safemag ru www safemag...

Отзывы: