background image


 COMM-TEC Germany                                       www.comm-tec.de


UP-1200 Presentation Switcher/Scaler  


Chapter Two: System Introduction 

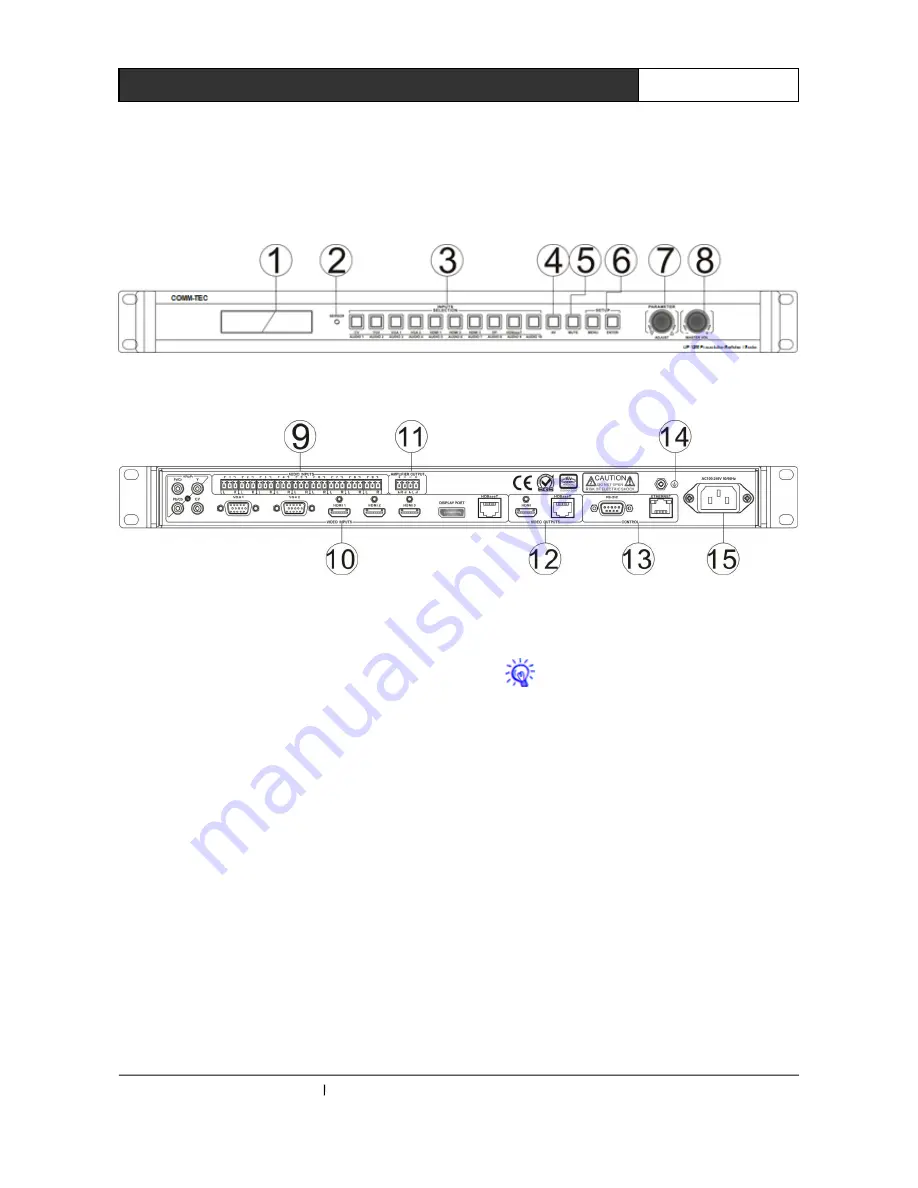
2.1  Panel layout 

Front panel: 


Rear panel: 


1. 

LCD display 

Displays various status information. 
 

2. 

SENSOR (infrared receiver)


For use with the infrared remote control 
 

3. 

INPUT SELECTION BUTTONS 

With these buttons you can select an input from the 
AV and audio sources.   
 

4. 

AV (Video / Audio select button)


Usually  the  digital  video  sources  use  their  own 
embedded  audio  signal  if  you  switch  between  the 
inputs  (“audio  follows  video”).  But  you  can  manually 
select a different audio source (“audio breakaway”) for 
a  video  source:  By  pressing  the  AV  button  you  can 
manually select an audio source to be combined with 
the current video source.. 
 

5. 

MUTE 

With  the  MUTE  button  the  audio  output  of 
the amplifier can be switched off and on.  

The  silent  mode  set  by  the  MUTE 

button does not apply to the DisplayPort 
audio signal. 
 

6. 

MENU


    With  this  button  you  can  enter  the  setup 
menu of the UP-1200. 


7. 

ENTER 

Press  the  ENTER  button  to  confirm  a 
selected function in the setup menu.  
 

8. 

PARAMETER  

With  this  rotary  knob  you  can  navigate  and 
set parameters in the setup menu.  


Содержание UP-1200

Страница 1: ...Switching Scaler Version 1 1 Operating Instructions Thank you for purchasing our product Please be sure to read this instruction manual carefully before using our product UP 1200 Operating instructio...

Страница 2: ...insulation occurring within the equipment may cause people suffer from shock CE certification means that the product has reached the directive safety requirements defined by the European Union Users...

Страница 3: ...g Only after cutting down all external power source can install wiring operation begin or it may cause electric shock or equipment damage This product grounds by the grounding wires To avoid electric...

Страница 4: ...ion 3 2 2 RJ45 network cable producing methods 4 2 3 Diagram of system connection 5 2 4 Panel operating instructions 5 2 4 1 LCD display 5 2 4 2 Button lights 5 2 4 3 Operation introduction 5 2 4 4 Op...

Страница 5: ...ontrol Therefor the UP 1200 can be widely used in broadcast environments conference rooms education facilities command and control centers and other occasions 1 1 Features Supports 9 video signal inpu...

Страница 6: ...if you switch between the inputs audio follows video But you can manually select a different audio source audio breakaway for a video source By pressing the AV button you can manually select an audio...

Страница 7: ...VGA1 VGA2 video input interface and AUDIO INPUTS 1 4 audio interface have access to signals AUDIO INPUTS 1 and CV signal default fixed synthesis HDIM output AUDIO INPUTS 2 and YPbPr signal default fi...

Страница 8: ...ked with different colors There are two methods of twisted pair connection EIA TIA 568B standard and EIA TIA 568A standard T568A line order 1 2 3 4 5 6 7 8 White and green green White and orange blue...

Страница 9: ...l light up red You can setup the device by pressing the button MENU Menu operation steps can be summarized as Enter the menu choose option with parameter knob select option with ENTER button change pa...

Страница 10: ...desired setting then press ENTER Step three Turn the PARAMETER knob to change the desired parameter then press ENTER to confirm the selection Step four Press the MENU to return to the previous menu If...

Страница 11: ...just option 7 Press ENTER to enter the option parameter settings The LCD shows the current brightness value Use the PARAMETER knob to set the brightness value to 60 8 Press ENTER to confirm the change...

Страница 12: ...COMM TEC Germany www comm tec de 8 COMM TEC UP 1200 Switching Scaler Manual...

Страница 13: ...OMM TEC UP 1200 Switching Scaler Manual 2 5 Menu structure VGA Adjust is only valid when a VGA source has been connected to the UP 1200 COPY TO HDMI in EDID menu is only valid when a sink has been con...

Страница 14: ...g Scaler Manual Chapter Three Control Codes RS232 communication RS232 communications settings Baud rate 115200 configurable Data bits 8 Parity None Stop bits 1 Flow control None TCP IP communication T...

Страница 15: ...n S AUDIO 0 AUDIO 1 INPUT Select the AUDIO 1 INPUT S AUDIO 1 AUDIO 2 INPUT Select the AUDIO 2 INPUT S AUDIO 2 AUDIO 3 INPUT Select the AUDIO 3 INPUT S AUDIO 3 AUDIO 4 INPUT Select the AUDIO 4 INPUT S...

Страница 16: ...Response Description S OUTPUT 0 OUTPUT 640x480 60Hz Set output resolution to 640x480 60Hz S OUTPUT 1 OUTPUT 800x600 60Hz Set output resolution to 800x600 60Hz S OUTPUT 2 OUTPUT 1024x768 60Hz Set outp...

Страница 17: ...9 it means that the audio input are the embedded audio signals of the digital inputs HDMI1 HMDI2 HDMI3 and HDBaseT For example For adjust the second audio input to 12dB the corresponding command is A...

Страница 18: ...ut H Start 1 Move the VGA input image one column right HTotal VGA Input H Total 1 Add 1 column to the total of VGA input images HTotal VGA Input H Total 1 Remove 1 column of the total of VGA input ima...

Страница 19: ...AR 192 168 1 1 Set the gateway SUBR 255 255 255 0 SUBR 255 255 255 0 Set the subnet mask SPORT 6666 SPORT 6666 Set connection port number SIPR SIPR 192 168 1 190 Get the IP address GAR GAR 192 168 1 1...

Страница 20: ...2 25 Gbps lane Interface HDMI A interface Type A connector 3 HDMI input 1HDMI output Minimum maximum level T M D S 2 9V 3 3V Input EDID Use the system default EDID supports EDID mapping to the input R...

Страница 21: ...Noise 0 05 1 kHz with rated voltage Signal to Noise S N 80dB Stereo separation 80dB 1 kHz Signal type stereo Impedance input 10 k unbalanced maximum input level 19 5dBu Control types Front panel Illu...

Отзывы: