Comfortaire HRG18 S1P Series Скачать руководство пользователя страница 12

Installation and Operation Manual  -  

HRG18xxS1P

Page 12 of 23

508133M01

Issue 2106

A - 

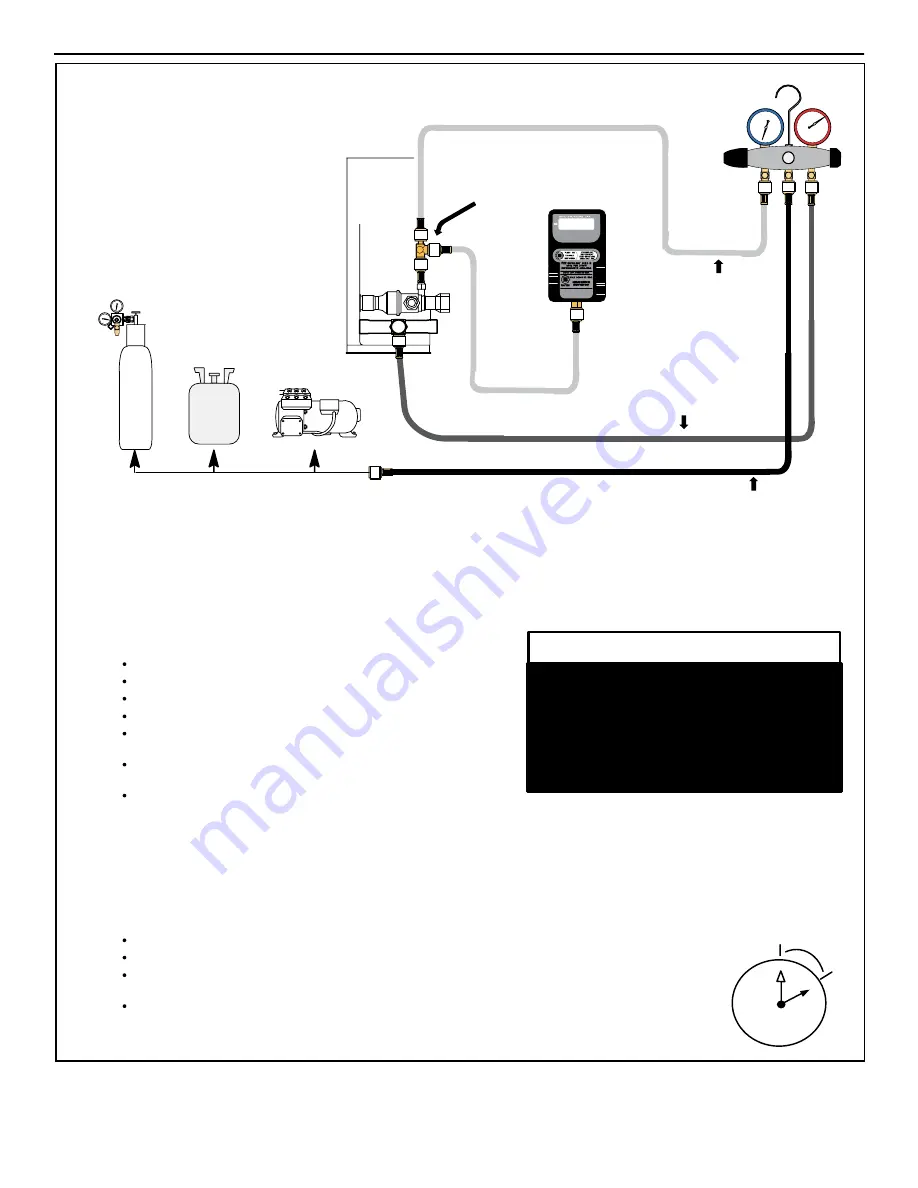
Open both manifold valves and start the vacuum pump.

B - 

NOTE 

- During the early stages of evacuation, it is desirable to close the manifold gauge valve at least once. A rapid rise in pressure

indicates a relatively large leak. If this occurs, 

repeat the leak testing procedure

.

NOTE 

- The term 

absolute pressure

 means the total actual pressure above absolute zero within a given volume or system. Absolute

pressure in a vacuum is equal to atmospheric pressure minus vacuum pressure.

C - 

When  the  absolute  pressure  reaches  23,000  microns (29.01 inches of

mercury), perform the following:

Close manifold gauge valves.
Close valve on vacuum pump.
Turn off vacuum pump.
Disconnect manifold gauge center port hose from vacuum pump.
Attach  manifold  center  port  hose  to  a  nitrogen  cylinder  with  pressure

regulator set to 150 psig (1034 kPa) and purge the hose.
Open manifold gauge valves to break the vacuum in the line set and indoor

unit.
Close manifold gauge valves.

D - 

Shut off the nitrogen cylinder and remove the manifold gauge hose from the cylinder. Open the manifold gauge valves to release the

nitrogen from the line set and indoor unit.

E - 

Reconnect the manifold gauge to the vacuum pump, turn the pump on, and continue to evacuate the line set and indoor unit until the

absolute pressure does not rise above 500 microns (29.9 inches of mercury) within a 20-minute period after shutting off the vacuum pump

and closing the manifold gauge valves.

F - 

When the absolute pressure requirement above has been met, disconnect the manifold hose from the vacuum pump and connect it to a

cylinder of HFC-410A positioned to deliver liquid refrigerant. Open the manifold gauge valve 1 to 2 psig in order to release the vacuum in the

line set and indoor unit.

G - 

Perform the following:

Close manifold gauge valves.
Shut off HFC-410A cylinder.
Reinstall service valve cores by removing manifold hose from service valve. Quickly install cores with core

tool while maintaining a positive system pressure.
Replace stem caps and finger tighten them, then tighten an additional one-sixth (1/6) of a turn as illustrated.

OUTDOOR

UNIT

TO VAPOR

SERVICE VALVE

TO LIQUID LINE

SERVICE VALVE

MICRON

GAUGE

VACUUM PUMP

1/4 SAE TEE WITH SWIVEL

COUPLER

500

MANIFOLD

GAUGE SET

HFC-410A

RECOMMEND

MINIMUM 3/8” HOSE

A - 

Connect low side of manifold gauge set with

1/4 SAE in-line tee to 

vapor 

line service valve

B - 

Connect high side of manifold gauge set to

liquid 

line service valve

C - 

Connect available micron gauge connector

on the 1/4 SAE in-line tee.

D - 

Connect the  vacuum pump (with vacuum

gauge)  to  the  center  port  of  the  manifold

gauge set. The center port line will be used

later for both the HFC-410A and nitrogen

containers.

HIGH

LOW

1

2

3

4

5

6

7

8

9

10

11 12

1/6 TURN

NITROGEN

3

CONNECT GAUGE SET

A

B

C

D

4

EVACUATE THE SYSTEM

NOTE 

- Remove cores from service valves (if not already done).

Possible equipment damage.
Avoid deep vacuum operation. Do not use

compressors  to  evacuate  a  system.

Extremely low vacuum can cause internal

arcing  and  compressor  failure.  Damage

caused  by  deep  vacuum  operation  will

void warranty.

WARNING !

EVACUATION

H - 

Open suction service valve first before liquid valve to release the unit charge into the system. Replace valve

caps and tighten (8 ft. lb.). Caps are the primary seal.

Evacuate the line set and indoor unit until a slight vacuum is indicated on the micron gauge (approximately 23,000 microns or 

29.01 inches of mercury).

NOTE 

- Position 

canister to deliver 

liquid refrigerant.

Содержание HRG18 S1P Series

Страница 1: ...d qualified service personnel should install or service this equipment Installation and service performed by unqualified persons can result in property damage personal injury or death WARNING Sharp me...

Страница 2: ...cautions Follow all safety codes Wear safety glasses and work gloves Use quenching cloth for brazing operations Have fire extinguisher available Read these instructions thoroughly and follow all warni...

Страница 3: ...lightly away from building not to exceed 1 4 per foot Figure 1 Slab Mounting Install on a Solid Level Mounting Pad The outdoor section is to be installed on a solid foundation This foundation should e...

Страница 4: ...he drier is shipped loose it must be installed by the installer in the field Unit warranty will be void if the drier is not installed Installation of Line Sets DO NOT fasten liquid or suction lines in...

Страница 5: ...that has not had compressor burnout If the system has experienced burnout it is recommended that the existing line set and indoor coil be replaced NOTE In lieu of R 410A an industry standard flushing...

Страница 6: ...uid line valve 3 Refrigerant gauge set center port to inlet on the recovery machine with an empty recovery tank connected to the gauge set 4 Connect recovery tank to recovery machine per machine instr...

Страница 7: ...system use a regulator that can control the pressure down to 1 or 2 psig 6 9 to 13 8 kPa WARNING Refrigerant must be reclaimed in accordance with national and local codes WARNING 1 Set the recovery ma...

Страница 8: ...Coil Shown Sensing bulb insulation is required if mounted external to the coil casing sensing bulb installation for bulb positioning STUB END TEFLON RING LIQUID LINE ASSEMBLY WITH BRASS NUT DISTRIBUT...

Страница 9: ...The pipe must remain round Do not crimp end of the line Remove service cap and core from both the vapor and liquid line service ports 1 2 LIQUID LINE SERVICE VALVE SERVICE PORT CORE SERVICE PORT CAP S...

Страница 10: ...INE SET TO SERVICE VALVES POINT FLAME AWAY FROM SERVICE VALVE PREPARATION FOR NEXT STEP 7 WRAP SERVICE VALVES To help protect service valve seals during brazing wrap water saturated cloths around serv...

Страница 11: ...valve on the high side of the manifold gauge set in order to pressurize the line set and the indoor unit E After a few minutes open one of the service valve ports and verify that the refrigerant added...

Страница 12: ...itioned to deliver liquid refrigerant Open the manifold gauge valve 1 to 2 psig in order to release the vacuum in the line set and indoor unit G Perform the following Close manifold gauge valves Shut...

Страница 13: ...re required to control the outdoor unit R C W1 O and Y1 and Y1 is jumpered to Y2 in the outdoor unit Note that the published performance data is based upon the use of a two stage thermostat Refer to t...

Страница 14: ...trol Using Suction Pressure Figure 9 Table 4 HRG18 Thermostat Control Options Size Circuit and Install Service Disconnect Switch Refer to the unit nameplate for minimum circuit ampacity and maximum fu...

Страница 15: ...Less than 100 30m 18 Temperature Rating 35 C Minimum More than 100 30m 16 Table 5 Conventional 24VAC Non Communicating Thermostat Wiring Route High Voltage and Ground Wires Any excess high voltage fie...

Страница 16: ...S C I I R DF TST Y1 O C W1 R G TC TO ACC2 ACC1 Y1 O DH C W2 W1 R G DS W2 O D SENSOR OPTIONAL FOR SINGLE STAGE OPERATION INSTALL A JUMPER BETWEEN Y1 TO Y2 ON THE OUTDOOR UNIT TERMINAL STRIP Figure 9 Co...

Страница 17: ...des of operation If the intended capacity for the application is 3 or 5 Ton skip this section The units are field convertible to 2 Ton or 4 Ton to efficiently perform for the required application If t...

Страница 18: ...harge Mode To exit the charging mode remove the Charge Mode Jumper from the Charge Mode Pins The system will be in Charge Mode for a maximum time of 60 minutes and will automatically exit the charge m...

Страница 19: ...ystems below 60 F charge in heating mode using the subcooling method and table provided on the unit access panel Attach low pressure gauge hose to auxiliary service port to access suction side in heat...

Страница 20: ...echnician These regular visits may include among other things checks for Motor operation Ductwork air leaks Coil drain pan cleanliness indoor outdoor Electrical component operation wiring check Proper...

Страница 21: ...e auxiliary heat Indicating Light Most heat pump thermostats have an amber light which indicates when the heat pump is operating in the emergency heat mode Temperature Indicator The temperature indica...

Страница 22: ...A SERVICE CALL 1 Ensure thermostat is set below cooling or above heating room temperature and that the system lever is in the COOL HEAT or AUTO position 2 Inspect your return air filter If it is dirty...

Страница 23: ...Installation and Operation Manual HRG18xxS1P 508133M01 Page 23 of 23 Issue 2106 Figure 14 Wiring Diagram...

Страница 24: ...See the HRG18 tables on page 1 and 2 Install a wire nut on any unused wire to electrically insulate the unused wire Field Connection Wire Harness Wire Color Marking Stamped on the Wire Thermostat Wir...

Страница 25: ...Yellow Y1 Y1 Y1 first stage cooling with conventional non communicating thermostat only Install a wire nut on this wire if unused Blue Y2 Y2 Y2 second stage cooling with conventional non communicating...

Страница 26: ...18 9 8 5 3 TON MODE INDOOR MATCHUP SUBCOOL 4 TON MODE C M CG60P C D AP C M CG60T C D AP 15 5 6 5 C M CG60P C D BP C M CG60T C D BP 16 7 5 5 TON MODE C M CG60P C D AP C M CG60T C D AP 15 5 C M CG36P A...

Страница 27: ...HULI LQJ GLPHQVLRQDO GDWD RQ WKH DFWXDO SURGXFW SULRU WR EHJLQQLQJ DQ LQVWDOODWLRQ SUHSDUDWLRQV QFHQWLYH DQG UHEDWH SURJUDPV KDYH SUHFLVH UHTXLUHPHQWV DV WR SURGXFW SHUIRUPDQFH DQG FHUWLILFDWLRQ OO SU...

Отзывы: