background image

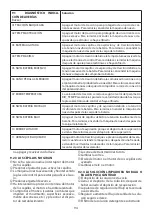
84

- Saque las bolsas que están dentro de la caja y 

compruebe su contenido (manual de uso y man-

tenimiento, conector para cargador de baterías)

- Quite las abrazaderas metálicas o flejes plásticos 

que fijan la máquina al pallet.

- Saque del embalaje los cepillos y la boquilla de 

secado.

- Saque la máquina (empujándola hacia atrás) del 

pallet utilizando una plataforma inclinada bien 

sujetada al pavimento y al pallet.

Si la máquina está embalada en jaula de madera:

- Separe del pallet todas las paredes de madera, 

empezando por la pared superior.

- Quite el film protectivo de la máquina.

- Quite las abrazaderas metálicas o flejes plásticos 

que fijan la máquina al pallet.

- Saque del embalaje los cepillos y la boquilla de 

secado.

- Saque la máquina (empujándola hacia atrás) del 

pallet utilizando una plataforma inclinada bien 

sujetada al pavimento y al pallet.

Proceda con las mismas precauciones e indica-

ciones para quitar de su embalaje el cargador de 

baterías opcional (extrayéndolo desde arriba del 

embalaje por medio de las específicas manillas) y 

la batería opcional.

Aleje la máquina del resto de los embalajes, ahora 

ya puede montar los accesorios y las baterías, para 

ello lea el correspondiente párrafo de este manual.

Se sugiere conservar todos los elementos del em-

balaje, porque podrían ser útiles para proteger la 

máquina y los accesorios en caso de transporte a 

otro lugar o a los centros de asistencia autorizados. 

Si no desea guardar el embalaje, el mismo deberá 

eliminarse según lo establecido en las leyes vigen-

tes en materia.

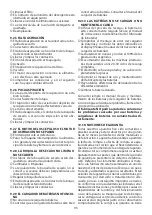
4.4 DESBLOQUEO DEL FRENO ELECTROMECÁ-

NICO

 Cuando la máquina está sin batería, o si es 

apagada, resulta ser frenada.

Para desbloquear el freno electromecánico hace 

falta actuar sobre el motor de tracción posicio-

nado sobre la rueda anterior ( Foto M1 - 2)  según 

el procedimiento siguiente:

-  Atornillar el gozne (Foto M2 - 2) y la palanca de 

desbloqueo (Foto M2 - 1) en la horquilla de desblo-

queo del freno electromecánico ( Foto M1 - 1)

-  Tirar el gozne hacia el exterior ( Foto M3)

- Girar la palanca de desbloqueo hacia el motor 

(Foto M4)

-  Parar la palanca sobre el motor de modo que la 

horquilla quede situado hacia el exterior ( Foto 

M5) El freno electromecánico es desbloqueado 

ahora y es posible mover la máquina.

Despues del desplazaminento de la máquina hace 

falta repetir al revés la operación y reconducir la 

horquilla en la posición de funcionamiento ( Foto 

M1 - 1).

Sacar el gozne y la palanca.

( ! ) ATENCIÓN:  antes de utilizar la máquina 

averiguar que la horquilla esté en la posición 

de funcionamiento ( Foto M1 - 1).

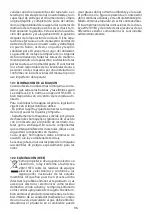
4.5 ELEVACIÓN Y TRANSPORTE: MÁQUINA, BA-

TERÍA Y CARGADOR DE BATERÍAS

  Nunca levante la máquina con una carretilla 

elevadora, el bastidor no tiene los elementos ne-

cesarios para efectuar una elevación directa.

Antes de preparar el embalaje y de efectuar el 

transporte, realice las siguientes operaciones:

- Vacíe el depósito de recuperación y el depósito 

de la solución.

- Desmonte la boquilla de secado y los cepillos o 

los platos de arrastre.

- Desconecte y quite las baterías.

Coloque la máquina en el pallet original (o en uno 

equivalente que soporte el peso y que sea ade-

cuado a las dimensiones de la máquina) para ello 

utilice una plataforma inclinada.

Fije fuertemente la máquina y la boquilla de se-

cado al pallet con abrazaderas metálicas u otros 

elementos que sean adecuados al peso de los ele-

mentos.

Levante el pallet con la máquina para cargarlo 

sobre el medio de transporte.

Fije fuertemente la máquina y el pallet con cables 

conectados al medio de transporte.

Si se tienen a disposición medios de transporte pri-

vados, con rampas inclinadas, se puede empujar 

directamente la máquina sin el pallet, asegurán-

dose de que todos los componentes y la máquina 

estén adecuadamente protegidos para que no 

sufran golpes violentos, humedad, vibraciones o 

movimientos accidentales durante el transporte.

Las cajas de las baterías están provistas de orificios 

para enganchar las herramientas necesarias para 

el transporte. 

 Para la elevación o introducción (en el vano de 

la máquina) de la batería, utilice exclusivamente 

personal y medios adecuados (cables, armellas, 

etc.) para la operación y para soportar el peso de 

las cargas en cuestión. Para el transporte tenga las 

mismas precauciones y siga las mismas indicacio-

nes sugeridas para la máquina, asimismo siga las 

indicaciones del manual del fabricante de la ba-

tería.

El cargador de baterías puede transportarse sobre 

los soportes de los que está provisto, tanto verti-

cal como horizontalmente, tome las mismas pre-

cauciones y siga las mismas indicaciones previstas 

para la máquina, asimismo siga las indicaciones 

del manual del cargador de baterías.

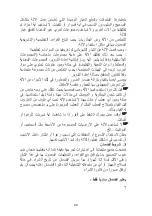
5.INFORMACIONES TÉCNICAS

5.1.2 BATERÍAS

Independientemente del tipo de construcción, las 

prestaciones de una batería se indican con la capa-

cidad referida a un periodo de descarga. Otro valor 

Содержание CRS 90 BT

Страница 1: ...ructions avant l usage ACHTUNG die anweisungen bitte vor gebrauch sorgf ltig lesen ADVERTENCIA leer atentamente las advertencias antes el uso de aparado AR RU TR D KKAT Kullanmadan nce talimatlar okuy...

Страница 2: ...97 104 ITALIANO PAGINA 13 ESPA OL PAGINA 80 ENGLISH PAGE 30 FRAN AIS PAGE 46 DEUTSCH SEITE 63 105 T RK SAYFA 123...

Страница 3: ...3 1 2 A B 2 8 7 6 4 1 3 3 7 4 5 6 8 10 9 5...

Страница 4: ...4 C D 3 2 4 1 1 2 3...

Страница 5: ...5 E 2 1 3 F 2 14 12 7 9 10 11 1 3 6 16 8 15 13 4 5...

Страница 6: ...6 3 3 2 1 4 6 7 6 7 1 2 5 1 G H...

Страница 7: ...7 4 3 2 5 6 8 L 1 2 I 1 7 9...

Страница 8: ...8 1 1 2 M1 M2 M3 2 M4 M5...

Страница 9: ...ASPRUZZI 7 3 MONTAGGIO SMONTAGGIO E REGOLAZIONE DEGLI ACCESSORI 7 4 RIEMPIMENTO E SCARICO DEL SERBATOIO SOLUZIONE 7 5 SCARICO DEL SERBATOIO DI RECUPERO 7 6 REGOLAZIONE DEL SEDILE 7 7 GUIDA DELLA MACCH...

Страница 10: ...qui di seguito definiti ed illustrati Macchina Questa definizione sostituisce la denominazione commerciale a cui fa riferi mento questo manuale Operatore Persona che installa fa funzionare regola ese...

Страница 11: ...i di versi da quelli espressamente previsti Valutare il tipo di edificio nel quale si opera e rispettare scrupolosamente le norme e le condizioni di sicurezza l vigenti Non utilizzare la macchina in l...

Страница 12: ...l impianto elettrico e tutte le operazioni di manutenzione e riparazione particolarmente quelle non esplicitamente descritte in questo manuale solo a centri assistenza autorizzati o a personale tecnic...

Страница 13: ...motore di trazione posizionato sul la ruota anteriore FOTO M1 2 secondo la procedura seguente Avvitare il perno Foto M2 2 e la leva di sblocco Foto M2 1 nella forcella di sblocco del freno elettromec...

Страница 14: ...l elettrolito in ogni elemento Se un elemento rimane scoperto dalla solu zione acida si ossida in 24 ore e le prestazioni di quell elemento vengono permanentemente compromesse Fare riferimento al manu...

Страница 15: ...della soluzione detergente FOTO G 1 Paracolpi posteriore del tergipavimento destro sinistro 2 Registro di regolazione pressione del tergipavimento destro sinistro 3 Manopola di sgancio aggancio rapido...

Страница 16: ...ti operazioni prima di iniziare a lavorare fare riferimento ai relativi paragrafi per una dettagliata descrizione di queste fasi Controllare il livello di carica della batteria e procede re alla ricar...

Страница 17: ...a lama posteriore cen trando ancora una volta i fori sulle viti sporgenti Serrare i listelli con i pomelli di fissaggio FOTO G 6 partendo da un estremit fino ad arrivare all opposta E normale che per...

Страница 18: ...tamento del serbatoio Chiudere saldamente il rubinetto di scarico 7 5 SCARICO DEL SERBATOIO DI RECUPERO Lo scarico delle acqua sporche deve essere effettuato in linea con le normative nazionali L util...

Страница 19: ...della ca rica della batteria Quando si accende la luce rossa spegnere il motore spazzole chiudere l erogazione soluzione terminare eventualmente di asciugare il piccolo residuo umido e portarsi press...

Страница 20: ...del detergente Sollevare il gruppo spazzole e spegnere il motore del le spazzole Dopo aver asciugato completamente la superficie da eventuali leggere tracce di acqua attendere qualche secondo poi soll...

Страница 21: ...LUZIONE DETERGENTE Assicurarsi che il serbatoio soluzione sia vuoto Controllare e pulire il filtro per la soluzione si tuato nella parte posteriore ed inferiore della macchina Lavare con acqua corrent...

Страница 22: ...hina tuttavia occorre far controllare da un tecnico specializzato il cor retto funzionamento del dispositivo in oggetto qualora il relativo disgiuntore continui ad inter venire 8 9 MANUTENZIONE PERIOD...

Страница 23: ...trazione per tensione batteria insufficiente Per ripristinare riavviare la macchina dopo aver ricaricato la batteria 04 TEMPERATURA MAX ELETTRONICA Ferma la trazione per eccessiva temperatura dello s...

Страница 24: ...batterie sono nuove e non danno il 100 delle prestazioni attese L accumulatore raggiunge il massimo delle prestazioni dopo 20 30 cicli di ricarica com Non selezionato l interruttore del motore spazzol...

Страница 25: ...Centro Assistenza Tecnica Autorizzato o presso la nostra sede e deve pervenire in por to franco e cio con spese e responsabilit per il trasporto a carico dell utilizzatore La garanzia non contempla l...

Страница 26: ...ACCESSORY ASSEMBLY DISASSEMBLY 7 4 FILLING AND DRAINING THE DETERGENT SOLUTION TANK 7 5 DRAINING THE RECOVERY TANK 7 6 SEAT ADJUSTMENT 7 7 DRIVING THE MACHINE 7 8 WORK METHOD 7 8 1 PREPARATION AND WA...

Страница 27: ...onsidered a person who has the experience technical education legislative and regulatory knowledge that allows him to carry out any type of required work and the ability to recognise and to avoid poss...

Страница 28: ...thinners acetone etc even if diluted inflammables or explosives e g petrol fuel oil etc never vacuum flaming or incandescent objects Do not use the machine on slopes or ramps steeper than 2 For small...

Страница 29: ...r the machine or clog the hoses 3 2 NOISE AND VIBRATIONS For informations relating to noise and vibration data see last page 4 HANDLING INFORMATION 4 1 PACKING LIFTING AND TRANSPORT During all lifting...

Страница 30: ...ements that can bear the weight of the parts Lift the pallet with the machine and load it on the transport vehicle Secure the machine and the pallet using ropes conne cted to the transport vehicle As...

Страница 31: ...rformances the service life the safety and the economic value invested 5 2 STRUCTURE AND FUNCTIONS 5 2 1 MACHINE Photo A 1 Recovery tank 2 Operator s seat 3 Solution tank 4 Rear wheel 5 Bumper wheel b...

Страница 32: ...terminals only on the poles marked with the same symbol red wiring black wiring A bat tery short circuit may cause an explosion Run the cables toward the wiring outlet opening on one side of the box o...

Страница 33: ...hoto G 3 in order to block the squeegee on the support Firmly insert the machine suction hose into the squee gee body Photo G 5 7 2 2 SQUEEGEE DISASSEMBLY Lower the lifting system to avoid having to k...

Страница 34: ...ntainer Contact the machine manufacturer to obtain a com plete list of available and suitable detergents Always add the detergent after filling the tank with water to prevent foam from being created i...

Страница 35: ...sh drying the small resi dual moisture and go to the battery charging area to charge the battery If these operations are not carri ed out the machine will automatically deactivate the brush motor and...

Страница 36: ...the detergent solution the floor might be damaged 7 8 5 POST SCRUBBING OPERATIONS Cut off the supply of detergent Lift the brush unit and turn off the brush motor After having completely dried any tra...

Страница 37: ...shes or the scraper disks To avoid damaging the floor and the machine carefully check if foreign matter such as metallic parts screws chips cords or similar items has be come jammed Check that the bru...

Страница 38: ...uction and traction motor due to battery voltage insufficient To restore restart the machine after the battery charging 04 MAX ELECTR TEMPERATURE Stops traction motor due to excessive temperature of t...

Страница 39: ...tor pedal turn off and re start the machine The accelerator pedal potentiometer is mal functioning Replace the potentiometer The drive motor was not stopped when the machine was turned on Place the ma...

Страница 40: ...all not be replaced and the warranty shall not be extended once the appliance has been affect ed by a fault Repairs shall be carried out at one of our Authorised technical Service Centres or at our fa...

Страница 41: ...iminate those parts of the machine that may be dangerous es pecially for children 10 2 DISPOSAL WEEE As the owner of electrical or electronic equipment the law in accordance with the EU Directive 2012...

Страница 42: ...T DEMONTAGE DE LES BROSSES 7 4 REMPLISSAGE ET VIDANGE DU RESERVOIR DE LA SOLUTION DETERGENTE 7 5 VIDANGE DU RESERVOIR DE L EAU SALE 7 6 REGLAGE DU SIEGE 7 7 CONDUITE DE LA MACHINE 7 8 METHODE DE TRAVA...

Страница 43: ...boles r dactionnels d finis et illustr s cidessous Machine Cette d finition remplace la d signation commerciale laquelle se r f re ce manuel Op rateur la les personne s charg e s d instal ler de faire...

Страница 44: ...pr sence de salet nui sible la sant poussi res nocives gaz etc sur des routes ou des passages publics ni l ext rieur en g n ral La plage de temp rature d exercice pr vue est comprise entre 4 C et 35...

Страница 45: ...r elles offrent la certitude que l appareil puisse fonctionner en toute s curit et sans inconv nient N utilisez jamais de pi ces r cup r es sur d autres machines Avant toute utilisation v rifiez la ma...

Страница 46: ...olution d tergente d monter le suceur et les brosses ou les entra neurs d brancher et enlever les batteries Placez la machine sur la palette d origine ou sur une autre de port e et dimensions suffisan...

Страница 47: ...in Le m me chargeur de batteries peut en effet aussi bien tre utilis pour les batteries au Pb Acide que pour les batteries au gel Le visuel num rique fournit une s rie d informations qui permet de con...

Страница 48: ...nuel correspon dant 5 3 ACCESSOIRES Votre revendeur pourra vous illustrer la liste com pl te et mise jour de tous les accessoires dispo nibles comme les brosses disques portepad etc 6 INFORMATIONS SUR...

Страница 49: ...ll les Choisissez une trajectoire rectiligne et commen cez par la zone plus loign e pour viter de passer sur des zones d j nettoy es 7 INFORMATIONS SUR L UTILISATION 7 1 RECHARGE DES BATTERIES Pr pare...

Страница 50: ...u pivot vis centrale vissezle pour am liorer le s chage des tra n es au milieu indiquent un vissage excessif du pivot vis centrale d vissezle pour am liorer le s chage 7 2 5 MONTAGE ET DEMONTAGE DE LA...

Страница 51: ...mages la machine La capacit du r servoir de l eau r siduelle est sup rieure celui de la solution d tergente Le moteur d aspiration est prot g par un flotteur de s curit qui se d clenche en l teignant...

Страница 52: ...eries peuvent s endommager irr m dia blement si le niveau de charge r siduelle se r duit trop cf le manuel de mode d emploi des batteries Ne forcez pas la d charge des batteries audel des limites fix...

Страница 53: ...e en tournant la cl et retirezla du tableau En cas de besoin effectuez la recharge des batteries cf le paragraphe correspondant 8 INFORMATIONS SUR L ENTRETIEN Tournez la cl de contact retirezla du tab...

Страница 54: ...nctionnement irr m diable de l l ment concern Le d bordement de l acide provoque l oxydation de la machine Utilisez un chargeur de batteries pr co nis par le fabricant et adapt au type de batteries ch...

Страница 55: ...Poussez manuellement la machine jusqu au nive au souhait D clenchement du disjoncteur du ou des moteurs 8 9 MANUTENTION PERIODIQUE Au besoin Apr s le travail Chaque semaine Mensuelle ment D montage et...

Страница 56: ...rosses de l aspiration et de la traction cause de la tension de batterie insuffisante Pour r tablir red marrer la machine apr s la charge de la batterie 04 TEMP MAX LECTRONIQUE Arr te le moteur de tra...

Страница 57: ...ontactez le centre de ser vice apr s vente agr le plus proche Le fabricant NE PEUT ETRE d aucune aide en cas de probl mes dus des batteries et un char en appuyant dessus le premier partir du haut La c...

Страница 58: ...tion ou le changement de pi ces soumises l usure normale Le fabricant d cline toute responsabilit en cas de d gats des per sonnes ou des biens provoqu s par une installation non conforme la notice ou...

Страница 59: ...TZES 7 3 EINBAU UND AUSBAU DER B RSTE 7 4 BEF LLEN UND ENTLEEREN DES L SUNGSBEH LTERS 7 5 ENTLEEREN DES SAMMELTANKS 7 6 EINSTELLUNG DES SITZES 7 7 FAHREN DER MASCHINE 7 8 ARBEITSWEISE 7 8 1 VORBEREITU...

Страница 60: ...UNG DER SYMBOLE F r ein besseres Verst ndnis und zum Hervorheben der verschiedenen Aspekte der Anleitungen wurden Begriffe und Symbole verwendet die nachstehend definiert und abgebildet werden Maschin...

Страница 61: ...darf nicht f r einen anderen als den ausdr cklich vorgesehenen Zweck eingesetzt werden Bei dem Gebrauch der Maschine ist der je weilige Geb udetyp zu ber cksichtigen und es sind die dort geltenden Si...

Страница 62: ...rungen ist die Maschine sofort abzustellen von dem Stromnetz oder den Batterien trennen Nicht versuchen die Ma schine selbst zu reparieren sondern ein technisches Kundendienstcenter des Herstellers ko...

Страница 63: ...m das gesamte Verpackungsmaterial ent fernt wurde k nnen die Zubeh rteile und Batterien gem den im spezifischen Abschnitt enthaltenen Anleitungen montiert werden Es wird empfohlen alle Verpackungselem...

Страница 64: ...gie Strom Daher variie ren die in C5 oder C20 ausgedr ckten Kapazit tswer te derart stark Es ist von grundlegender Bedeutung diese Faktoren zu ber cksichtigen um einen korrek ten Vergleich zwischen de...

Страница 65: ...chalter 7 W hlschalter Heben Absenken Squeegee 8 Operationsnotschalter 9 Geschwindigkeitsanpassung potentiometer 10 Schl sselschalter 11 Bedienungsfeld Schutz Sicherung 12 W hlschalter Heben Absenken...

Страница 66: ...verwendeten Reinigungsl sung ange gebenen oder von der Arbeitsumgebung geforder ten pers nlichen Schutzausr stungen anzuwenden Vor Arbeitsbeginn sind folgende Eingriffe Vor Zu nehmen F r eine detaill...

Страница 67: ...n den Rumpf des Squeegees ein 7 2 2 ABNEHMEN DES SQUEEGEES Senken Sie das Hebesystem ab damit Sie w hrend der Verbindungsphase nicht den Rumpf der Maschi ne angehoben lassen m ssen Ziehen Sie den Saug...

Страница 68: ...auf die gleiche Weise vorzugehen 7 4 BEF LLEN UND ENTLEEREN DES L SUNGS BEH LTERS Die Temperatur des einzuf llenden Wassers oder Reinigungsmittels darf nicht ber 50 C lie gen Bei jedem Bef llen des L...

Страница 69: ...schl ssel zie hen Es besteht die M glichkeit auch bei der Arbeit mit Fu auf dem Gaspedal die Fahrtrichtung mit dem Vorw rt R ckw rtshebel zu wechseln 7 8 ARBEITSWEISE 7 8 1 VORBEREITUNG UND WARNHINWEI...

Страница 70: ...in das Z ndschloss stecken und dre hen Den B rstenmotor und die Reinigungsl sungs abgabe einschalten Die B rsten absenken Mit dem Einstellhebel der Reinigungsl sung die aus tretende Reinigungsl sungsm...

Страница 71: ...eeintr chtigt In diesem Fall sind die Squee gee Bl tter zu ersetzen Zum Ersetzen der abgenutzten Wischbl tter sind die im entsprechenden Abschnitt enthaltenen Anleitun gen zu befolgen Die Bl tter umdr...

Страница 72: ...ntlichen Wartungseingriffe zu program mieren um immer die maximale Leistung der Ma schine zu erhalten Das Verzeichnis dieser Ersatzteile fordern Sie bitte bei Ihrem H ndler an 9 BETRIEBSKONTROLLE 9 1...

Страница 73: ...er Fahrmotoren hat angesprochen 9 1 FEHLERMELDEDIAGNOSTIK Anzahl der Summer L sung 01 ANTRIEBSSPERRE Motorstop um Sie vor berm ssiger Stromspitzen zu sch tzen Bitte einen Neustart durchf hren 02 H CHS...

Страница 74: ...s Fluss ffnungsmagnetventil ist durchgebrannt Magnetventil ersetzen lassen 9 2 5 KEIN SAUGBETRIEB Das Saugrohr ist nicht an den Squeegee angeschlossen Korrekt anschlie en Das Saugrohr die Squeegee Lei...

Страница 75: ...altungsrechtlich bestraft werden Die Fehlermeldung auf dem Batterieladeger t berpr fen und die auf dem Display angezeigten Daten kontrollieren siehe Gebrauchsanleitung de Batterieladeger therstellers...

Страница 76: ...DE SECADO 7 2 5 MONTAJE Y DESMONTAJE DEL PROTECTOR CONTRA SALPICADURAS 7 3 MONTAJE DESMONTAJE Y REGULACI N DE LOS ACCESORIOS 7 4 LLENADO Y DESCARGA DEL DEP SITO DE LA SOLUCI N LIMPIADORA 7 5 VACIADO D...

Страница 77: ...persona s encarga da s de instalar poner en marcha regular man tener limpiar reparar transportar una m quina T cnico Por t cnico se entienden las personas con la experiencia preparaci n t cnica y con...

Страница 78: ...a para la salud polvos gases etc en calles o pasajes p bli cos y en ambientes exteriores en general El campo de temperatura previsto para el uso de la m quina es de 4 C a 35 C coloque la m quina en re...

Страница 79: ...y experto en el sector y en las normas de seguridad Se permite usar s lo accesorios y recambios originales proporcionados exclusivamente por el fabricante puesto que s lo estos recambios ga rantizan q...

Страница 80: ...i n y reconducir la horquilla en la posici n de funcionamiento Foto M1 1 Sacar el gozne y la palanca ATENCI N antes de utilizar la m quina averiguar que la horquilla est en la posici n de funcionamien...

Страница 81: ...permite una excelente recarga de las bater as pro longando la autonom a y la vida de las mismas y gracias a la posibilidad de configurarlo representa una soluci n muy vers til al reducir el n mero de...

Страница 82: ...bater as al Pb cido si no son de carga en seco o al gel ya est n listas para ser instaladas Color rojo polo positivo Color negro polo negativo 5 2 3 CARGADOR DE BATER AS Si se incluye en el suministro...

Страница 83: ...INFORMACIONES SOBRE LA UTILIZACI N 7 1 RECARGA DE LAS BATER AS Prepare y controle el cargador de bater as para ello siga las instrucciones del correspondiente p rrafo Desconecte el conector de la bate...

Страница 84: ...o largo de todo el frente de secado Tramos h medos a los lados indican un secado insufi ciente regule mediante los pomos para optimila eficacia 7 2 5 MONTAJE Y DESMONTAJE DEL PROTEC TOR CONTRA SALPICA...

Страница 85: ...a situaci n de potencia peligro para el motor de aspiraci n De todos mo dos hay un flotador de seguridad que interviene apagando el motor de aspiraci n en caso de que el nivel del l quido sucio sea ex...

Страница 86: ...able mente si el nivel de carga residua se reduce exce sivamente v ase el manual de uso de la bater a no fuerce la descarga de la bater a m s all de los l mites fijados por los dispositivos de segurid...

Страница 87: ...ario a recargar la bater a v ase el correspondiente p rrafo 8 INFORMACIONES SOBRE EL MANTE NIMIENTO Vac ar los dos dep sitos como se describe en los correspondientes p rrafos Eliminar la suciedad s li...

Страница 88: ...pre sente manual Dejar descubiertas no completamente sumergi das en la soluci n cida las placas de los elemen tos ocasiona una r pida oxidaci n y perjudica irre mediablemente la funcionalidad del ele...

Страница 89: ...ico que se ala con un LED luminoso rojo el funciona miento correcto o el funcionamiento defectuoso Foto L 5 Ver la siguiente lista en la tabla 9 2 RESOLUCI N DE LOS PROBLEMAS Estas indicaciones sirven...

Страница 90: ...ebido a la tensi n insuficiente de la bater a Para reiniciar encender la m quina de nuevo despu s de la carga de la bater a 04 TEMP M XIMA Apaga el motor de tracci n debido a la temperatura excesiva d...

Страница 91: ...or uso e instalaci6n impropios o errados no conformes con las advertencias indicadas en el manual de instrucciones y tambi n por causas no dependientes de la norma y del funcionamiento o uso del apara...

Страница 92: ...r hay que desconectar la m quina de la red vaciar los l quidos y limpiarla Seguidamente la m quina se divide por grupos de materiales homog neos pl sticos de acuerdo con lo indicado por el s mbolo de...

Страница 93: ...97 8...

Страница 94: ...98 7 3 12...

Страница 95: ...99 6...

Страница 96: ...100 5 2 10...

Страница 97: ...101 4 4 35 10 50 30 95...

Страница 98: ...102 3 5 1 CE CE 2 1 2...

Страница 99: ...103 2 3 1 CE 4 1...

Страница 100: ...104 1 1 1 1 1 2...

Страница 101: ...5 2 3 111 5 3 111 6 111 6 1 111 6 2 112 6 3 112 7 113 7 1 113 7 2 113 7 2 1 113 7 2 2 113 7 2 3 113 7 2 4 113 7 2 5 114 7 3 114 7 4 114 7 5 115 7 6 115 7 7 115 7 8 115 7 8 1 115 7 8 2 115 7 8 3 116 7...

Страница 102: ...106 2 2 1 2 2 2 10 2 3 2 4...

Страница 103: ...107 2 5 3 3 1 4 35 C 10 50 C 30 95 2 10...

Страница 104: ...108 3 2 4 4 1 4 2 4 3...

Страница 105: ...109 4 4 M1 2 M2 2 M2 1 M1 1 3 4 5 M1 1 M1 1 4 5 5 5 1 2...

Страница 106: ...110 20 20 20h 5 5 5h 5 20 24 5 1 3 5 2 5 2 1 A 1 2 3 4 5 6 7 8 9 10 B 1 2 3 4 5 6 7 8 C...

Страница 107: ...1 2 3 D 1 2 3 4 E 1 2 3 F 1 2 3 4 5 6 7 8 9 10 11 12 13 14 15 16 G 1 2 3 4 5 6 7 H 1 I 1 2 L 1 2 100A 3 40A 4 70A 5 6 7 8 9 M1 M2 1 2 M3 M4 M5 Q COMFORT S R 75 CS A18 R 5300 1 2 3 5 2 2 5 2 3 5 3 6 6...

Страница 108: ...112 6 2 90 Anderson An derson 0 6 3 2...

Страница 109: ...113 7 7 1 7 2 7 2 1 G 3 G 3 G 5 7 2 2 G 5 G 3 7 2 3 7 2 2 G 6 G 6 7 2 4 G 4...

Страница 110: ...114 G 2 45 G 4 G 2 7 2 5 7 3 0 1 1 0 7 4 50 C 7...

Страница 111: ...115 B 5 Q 3 7 5 O 1 7 6 7 7 7 8 7 8 1 7 8 2...

Страница 112: ...116 7 8 3 2 7 8 4...

Страница 113: ...117 7 8 3 2 7 8 5 7 4 7 5 7 4 7 5 8 8 1 50 8 2 8 3...

Страница 114: ...118 8 4 8 5 8 6 8 7 8 7 1 8 7 2 8 8 8 9 8 10 9 9 1 9...

Страница 115: ...119 L 5 9 2 9 2 1 1 30 9 2 2 5 8 9 X X X X X X X X X X X X X X X X X...

Страница 116: ...120 9 1 01 02 03 04 05 06 07 _ 08 09 10 11...

Страница 117: ...121 9 2 3 9 2 4 9 2 5 9 2 6 9 2 7 9 2 8 9 2 9 9 2 10 100 20 30...

Страница 118: ...122 10 12 10 1 2013 56 EU 10 2 2012 19 EU 2012 19 EU...

Страница 119: ...USUNUN TAKILMASI V E S K LMES 7 3 AKSESUARLARIN TAKILMASI S K LMES VE AYARI 7 4 DETERJAN ZELT S HAZNES N N DOLDURULMASI VE BO ALTILMASI 7 5 TOPLAMA HAZNES N N BO ALTILMASI 7 6 KOLTUK AYARI 7 7 MAK NEN...

Страница 120: ...l r Operat r Operat r normalde makineyi kulla nan ve al t rma zelliklerini bilen ancak o ma kineye m dahelede bulunmak i in belirli teknik becerileri olmayan ki i olarak kabul edilir Teknisyen Teknisy...

Страница 121: ...elidir Seyreltilmi olsa bile asla s v lar gazlar kuru tozlar asitler ve solventler rn tiner aseton vs yan c ya da patlay c maddeleri rn benzin akaryak t vs asla kullanmay n veya vakumlamay n yan c vey...

Страница 122: ...durumda ve kullan m i in g venli oldu unu kontrol edin M kemmel durumda de illerse yetkili uzman ar zal par alar onarana dek herhangi bir nedenle makineyi kullanmay n K p k veya s v ka a fark edilirse...

Страница 123: ...madan nce atal n al ma konumunda oldu undan emin olun Foto M1 1 4 5 KALDIRMA VE TA IMA MAK NE AK VE AK ARJ C HAZI Makineyi kald rmak i in asla forklift kullanmay n asi zerinde makineyi direk olarak ka...

Страница 124: ...lidir Sadece bu elemanlar aras ndaki m kemmel uyum Pb Asitli ak ler jel ak ler ve ak arj cihazlar performanslar servis mr ve g venlik ve yat r m yap lan ekonomik de eri g venceye alacakt r 5 1 3 AK AR...

Страница 125: ...ren a ma atal FOTO M2 1 A ma kolu 2 Pim FOTO M3 M4 M5 Elektro mekanik frenin devre d b rak lmas prosed r 5 2 2 AK Mevcutsa Pb Asit kuru arjl de ilse veya jel ak ler tak lmaya haz rd r Pozitif kutup k...

Страница 126: ...tler yaparak makine hareketlerini renin Temizlik ve ekipman servis mr bak m ndan en iyi sonu lar elde etmek i in a a daki basit ancak nemli i lemleri ger ekle tirmelisiniz T m olas engelleri yoldan ka...

Страница 127: ...cinin zemine uygulad bask n n ayarlanmas nda kullan lmaktad r M kemmel ayar ko ullar nda arka kau uk b a n hareket esnas nda s rt n rken her bir noktas n n zemin ile yakla k 45 derece a yapmas gerekme...

Страница 128: ...HAZNES N N BO ALTILMASI Kirli su ulusal d zenlemelere g re bo alt lmal d r Kullan c bu t r kurallara uyumun sa lanmas ndan tamamen sorumludur Deterjan zeltisi bittikten sonra tekrar doldurmadan nce t...

Страница 129: ...en deterjan n sol syonunun miktar n n ayarlanmas nda kullan lan sol syon ak ayar kolu yukar da maksimum altta minimum Ak arj g stergesi klar dizisi ak n n arj t kenene kadar kademeli olarak s nmektedi...

Страница 130: ...dili i ekilde hareket edin 7 8 3 leme tabi tutulacak y zeylerde hasara neden olmamak i in ilerleme pedal b rak ld ktan yakla k 2 saniye sonra f r a motoru otomatik olarak kapanacakt r Geri vites durum...

Страница 131: ...uarlar kullan n di er r nler al ma g venli ini azaltabilir 8 5 DETERJAN ZELT S F LTRES Sol syon haznesinin bo oldu undan emin olun Makinenin arka ve alt k sm nda yer alan sol syon filtresini kontrol e...

Страница 132: ...n X Toplama haznesini bo alt n temiz suyla durulay n veya steril hale getirin X Ak leri arj edin X X Ak h crelerindeki asit seviyesini kontrol edin X F r alar s k n ve a nma durumlar n kontrol edin Te...

Страница 133: ...eyi yeniden ba lat n 03 AK DEK GER L M D K Ak deki gerilim yetersiz oldu undan f r alar emi ve eki durdurulmu tur D zeltmek i in ak y arj ettikten sonra ma kineyi yeniden ba lat n 04 ELEKTRON K G B L...

Страница 134: ...AZ GEL YOR Deterjan zeltisi haznesi bo Toplama haznesini bo altt ktan sonra deterjan zeltisi haznesini doldurun F r alar veya makine durdu F r alar al t r n ve gaz pedal na bas n Ak ayar kolu kapal y...

Страница 135: ...er yeni ve beklenen performanslar n 100 n retmiyor Ak m lat r 20 30 tam arj devrinden sonra maksimum performansa ula r Elektrolit buharla m ve plakalar tam olarak kapatm yor reticinin kullan m ve bak...

Страница 136: ...alar n onar lmas n ya da de i tirilmesini kapsamamaktad r retici k lavuza uygun olmayan kurulum ya da cihaz n usuls z kullan m nedeni ile insan ya da e yalarda meydana gelen hasarlardan dolay hi bir s...

Страница 137: ......

Страница 138: ......

Страница 139: ...0 13 m s sur le si ge 0 26 m s am Steuer 0 13 m s auf dem Sitz 0 26 m s sobre el volante 0 13 m s en el asiento 0 26 m s 0 13 m s 0 26 m s direksiyonda 0 13 m s stoel Vibrazioni trasmesse all utilizz...

Страница 140: ...atthemachine Attestesous saresponsabilit quelamachine Erkl rtunterdereigenenVerantwortungdieMaschine Declarabajosupropiaresponsabilidad quelam quina Kendisorumlulu ualt ndaa a dakimakinenin DICHIARAZI...

Отзывы: