


21
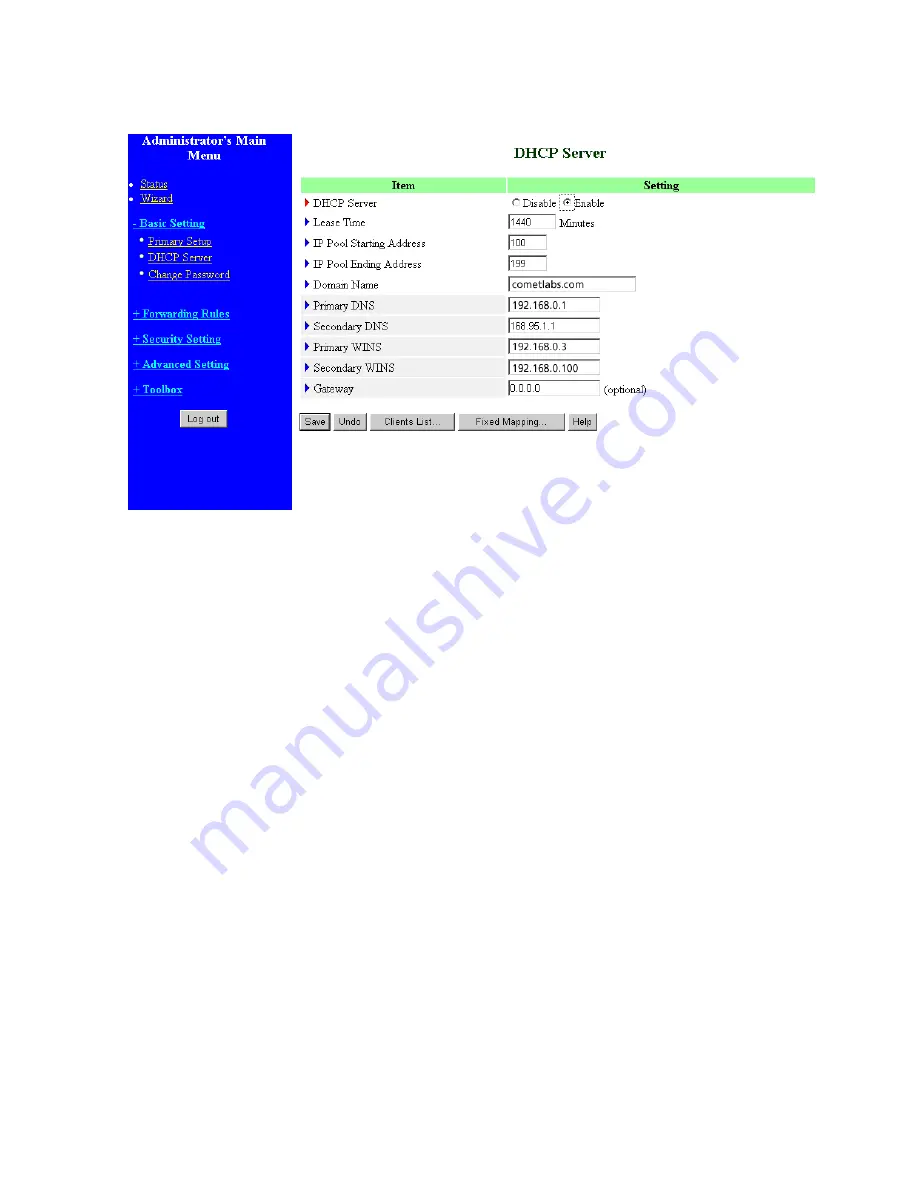
3.4.2 DHCP Server
Press
“More>>”
The settings of a TCP/IP environment include host IP, Subnet Mask, Gateway, and DNS configurations.
It is not easy to manually configure all the computers and devices in your network. Fortunately, DHCP
Server provides a rather simple approach to handle all these settings. This product supports the
function of DHCP server. If you enable this product’s DHCP server and configure your computers as
“automatic IP allocation” mode, then when your computer is powered on, it will automatically load the
proper TCP/IP settings from this product. The settings of DHCP serve r include the following items:
1.
DHCP Server
: Choose “Disable” or “Enable.”
2.
Lease Time:
this feature allows you to configure IP’s lease time (DHCP client).
3.
IP pool starting Address/ IP pool starting Address
: Whenever there is a request, the DHCP
server will automatically allocate an unused IP address from the IP address pool to the
requesting computer. You must specify the starting and ending address of the IP address pool.
4.
Domain Name
: Optional, this information will be passed to the client.
5.
Primary DNS/Secondary DNS
: This feature allows you to assign DNS Servers
6.
Primary WINS/Secondary WINS
: This feature allows you to assign WINS Servers
7.
Gateway
: The Gateway Address would be the IP address of an alternate Gateway.
This function enables you to assign another gateway to your PC, when DHCP
server offers an IP to your PC.
Содержание WRB54+
Страница 1: ...1 User s Manual Wireless Internet Broadband Router Model Nr WRB54 English version...
Страница 15: ...15 3 3 Wizard Setup Wizard will guide you through a basic configuration procedure step by step Press Next...
Страница 16: ...16 Setup Wizard Select WAN Type For detail settings please refer to3 4 1 primary setup 3 4 Basic Setting...
Страница 17: ...17 3 4 1 Primary Setup WAN Type Virtual Computers Press Change...
Страница 25: ...25 3 5 Forwarding Rules 4 5 1 Virtual Server...
Страница 29: ...29 3 6 Security Settings...
Страница 52: ...52 3 7 Advanced Settings...
Страница 57: ...57 Example After Dynamic DNS setting is configured click the save button...
Страница 66: ...66 3 8 Toolbox...
Страница 67: ...67 3 8 1 System Log You can View system log by clicking the View Log button...
Страница 68: ...68 3 8 2 Firmware Upgrade You can upgrade firmware by clicking Firmware Upgrade button...
Страница 73: ...73 b Don t input any value in the Gateway tab...
Страница 78: ...78 Double click Administrative Tools...
Страница 79: ...79 Local Security Policy Settings Double click Local Security Policy...
Страница 82: ...82 click Add button...
Страница 83: ...83 Enter a name for example xp router and dis select Use Add Wizard check box Click Add button...
Страница 85: ...85 Click OK button Then click OK button on the IP Filter List page...
Страница 86: ...86 select Filter Action select Require Security then click Edit button...
Страница 87: ...87 select Negotiate security Select Session key Perfect Forward Secrecy PFS click Edit button...
Страница 88: ...88 select Custom button...
Страница 90: ...90 select Authentication Methods page click Add button...
Страница 92: ...92 configure The tunnel endpoint is specified by this IP address 192 168 1 254 Select Connection Type...
Страница 94: ...94 click Add button...
Страница 95: ...95 Enter a name such as router xp and dis select Use Add Wizard check box Click Add button...
Страница 97: ...97 Click OK button Then click OK button on IP Filter List window...
Страница 98: ...98 select Filter Action tab select Require Security then click Edit button...
Страница 99: ...99 select Negotiate security Select Session key Perfect Forward Secrecy PFS click Edit button...
Страница 100: ...100 select Custom button...
Страница 102: ...102 select Authentication Methods page click Add button...
Страница 104: ...104 Configure The tunnel endpoint is specified by this IP address 192 168 1 1 Select Connection Type...
Страница 105: ...105 select All network connections...
Страница 106: ...106 Configure IKE properties Select General Click Advanced...
Страница 109: ...109 VPN Settings VPN Enable Max number of tunnels 2 ID 1 Tunnel Name 1 Method IKE Press More...
Страница 115: ...115 3 Choose Virtual Private Network 4 Do not dial to initial connection...
Страница 116: ...116 5 Input the router wan ip address 6 Then ok please input username and password as you setup in the router...
Страница 117: ...117 7 Select the type of VPN...
Страница 119: ...119 Then the steps refer to pptp settings...
Страница 122: ...122 Figure 2 Enable IEEE 802 1X access control...
Страница 124: ...124 Figure 4 Certificate information on PC1 Figure 5 Authenticating...


