


10
2.2 Procedure for Hardware Installation
1. Decide where to place your Wireless Broadband Router
You can place your Wireless Broadband Router on a desk or other flat surface, or you can mount it
on a wall. For optimal performance, place your Wireless Broadband Router in the center of your
office (or your home) in a location that is away from any potential source of interference, such as a
metal wall or microwave oven. This location must be close to power and network connection.
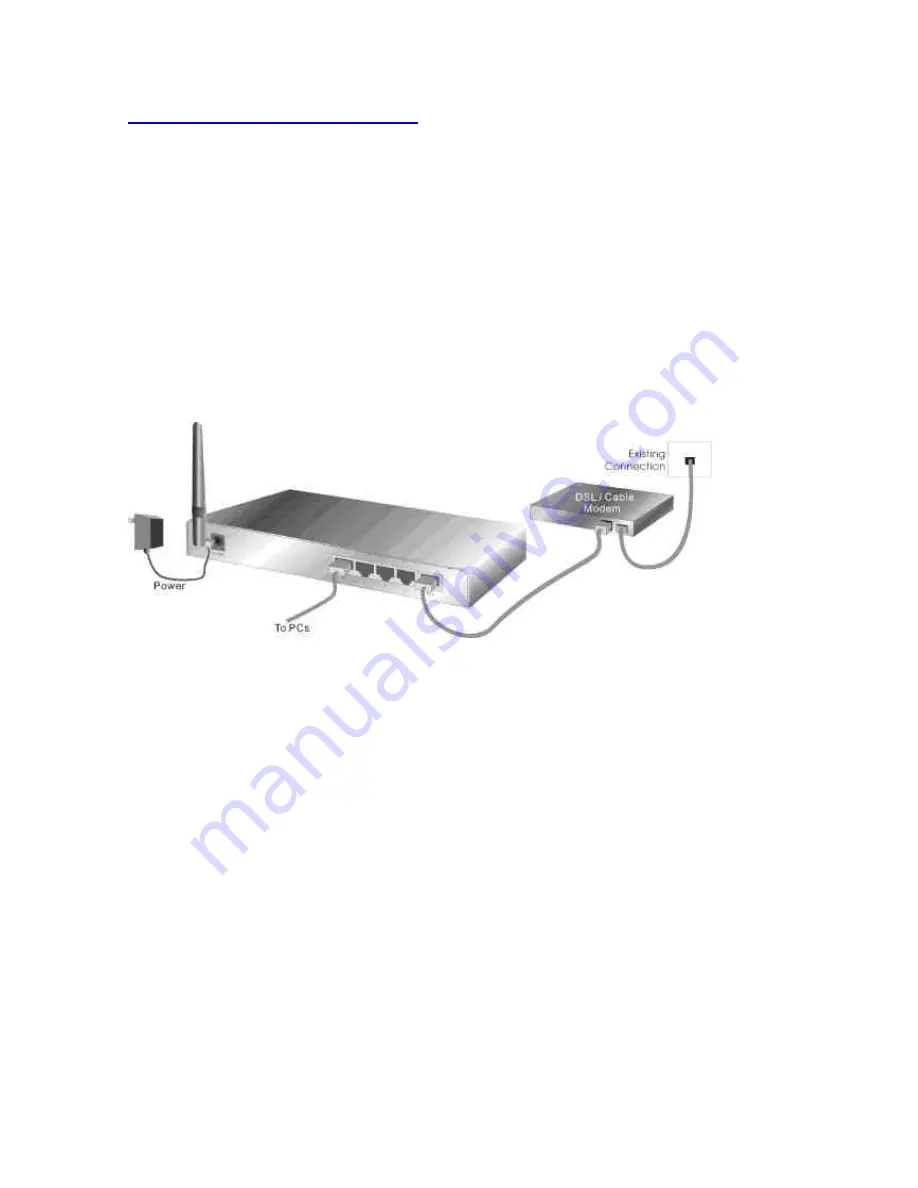
2.
Setup LAN connection
a.
Wired LAN connection: connects
an Ethernet cable from your computer’s Ethernet port to one
of the LAN ports of this product.
b.
Wireless LAN connection: locate this product at a proper position to gain the best transmit
performance.
Figure 2-3 Setup of LAN and WAN connections for this product.
3. Setup WAN connection
Prepare an Ethernet cable for connecting this product to your cable/xDSL modem or Ethernet
backbone. Figure 2-3 illustrates the WAN connection.
4. Power on
Connecting the power cord to power inlet and turning the power switch on, this product will
automatically enter the self-test phase. When it is in the self-test phase, the indicators SYS will be
lighted ON for about 10 seconds, and then SYS will be flashed 3 times to indicate that the self-test
operation has finished. Finally, the SYS will be continuously flashed once per second to indicate
that this product is in normal operation.
Содержание WRB54+
Страница 1: ...1 User s Manual Wireless Internet Broadband Router Model Nr WRB54 English version...
Страница 15: ...15 3 3 Wizard Setup Wizard will guide you through a basic configuration procedure step by step Press Next...
Страница 16: ...16 Setup Wizard Select WAN Type For detail settings please refer to3 4 1 primary setup 3 4 Basic Setting...
Страница 17: ...17 3 4 1 Primary Setup WAN Type Virtual Computers Press Change...
Страница 25: ...25 3 5 Forwarding Rules 4 5 1 Virtual Server...
Страница 29: ...29 3 6 Security Settings...
Страница 52: ...52 3 7 Advanced Settings...
Страница 57: ...57 Example After Dynamic DNS setting is configured click the save button...
Страница 66: ...66 3 8 Toolbox...
Страница 67: ...67 3 8 1 System Log You can View system log by clicking the View Log button...
Страница 68: ...68 3 8 2 Firmware Upgrade You can upgrade firmware by clicking Firmware Upgrade button...
Страница 73: ...73 b Don t input any value in the Gateway tab...
Страница 78: ...78 Double click Administrative Tools...
Страница 79: ...79 Local Security Policy Settings Double click Local Security Policy...
Страница 82: ...82 click Add button...
Страница 83: ...83 Enter a name for example xp router and dis select Use Add Wizard check box Click Add button...
Страница 85: ...85 Click OK button Then click OK button on the IP Filter List page...
Страница 86: ...86 select Filter Action select Require Security then click Edit button...
Страница 87: ...87 select Negotiate security Select Session key Perfect Forward Secrecy PFS click Edit button...
Страница 88: ...88 select Custom button...
Страница 90: ...90 select Authentication Methods page click Add button...
Страница 92: ...92 configure The tunnel endpoint is specified by this IP address 192 168 1 254 Select Connection Type...
Страница 94: ...94 click Add button...
Страница 95: ...95 Enter a name such as router xp and dis select Use Add Wizard check box Click Add button...
Страница 97: ...97 Click OK button Then click OK button on IP Filter List window...
Страница 98: ...98 select Filter Action tab select Require Security then click Edit button...
Страница 99: ...99 select Negotiate security Select Session key Perfect Forward Secrecy PFS click Edit button...
Страница 100: ...100 select Custom button...
Страница 102: ...102 select Authentication Methods page click Add button...
Страница 104: ...104 Configure The tunnel endpoint is specified by this IP address 192 168 1 1 Select Connection Type...
Страница 105: ...105 select All network connections...
Страница 106: ...106 Configure IKE properties Select General Click Advanced...
Страница 109: ...109 VPN Settings VPN Enable Max number of tunnels 2 ID 1 Tunnel Name 1 Method IKE Press More...
Страница 115: ...115 3 Choose Virtual Private Network 4 Do not dial to initial connection...
Страница 116: ...116 5 Input the router wan ip address 6 Then ok please input username and password as you setup in the router...
Страница 117: ...117 7 Select the type of VPN...
Страница 119: ...119 Then the steps refer to pptp settings...
Страница 122: ...122 Figure 2 Enable IEEE 802 1X access control...
Страница 124: ...124 Figure 4 Certificate information on PC1 Figure 5 Authenticating...


