background image


16 


to  save  this  plan. When  controlling  plans,  the  number  of  the  plan  can  be  viewed  through 
clicking TV Wall Management

TV Wall View

TV Wall Plan. You can also edit this plan in 

this  interface.  The  setting  steps  are  as  follows:  In  the  TV  Wall  Plan  interface,  click 


beside the plan name to edit it. 
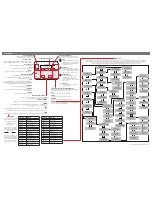
 

5.2

  Screen Display Mode 

At present, it is only to support 1/4/9/16/25/36 screen display mode. 
To set the screen display mode 
1. Select a TV wall. For example: tap 

“1” and then tap “MON” to choose NO.1 TV wall. 

2. Select a window. For example: tap 

“3” and then tap “WIN” to choose NO.3 window. 

3. Select the screen display mode. For example: tap 

“4” and then tap “Split Screen” to select 

the screen display mode. 

Note

: The maximum number of the screen display mode of the platform is 36 screens. As a 

result, the maximum of 36 screens can be called when controlling TV wall. 
 

5.3

    Camera->Monitor 

Select the input signal (camera) to the designated TV wall and window. 

1. Select a TV wall. For example: tap 

“1” and then tap “MON” to choose NO.1 TV wall. 

2. Select a window. For example: tap 

“3” and then tap “WIN” to choose NO.3 window. 

3.  Select  a  camera.  For  example:  tap 

“2”  and  then  tap  “CAM”,  and  finally  tap  “Send”  to 

select No.2 camera. 

You  can  view  and  change  the  relationship  between  camera  number  and  channel  from 
ECMS/NVMS  (go  to  TV  Wall  Management

TV  wall  System  Setting

Channel  Number 

Setting). 
 

Note

:  The  effective  number  ranges  of  camera  from  1  to  999999.  When 

entering  “0”,  it 

means stopping playing in the specific window. 
     

5.4

    PTZ Control 

Only  when  the  PTZ  is  input  to  the  window  and  the  live  images  are  not  displayed  in 
sequence in this window, can the PTZ control be effective

—that is, the camera input to this 

window must be a PTZ device (or speed dome).   
 

5.4.1

    Move / Stop 

The setting steps are as follow. 
1. Select a TV wall. For example: tap 

“1” and then tap “MON” to choose NO.1 TV wall. 

2. Select a window. For example: tap 

“3” and then tap “WIN” to choose NO.3 window. 

3. Select a PTZ camera. For example: tap 

“2” and then tap “CAM”, and finally tap “Send” to 

select No.2 PTZ camera. 

Содержание IPKYBA02A

Страница 1: ...IP KEYBOARD ADVANCE SERIES Please read this manual thoroughly before use and keep it for future reference...

Страница 2: ...y Touch Sound 9 3 6 System Update 9 3 7 Restore to Factory Default Settings 9 3 8 View Version Information 9 4 PTZ Mode 10 5 Platform Mode 15 5 1 Call Plan 15 5 2 Screen Display Mode 16 5 3 Camera Mon...

Страница 3: ...5 6 1 Display Connection Status 19 5 6 2 Display the Real Time Image of the Designated Window 19 6 Specifications 20...

Страница 4: ......

Страница 5: ...led such as schools hospitals hotels residential areas factories workshops etc to achieve a unified control for network PTZ cameras with onvif protocol via LAN 1 2 Features 10 1 inch capacitive touch...

Страница 6: ...4 Audio Audio input unavailable temporarily 5 USB2 0 Connector for USB mouse or USB storage device for upgrade 6 HDMI OUT Connector for a monitor used to display the image of LCD synchronized display...

Страница 7: ...etter symbol Left button control area Preset cruise scan and other functions quickly set and call Large middle screen display area 10 1 inch capacitive touch screen operation and display area Right si...

Страница 8: ...n and then tap MON on the screen select NO 1 TV Wall 1 6 Joystick and Knob Control Joystick Operation Function Up Control the speed dome to move up Down Control the speed dome to move down Left Contro...

Страница 9: ...start the keyboard Turn on the power switch 2 2 Login After the device is started it will enter the login interface as shown below The default username is admin and the default password is admin as w...

Страница 10: ...6 After that tap to confirm Then tap LOGIN to go to the main menu interface In the above interface tap Logout to exit...

Страница 11: ...that of the authentication management server of the platform Platform IP Select Platform IP to go to the following interface Fill out the IP address port username and password of the authentication ma...

Страница 12: ...gement permission Please set the user and password as needed Select the added user and tap Delete to delete this user The default admin cannot be deleted 3 3 Language Setting You can switch the UI lan...

Страница 13: ...ge device Insert the USB storage device into the keyboard Then go to System Setting System Update interface and tap System Update If the upgrade file can be recognized normally tap Install and then th...

Страница 14: ...terface tap PTZ Mode to go to the following interface Tap to extend the menu Quickly Add Devices Tap Device Management to go to the following interface Then tap Quickly Add to quickly search and add d...

Страница 15: ...er its username and password Manually Add In the device management interface tap Manually Add to appear the following interface Manually enter the IP address port username and password Then tap to sav...

Страница 16: ...the device and then tap Edit to modify the username and password of the added device tap Delete to delete the device Tap to extend the menu Then tap Live View Tap as shown in the following picture or...

Страница 17: ...ap a window to switch to single channel display mode Double tap again to switch to four screen display mode In single channel display mode you can move your finger on the screen to change the directio...

Страница 18: ...joystick to set the position of the preset press the digital number and then press SET PRE For example press 3 and SET PRE to save preset 3 To call cruise Select the PTZ camera press the digital numb...

Страница 19: ...ll NO 1 plan How to set the TV wall and the plan in the NVMS2 0 To set a TV wall Go to Home TV Wall Management TV Wall Setting interface to create a TV wall Then double click this TV wall name to brin...

Страница 20: ...ignated TV wall and window 1 Select a TV wall For example tap 1 and then tap MON to choose NO 1 TV wall 2 Select a window For example tap 3 and then tap WIN to choose NO 3 window 3 Select a camera For...

Страница 21: ...tive number of the cruise line ranges from 1 8 the effective number of track ranges from 1 4 5 4 3 Set Call or Stop Cruise To set cruise 1 Select a TV wall For example tap 1 and then tap MON to choose...

Страница 22: ...to Scan To start or stop auto scan 1 Select a TV wall For example tap 1 and then tap MON to choose NO 1 TV wall 2 Select a window For example tap 3 and then tap WIN to choose NO 3 window 3 Tap Start A...

Страница 23: ...example tap 3 and then tap WIN to choose NO 3 window 3 Select 4 and then tap Change Playback Position to play the next frame 5 5 6 Stop Playback When the record is in playing or pause mode you can st...

Страница 24: ...specified window status 6 Specifications Screen size IPS 10 1 inch screen 1280 800 capacitive touch screen Display HDMI 4K 30fps Decoding capability Max H 264 1CH 1080p 60fps 4CH 720p 30fps Max H 265...

Страница 25: ...21...

Отзывы: