background image


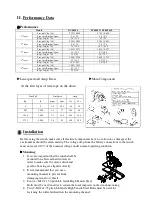
II. Performance Data 


Performance 

Model 

DV-6000S 

DV-6000L / DV-6000SL 

Line pull ( kg / lb) 

2,722 / 6,000 

2,722 / 6,000 

Line speed (mpm / fpm) 

2.0 / 6.5 

2.0 / 6.5 

1

st

 layer 

Rope cap ( m / ft) 

3.6 / 11.8 

6.7 / 22 

Line pull ( kg / lb) 

2,264 / 4,991 

2,264 / 4,991 

Line speed (mpm / fpm) 

2.4 / 7.8 

2.4 / 7.8 

2

nd

 layer 

Rope cap ( m / ft) 

7.8 / 25.6 

14.7 / 48.2 

Line pull ( kg / lb) 

1,938 / 4,273 

1,938 / 4,273 

Line speed (mpm / fpm) 

3.1 / 10.1 

3.1 / 10.1 

3

rd

 layer 

Rope cap ( m / ft) 

12.8 / 42 

24 / 78.7 

Line pull ( kg / lb) 

1,694 / 3,735 

1,694 / 3,735 

Line speed (mpm / fpm) 

3.7 / 12.1 

3.7 / 12.1 

4

th

 layer 

Rope cap ( m / ft) 

18.5 / 60.7 

30 / 100 

Line pull ( kg / lb) 

1,505 / 3,318 

Line speed (mpm / fpm) 

4.2 / 13.7 

5

th 

layer 

Rope cap ( m / ft) 

24.4 / 80 


Line speed and Amp. Draw                                       

Main Components 

At the first layer of wire rope on the drum     

. Installation 

Before using the winch, make sure all electrical components have no corrosion or damaged; the   
environment should be clean and dry. The voltage drop from the battery connections to the winch 
must not exceed 10% of the nominal voltage under normal operating condition.


Mounting 

1.


It is very important that the winch shall be   

  mounted on a flat and hard surface in 

order to make sure the motor, drum and 
gearbox housing are aligned correctly. 

2.


It is recommended that you use a 

mounting channel to prevent from 

damaging winch or vehicle.                                                             


3.


Four (4) M10 x 1.50 pitch 8.8 Grade High Tensile Steel   
Bolts must be used in order to sustain the loads imposed on the winch mounting.   

4.


Two(2) M12x1.75 pitch 8.8 Grade High Tensile Steel Bolts must be used for   
fastening the roller fairlead into the mounting channel. 


Line Pull 

Line Speed 

Amp 

Kg 

lb 

mpm 

fpm 

12v 

24v 

8.0 

26.2 

60 

35 

907 

2,000 

5.2 

17 

150 

90 

1,814 

4,000 

3.1 

10.2 

240 

140 

2,722 

6,000 

2.0 

6.5 

300 

200 

Содержание DV-6000L

Страница 1: ......

Страница 2: ...ion without load before winching operation Make sure the wire rope is wound evenly on the first layer on the drum rewind it if not evenly wound 1 The winch is rated for intermittent periodic duty 2 The winch is not to be used to lift support or otherwise transport personnel 3 A minimum of five 5 wraps of rope around the drum are necessary to support the rated load 4 When choosing the right winch y...

Страница 3: ...o applicable laws and ordinances Do not use the winch as a lifting device or a hoist for vertical lifting Fig1 Do not use winch to move people Do not exceed maximum line pull ratings shown in tables Shock load must not exceed these ratings Keep hands clear of wire rope and fairlead opening Pull from an angle below 15 to straighten up the vehicle or load Fig2 Use leather gloves or a heavy rag when ...

Страница 4: ...re using the winch make sure all electrical components have no corrosion or damaged the environment should be clean and dry The voltage drop from the battery connections to the winch must not exceed 10 of the nominal voltage under normal operating condition Mounting 1 It is very important that the winch shall be mounted on a flat and hard surface in order to make sure the motor drum and gearbox ho...

Страница 5: ...termittent periodic If the winch fails to pull a load under normal conditions stop the operation within 30 seconds otherwise motor damage may be occurred Ensure that the winch is connected to the correct voltage 12V DC or 24V DC only Check that the freespool knob is in the Engaged position during and after use Remove the switch from the winch when not in use Do not wrap the wire rope around the lo...

Страница 6: ...before winching 1 To disengage the freespool lift the freespool knob up and turn it at 90 clockwise rotation to the Disengaged position wire rope can now be freespooled off the drum 2 To engage the freespool lift the freespool knob up and turn it at 90 counter clockwise rotation to the Engaged position 3 If a freespool knob can t be properly locked in the Engaged position rotate the drum to make t...

Страница 7: ...ning pass below the drum and insert it into the hole on the drum core Fig7 4 Tighten the screw downwards to secure the wire rope Fig7 Engaged Disengaged Fig 6 Fig 7 Brake adjustment Over time the load holding brake in your winch will wear Should you find the load beginning to slip adjustments can be made to the brake mechanism as follows 1 Loosen the 3 retaining bolts and remove the brake cover 2 ...

Страница 8: ...ecking method Checking reference Installation Mounting bolts alignment Bolt tension wear Existence of abnormalities Working Manual Reasonable actuation Remote control Wearing in contact points Visual Free of wear or damage Broken strands Visual measuring Less than 10 Decrease in rope diameter Visual measuring 7 of nominal diameter max Deforming or corrosion Visual Existence of abnormalities Wire r...

Страница 9: ...ed 1st shaft Replace 1st shaft Damaged brake cam and disc Replace brake cam and disc Drum will not freely spool Damaged output shaft Replace output shaft Damaged brake cam and disc Replace brake cam and disc Damaged gear box Replace gear box Dropt retaining ring Replace retaining ring Oil leakage at brake Clean oil leakage No brake Damaged or inoperative spiral spring Replace and position spiral s...

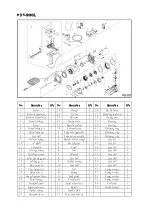
Страница 10: ... switch socket 1 45 Hex nut 2 10 1st shaft 1 3 Socket gland 1 46 Hex bolt 1 11 1st pinion 1 4 Cross screw 2 47 Hex bolt 4 12 1st stage carrier 1 5 Nut 2 48 Hex bolt 2 13 2nd stage carrier 1 6 Solenoid ass y 1 49 Hex bolt 1 14 1st 2nd ring gear 1 7 Cross screw 4 50 Hex bolt 9 15 3rd ring gear 1 8 Lower solenoid plate 1 51 Hex bolt 3 16 Brake cam B 1 9 Hex bolt 3 52 Spring washer 1 17 Cone brake dis...

Страница 11: ...2 8 Hex bolt 2 2 Solenoid lower plate 1 43 Retaining ring 1 9 Motor coupling 1 3 Remote switch socket 1 44 Hex nut 1 10 1st shaft 1 4 Socket gland 1 45 Hex nut 2 11 1st pinion 1 5 Screw 2 46 Hex bolt 1 12 1st stage carrier 1 6 Nut 2 47 Hex bolt 4 13 2nd stage carrier 1 7 Solenoid 1 48 Hex bolt 2 14 1st 2nd ring gear 1 8 Hex bolt 5 49 Hex bolt 1 15 3rd ring gear 1 9 Toothed washer 5 50 Hex bolt 9 1...

Страница 12: ...ons Any Winch which is defective will be repaired or replaced without charge to the Purchaser Upon discovering any defect the Purchaser under this Limited Warranty is requested to return the complete winch and inform the seller or their authorised distributors of any claims The Purchaser must provide a copy of the proof of purchase bearing the winch serial number date of purchase owners name and a...

Отзывы: