


CBR2 CGA4332COM- User Guide
49
of
51
8 Support
This chapter suggests solutions for issues that you may encounter while installing, configuring, or using your
Gateway. If the suggestions provided here do not resolve the problem, look at the support pages on
www.technicolor.com
or contact your service provider.
Topics
This chapter contains the following topics:
Topic
Page
8.1 Wireless Connection Troubleshooting
8.2 Network Diagnostic Tools
8.3 Gateway Reset and Restore Options
8.1 Wireless Connection Troubleshooting
No wireless connectivity
Try the following:
Make sure that the wireless client is enabled (message like “radio on”).
Make sure that the wireless client is configured with the correct wireless settings (Network Name, security
settings).
If the signal is low or not available, try to reposition the Gateway.
Make sure that the wireless client supports the wireless band, protocol, and the selected wireless
security that are currently used by the access point.
Change the wireless channel.
Make sure that the access point is enabled.
For more information, see
“Make sure that the wireless access point is enabled”
Poor wireless connectivity or range
Try the following:
Check the signal strength, indicated by the wireless client manager. If the signal is low, try to reposition
the Gateway.
If you are connected to the 5 GHz access point, try connecting to the 2.4 GHz access point instead.
Change the wireless channel.
Use
WPAWPA2-PSK (TKIP/AES)
as encryption.
For more information, see
“5.2 How to configure the wireless settings”
Make sure that the wireless access point is enabled
Proceed as follows:
1. Go to the Admin Tool (http://10.1.10.1), using a computer or device that is currently connected to your
Gateway (either wired or wirelessly). For more information, see
2. Under
Gateway
, click
Connection
and then click
WiFi
.
3. The
WiFi
page appears. Click
EDIT
next to the access point that you want to modify.
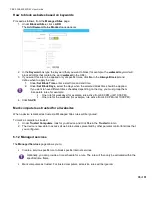
4. The
Edit
page appears.


