


CBR2 CGA4332COM- User Guide
42
of
51
In the
Service Type
list, select the protocol that is used by the service.
In the
Starting Port
box, type the start port number of the port range.
In the
End port
box, type the last port number of the port range. If you only want to specify one
port, use the same number as in the
Starting Port
box.
7. In the
Server IPv4 Address
box, type the IP address of the computer to which you want to assign
the service.
8. In the
Server IPv6 Address
box, type the IP address of the computer to which you want to assign
the service.
9. If you don’t want to type in the IP address boxes, then click the
Connected Device
tab, select the IP
address of the computer to which you want to assign the service, and click
Add
.
10. Click
SAVE
.
Your service is now listed in the Port Forwarding table. All incoming requests for the selected service will
now be directed to the selected device. The Gateway also automatically configures its firewall to allow this
service.
7.1.3. Port Triggering
Port triggering allows you to define a set of dynamic port-forwarding rules that will be activated as soon as a
device sends traffic to the Internet over a specific port(s), the
trigger port(s)
.
The difference from the port forwarding function described in
is:
Port triggering rules will only be activated if a local device is sending traffic over one of the trigger ports.
There must be outbound traffic first.
Port triggering rules forward traffic to any device that has initiated communication while port
forwarding only forwards to a specific fixed IP.
Port triggering rules allow you to translate the port numbers. Thus the incoming port can differ from the
target port.
Procedure
1. Go to the Admin Tool (http://10.1.10.1), using a computer or other device that is currently connected
to your Gateway (either wired or wirelessly). For more information, see
2. On the
Advanced
menu, select
Port Triggering
.
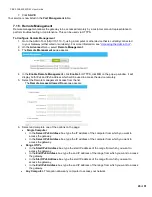
3. The
Port Triggering
page appears.


