background image

20

www.colormetric.net

Color

metrics Vion

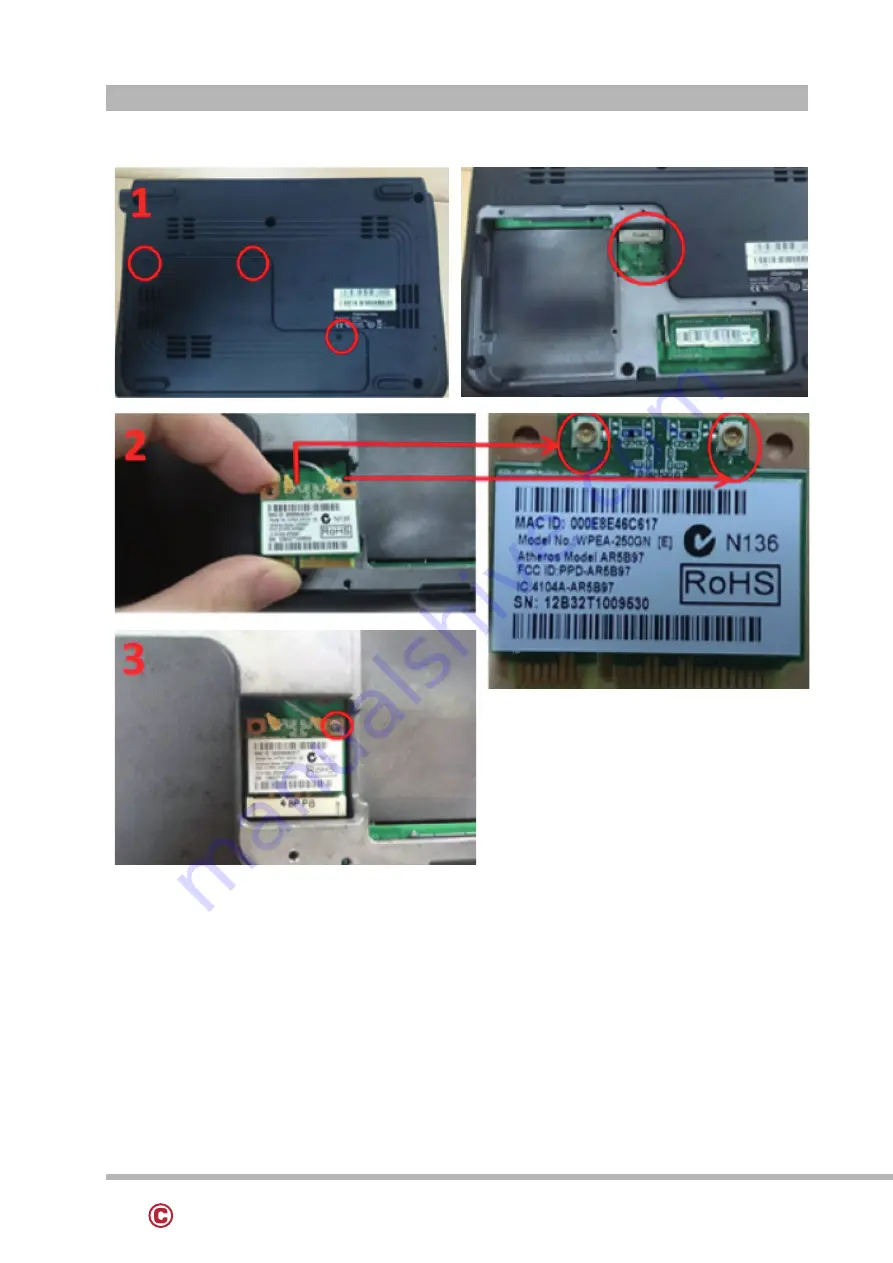
5-6. Wi-Fi

1. Unscrew 3 screws and remove the base cover
2. Connect 2 antennas on Wi-Fi module.( Notice: The antenna in black should be connected on position
  1 of WI-FI module, and antenna in gray should be connected on position 2 of WI-FI module)
3. Put Wi-Fi module into socket with 1 screw

Содержание Vion

Страница 1: ...Errors excepted subject to change www colormetric net Vion User Manual Version 1 0...

Страница 2: ...ission of the publisher All products and trade names described within are mentioned for identification purpose only No affiliation with or endorsement of the manufacturer is made or implied Product na...

Страница 3: ...his could cause fire or electrical shock 9 If one of the following situations arises get the equipment checked by a service personnel a The power cord or plug is damaged b Liquid has penetrated into t...

Страница 4: ...uraged to try to correct the interference by one or more of the following measures Reorient or relocate the receiving antenna Increase the separation between the equipment and receiver Connect the equ...

Страница 5: ...4 REAR I O INTERFACE 13 5 SYSTEM ASSEMBLY DISASSEMBLY 15 5 1 HDD 15 5 2 Memory 16 5 3 MSR 17 5 4 VFD 18 5 5 8 2nd Monitor 19 5 6 Wi Fi 20 5 7 Parallel cable 21 6 DEVICE DRIVER INSTALLATION 22 6 1 Res...

Страница 6: ...1 PACKING LIST a System with stand b Power Adapter c Power Cord d Driver Bank MSR side Barcodescanner 1D 2D front 2x20 customer display 8 customer display 10 customer display 15 customer display MSR...

Страница 7: ...ww colormetric net Colormetrics Vion 2 SYSTEM VIEW 2 1 Rear View 2 2 Side View 2 3 Front View 2 4 Back View 2 5 Bottom View Please make sure 19V DC plug in the right direction before plugging in DC ja...

Страница 8: ...eron J1900 Quad Core 2 0Ghz One SO DIMM socket supports DDR3L up to 8GB 2 5 SATAII HDD SSD Line out Mic in RJ45 10 100 1000 Base T 4x USB 2 0 1x USB 3 0 2x DB9 2x RJ45 Insyde UEFI BIOS AC 19V 60W Adap...

Страница 9: ...9 www colormetric net Colormetrics Vion 2 7 Internal Layout...

Страница 10: ...on Put the finger on the pad for 0 5 second and slide your finger from left to right 4 Power off Put the finger on the pad for 0 5 second and slide your finger from right to left 3 Shut down Put two f...

Страница 11: ...DP 22 BL Enable 8 GND 23 BL PWM DIM 9 DDI1 AUX DP 24 NC 10 DDI1 AUX DN 25 NC 11 GND 26 12V 12 LCD VCC 27 12V 13 LCD VCC 28 12V 14 LCD Self Test 29 12V 15 GND 30 NC Pin NO Definition Pin NO Definition...

Страница 12: ...inition 1 V5S 20 SLCT 2 V5S 21 PD6 3 V5S 22 GND 4 V5S 23 PD7 5 GND 24 GND 6 GND 25 ACK 7 STB 26 GND 8 AFD 27 GND 9 PD0 28 DSR 3 10 ERR 29 DCD 3 11 PD1 30 RTS 3 12 INIT 31 SIN3 13 PD2 32 CTS 3 14 SLIN...

Страница 13: ...1 5V 12V 2 DSR 3 GND 4 DTR 5 RST 6 CTS 7 TxD 8 RxD 4 REAR I O INTERFACE Jumper for COM4 Voltage Setting NOTICE COM 4 port Warning COM4 RJ45 Connector for external VFD use only Never use on network dev...

Страница 14: ...1 Frame GND 2 Drawer Kick out drive signal 1 Output 3 Cash Drawer Status Input 4 12V 5 N C 6 Signal GND Pin NO Signal Name 1 Ground 2 Ground 3 Ground 4 DC IN 19V 5 Ground 6 Ground Example DOS COMMAND...

Страница 15: ...15 www colormetric net Colormetrics Vion 5 SYSTEM ASSEMBLY DISASSEMBLY 5 1 HDD 1 Unscrew 3 screws and remove the base cover 2 Fasten HDD on HDD bracket with 4 screws 3 Install HDD with 2 screws...

Страница 16: ...16 www colormetric net Colormetrics Vion 5 2 Memory 1 Unscrew 3 screws and remove the base cover 2 Put the memory into socket...

Страница 17: ...17 www colormetric net Colormetrics Vion 5 3 MSR 1 Remove MSR cover 2 Install MSR holder with 2 screws 3 Plug MSR cable 4 Install MSR with 2 screws...

Страница 18: ...colormetric net Colormetrics Vion 5 4 VFD 1 Remove the Top cover 2 Plug VFD cable 3 Install VFD with 2 screws 4 Cover the Top cover with Hinge hole Alternative of external COM4 RJ45 Connector or Inter...

Страница 19: ...19 www colormetric net Colormetrics Vion 5 5 8 2nd Display 1 Remove the Top cover 2 Plug 8 2nd display cable 3 Install 8 2nd display with 2 screws 4 Cover the Top cover with Hinge hole...

Страница 20: ...screws and remove the base cover 2 Connect 2 antennas on Wi Fi module Notice The antenna in black should be connected on position 1 of WI FI module and antenna in gray should be connected on position...

Страница 21: ...21 www colormetric net Colormetrics Vion 5 7 Parallel cable Please ensure error proofing pin is on the upside position of the connector before plugging in...

Страница 22: ...22 www colormetric net Colormetrics Vion 6 DEVICE DRIVER INSTALLATION 6 1 Resistive Type Touch Panel and P CAP 1 Click Next 2 Click Next...

Страница 23: ...23 www colormetric net Colormetrics Vion 3 Click Next 4 Select None Click Next 5 Click OK...

Страница 24: ...24 www colormetric net Colormetrics Vion 6 Select Support Multi Monitor System Click Next 7 Click Next...

Страница 25: ...25 www colormetric net Colormetrics Vion 9 Click Next 8 Click Next...

Страница 26: ...26 www colormetric net Colormetrics Vion 10 Select Create a eGalaxTouch Utility shortcut on desktop Click Next...

Страница 27: ...27 www colormetric net Colormetrics Vion 11 Would you do 4 point calibration now Click Yes 12 Do 4 points aligrment to match display 13 Calibration utility...

Страница 28: ...ide you how to install the Utility program Insert the setup CD Run the 80066804 006_Magswipe_Configuration_Software_V2_1_A setup file that is located in the Software folder of CD Follow the wizard to...

Страница 29: ...should be connected Select the corresponding connected reader interface and click the Continue button After the interface selection is made click the Continue button The utility attempts to communicat...

Страница 30: ...er selecting the appropriate interface for the reader select one of the Home Menu Page buttons to proceed with the Magnetic Stripe Reader MSR configuration process The Basic Reader Settings group defi...

Страница 31: ...Select this command start a File Open dialog which allows selection of the file Save To File The configuration data can be saved as a file and being used later to configure other readers When saving a...

Страница 32: ...e bi directional operation the user can swipe the card in both swipe directions and the data encoded on the magnetic stripe will be output In the single swipe direction selections the card can only be...

Страница 33: ...een sending successive characters Some terminals or computers host require an inter character delay to simulate the effects of keystroke delays Choosing a longer inter character delay causes the chara...

Страница 34: ...le can be added only after a terminator character if specified Track Prefix and Suffix For some Host applications it may be convenient to start or end a string of reader data with a Sentinel or termin...

Страница 35: ...is option allows the user to select the character to be used to separate data decoded by a multi ple track reader The default value is CR Send Start End Sentinel The reader can send the Start End sent...

Страница 36: ...an Italian Spanish Mexico German French Japanese UK and Universal Universal language sends out all the data as a series of ALT keypad sequence Function Key Output The function key output be used to su...

Страница 37: ...FID 1 Install driver 1 1 Check the Device Manager to verify the status of RFID reader Computer Management Device Manager Other devices The device will show a question mark if the installation is not d...

Страница 38: ...38 www colormetric net Colormetrics Vion 1 3 Select Browse my computer for driver software 1 4 Click Browse to select file called HFF320U Driver FTD x64 1 5 Install the driver...

Страница 39: ...39 www colormetric net Colormetrics Vion 1 6 Install complete and then click close 1 7 Restart the computer...

Страница 40: ...40 www colormetric net Colormetrics Vion 2 Install framework 4 0 2 1 Double click to install 2 2 Select I have read and accept the license terms And click Install...

Страница 41: ...re 3 1 The demonstration software is MP Studio exe provided in the folder Demo Software There is no software setup required just double click the MP Studio exe The demonstration software can run eithe...

Страница 42: ...42 www colormetric net Colormetrics Vion 3 2 Following steps as shown in below picture demonstration a simple usage in reading UID of ISO14443A card for quick understanding...

Страница 43: ...Button Reader Installation Below steps guide you how to install the Utility program Insert the setup CD Run the I Button Utility exe setup file that is located in the Software folder of CD Follow the...

Страница 44: ...44 www colormetric net Colormetrics Vion...

Страница 45: ...45 www colormetric net Colormetrics Vion...

Страница 46: ...e and IButton module The utility program will detect the connected reader If detected all the input text boxes will be enabled If the reader has not been connected to PC yet please connect the reader...

Страница 47: ...S Length i Button ID length request from 0 16 Output order 4 formats could be select at Attach Remove i Button ID iButton 64 Bit Registration Number 8 Bit CRC 48 Bit ID 8 Bit FC DEMO SETUP OUTPUT OUTP...

Страница 48: ...www colormetric net Colormetrics Vion 6 5 VFD VD1220 1 Power on VFD and waiting test page of EEPROM test Baud rate and Command page Set up the customer display by VFDset exe 2 Setup VFDset exe softwa...

Страница 49: ...tton to get all the settings from Colormetrics and it ll refresh the VFDset exe software 5 Select Character Type Command Mode Baud Rate Select pass through Mode 1 2 3 Please then follow the steps as s...

Страница 50: ...NICE DAY AND THANK YOU 7 Welcome Message Welcome Message line1 maximum 20 characters line 2 maximum 20 characters total of 40 characters a ASCII mode b Hex mode Hex mode can define the character from...

Страница 51: ...ownload the setting from VFDset exe to VFD module After success dialog Download O K Please restart message popped up Please restart display for enable new setting 9 Click Save button To save user s se...

Страница 52: ...52 www colormetric net Colormetrics Vion 10 Click Load button After saving you must restart the utility here Then load your setting rename GOODLUCK vfd...

Страница 53: ...information Date and Time The Date and Time items show the current date and time on the computer If you are running a Windows OS these items are automatically updated whenever you make changes to the...

Страница 54: ...Colormetrics Vion 7 1 Advanced 7 1 1 Boot Configuration Use the Advanced menu to configure the system for basic operation through the following sub menus Use the Boot Configuration menu to select powe...

Страница 55: ...Configuration Use the Audio Configuration menu to read Audio configuration information and configure the Audio settings 7 1 3 Video Configuration Use the Video Configuration menu to read Video config...

Страница 56: ...net Colormetrics Vion 7 1 4 SATA Configuration Use the SATA Configuration menu to read SATA configuration information and configure the SATA settings 7 2 Security Use the Security menu to install or c...

Страница 57: ...er AC power restored When enabled System will wake on the hr min sec specified Wake on LAN Enable or disable system wake by onboard LAN chip Power button delay 4s This item allows you to enable or dis...

Страница 58: ...net Colormetrics Vion 7 4 Boot 7 5 Exit Use the Boot menu to select type to Dual type Legacy type or UEFI type Use the Save Exit menu to load default BIOS values optimal failsafe values and to save co...

Страница 59: ...d to clean an LCD screen A soft cotton cloth When cleaning the LCD screen it is important to use a soft cotton cloth rather than an old rag Some materials such as paper towels could cause scratches an...

Отзывы: