Cognionics Quick-20 Скачать руководство пользователя страница 23

5.

Pr epar ing t he Headset

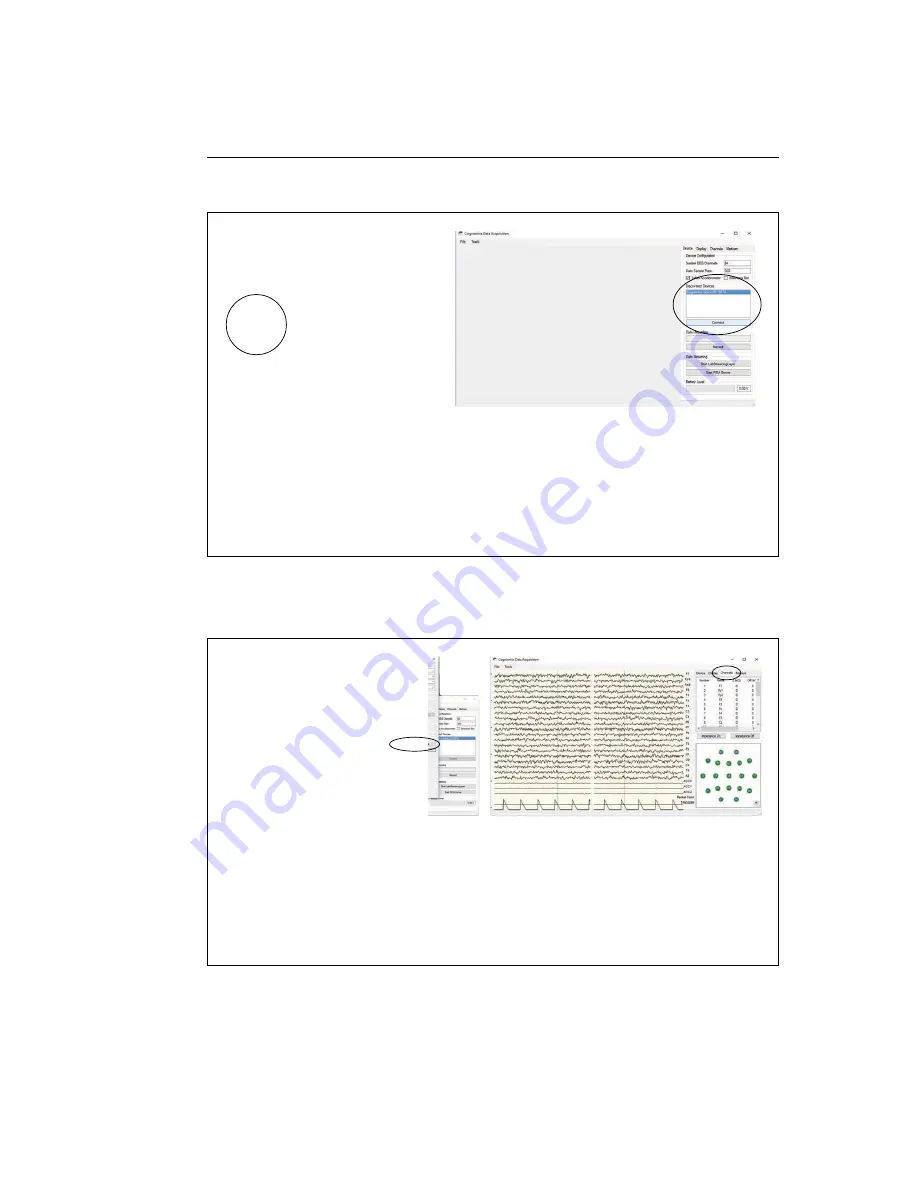
Double click on the icon for the Cognionics Data Acquisition Software. You
should see your Quick-20 under

Discovered Devices

. If you do not, please

remove and re-insert the dongle, then restart the software. Select your

Quick-20 and click on the

Connect

button. You should see a small pop-up

window asking if you wish to auto-configure. Click

Yes

. If you do not see

the pop-up, check beneath the main window of the software.

You should now see the device configuration window momentarily. If you do

not, double check to make sure the headset is powered on. Leave the

settings to their default value. Click

Write to Device and Start

. You will

now see data streaming into the display. Click the

Channels

tab on the

top right hand side of the program. This will bring you to the impedance

check. You are now ready to apply the headset on a subject.

22

Содержание Quick-20

Страница 1: ...QUICK 20 DRY EEG HEADSET USER GUIDE Cognionics Inc 8445 Camino Santa Fe Suite 205 San Diego CA 92121...

Страница 2: ...3 2 Sensor Layout 13 3 3 Specifications 14 4 Care and Handling 15 5 Preparing the Headset 17 5 1 Inserting the Battery 17 5 2 Installing the Sensors 19 5 3 Starting the Acquisition Software 20 6 Apply...

Страница 3: ...7 2 Using the SD Card 33 8 Removal Cleaning and Storage 35 8 1 Removing the Headset 35 8 2 Cleaning the Headset 35 8 3 Removing and Cleaning the Sensors 36 8 4 Storage 37 9 Troubleshooting 39 9 1 Rese...

Страница 4: ...is organized as a detailed step by step guide on setting up and using the device Please read through the entire manual first to familiarize yourself with the operation of your headset before proceedin...

Страница 5: ......

Страница 6: ...h speed reciever dongle which plugs into your computer s USB port 3 Flex Sensor flexible dry electrode for use over hair 4 Drypad Sensor Flat dry electrode for use over areas with light or no hair 5 E...

Страница 7: ...brush Depending on your specific configuration you may have also received ad ditional components such as our Wireless Trigger or Auxiliary Input Module Please refer to their specific manuals for deta...

Страница 8: ...Headset Bluetooth Dongle Purell Hand Sanitizer Drypad Sensors Rechargeable Li ion Batteries with Charger Ear Clip Wire Flex Sensors Electric Brush microSD card with Adapter Standard Quick 20 Kit Comp...

Страница 9: ......

Страница 10: ...he power button until the main power LED flashes blue 2 Battery Compartment The Quick 20 contains two battery compart ments The Lithium ion rechargeable batteries can be hot swapped during use 3 Power...

Страница 11: ...a port for attaching an Auxil iary Input Module for external sensors The port can also be used with the wired data dongle Do not connect the Quick 20 to a standard USB port 9 microSD Card Slot The Qu...

Страница 12: ...r Button Power LED Green On Red Blink 20 battery life Red 10 battery life microSD Slot Connector for the Auxiliary Input Module or Wired Data Dongle Trigger Status LED Blue Dim Trigger in range Blue F...

Страница 13: ...3 About t he Quick 20 Power Button Battery Cover Flexible Leg Sensor Pod Sensor Connector Ear Pad Ear Clip Connector 12...

Страница 14: ...Fp2 positions Note some headsets have custom layouts If so refer to your order for specifics Always ensure that reference and ground are physically touching the skin The impedance check and all of the...

Страница 15: ...ling Sampling Rate 500 and 1 000 samples sec Impedance Monitoring Real time with EEG acquisition Noise 0 7 V RMS from 1 50 Hz shorted inputs Wireless Custom high speed Bluetooth Power Lithium ion 8 hr...

Страница 16: ...20 is designed to work only with Cognionics accessories which provide electrical isolation to protect the headset and subject from electrical shock Directly connecting the Quick 20 to a PC without the...

Страница 17: ...sion may cause the headset to deform If the legs of the headset become compressed the system may become tight and uncomfortable for the subject Do not pull on the ear clip wire When removing the ear c...

Страница 18: ...ries into the charger and wait until the charger indicates that the battery is full The Quick 20 features dual hot swappable batteries on each earpad The device will function with a battery in either...

Страница 19: ...adset a b a Open the battery cover b Insert one lithium ion battery Make sure that the battery is inserted in the correct orientation The metal contacts on the battery should be oriented towards the t...

Страница 20: ...sor and b push down on the center of the sensor into the receptacle For areas with light or no hair insert drypad sensors When inserting sensors always push at the center of the sensor For flex sensor...

Страница 21: ...r clip to expose the snap connector and b insert a drypad sensor if one is not already installed b a a Grab the connector end of the ear clip wire b Firmly insert the connector into the jacks at the b...

Страница 22: ...hat you are using the Cognionics Data Acqui sition software If you are using Neuroguide please refer to the Neuroguide documentation http www appliedneuroscience com Tutorials htm to con nect to the Q...

Страница 23: ...f you wish to auto configure Click Yes If you do not see the pop up check beneath the main window of the software You should now see the device configuration window momentarily If you do not double ch...

Страница 24: ...you first practice on another subject to familiarize yourself with the procedure If you are attempting to self apply the system please have a mirror handy to help with the process Always double check...

Страница 25: ...Grasp each ear band and pull them gently apart to open the Quick 20 and slide the system on to the subject s head Adjust the position of the headset so that the ear cups fit around the subject s ears...

Страница 26: ...tilted Grasp and rotate the pod so that the sensor is normal to the subject s head a b c a Push the Quick 20 fully onto the subject s head such that the crown Cz is touching the subject s head b Some...

Страница 27: ...a b a Lift the ear cup to access the ear lobe and pinch open the ear clip b Place the ear clip on the earlobe of the subject If the subject s earlobe is too small for the drypad you can alternatively...

Страница 28: ...on the top of the subject s head and the earcups should rest securely around the subject s ears Ensure that the Quick 20 is not tilted too far towards the back of the head Check again to see that all...

Страница 29: ...Green Marginal impedance 2 500 5 000k Dark Green Acceptable impedance 2 500k The range of impedances with dry electrodes may be much higher than what you are accustomed to when working with convention...

Страница 30: ...adjust the length of the ear bands to keep the headset and Cz in contact with the subject s head It is very important that the headset is seated properly in the correct position and that all of the le...

Страница 31: ...pod back and forth to help move the sensor through the subject s hair b Lightly press down on the pod with your finger Hold for 5 to seconds then gently remove your finger from the pod When manipulat...

Страница 32: ...ly di cult you can apply a small amount of hand sanitizing liquid to help improve contact quality a Dispense enough liquid to form a thin layer on your finger b Transfer the liquid only to the tips on...

Страница 33: ......

Страница 34: ...7 2 Using the SD Card After you havesuccessfully madeall thepositionsreach an acceptableimpedance level turn o the headset and insert the microSD card To begin your recording turn on the headset The...

Страница 35: ......

Страница 36: ...ay become entangled with the sensors Double check to see if any sensors have been caught in subject s hair 8 2 Cleaning the Headset The headset can be cleaned with the supplied brush with hand sanitiz...

Страница 37: ...cleaning or for long term storage and transport Sensors should be stored in the original padded bag or other cushioned box to prevent damage For a deeper sensor cleaning flex sensorscan berinsed in 7...

Страница 38: ...ng on a table top or on it s side resting on the earpad When transporting the headset please use the supplied carrying case However it is not recommended to leave the Quick 20 in the carrying case for...

Страница 39: ......

Страница 40: ...check to make sure that a fully charged battery is inserted in the correct orientation The Quick 20 powers on but quickly shuts o Make sure the battery is fully charge Check to see if a microSD card...

Страница 41: ...wire assembly If replacing the ear clip solves the problem then the previous one was likely defective Many channels exhibit power line noise Recheck reference and ground contacts and make sure that t...

Отзывы: