Coby Snapp CAM5002 Скачать руководство пользователя страница 8

Page 8 

Getting Started

En

gl

ish

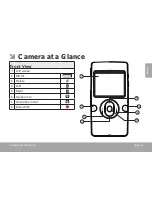
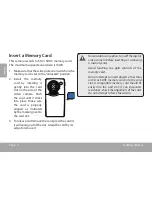
Insert a Memory Card

This camera records to SD or SDHC memory cards. 

The maximum supported card size is 16GB. 

Make sure that the write protection switch on the 

1. 

memory card is set to the “unlocked” position.
Install  the  memory 

2. 

card  by  inserting  it 

gently  into  the  card 

slot on the side of the 

video  camera.  Push 

the  card  until  it  clicks 

into  place.  Make  sure 

the  card  is  properly 

aligned  as  indicated 

by the marking next to 

the card slot.
To release and remove the card, press the card in; 

3. 

it will spring out of the slot. Grasp the card by its 

edge to remove it.

  To avoid data corruption, turn off the digital 

video camera before inserting or removing 

a memory card.


Avoid  touching  the  gold  contacts  of  the 

memory card.


Do not attempt to insert objects other than 

an SD or SDHC memory card into the card 

slot.  A  compatible  memory  card  should  fit 

easily  into  the  card  slot;  if  you  encounter 

resistance, check the alignment of the card. 

Do not attempt to force the card in.

Содержание Snapp CAM5002

Страница 1: ...AM5002 EN Snapp HD Digital Camcorder Instruction Manual Page 2 ES Snapp HD Videoc mara Digital Manual de Instrucciones Pagina 38 FR Snapp HD Cam scope Num rique Manuel D instruction Page 76 Pleaseread...

Страница 2: ...ng the Camera On Off 10 Changing Camera Modes 10 Video Mode 10 To Record Video 11 Zoom 11 Video Size 11 Photo Mode 12 To Take a Photo 12 Zoom 12 Photo Size 12 Playback Mode 13 Playback Controls 13 Del...

Страница 3: ...Table Of Contents Page 3 English Important Information 33 FCC Statement 34 Important Safety Instructions 35 Maintenance and Care 37...

Страница 4: ...This package includes CAM5002 camera A V Cable USB extension cable Lithium polymer battery Installation CD Hand strap Pouch Should any of the above items be missing please contact the dealer from whom...

Страница 5: ...Camera At A Glance Page 5 English Camera At A Glance Page 5 English Camera at a Glance Front View 1 LCD screen 2 MODE 3 Delete 4 Left 5 Right 6 Up Zoom In 7 Down Zoom Out 8 Record OK 1 2 5 6 3 4 7 8...

Страница 6: ...Plug Left View 2 A V out jack 3 Power 4 HDMI port Rear View 5 Lens 6 Microphone 7 LED light 8 Speaker 9 Battery cover Right View 10 USB plug switch 11 SD SDHC card slot Bottom View 12 Tripod mount 13...

Страница 7: ...or and 3 snap it into place The battery used in this device may present a fire or chemical hazard if mistreated Do not recharge disassemble incinerate or heat the batteries Used batteries should be di...

Страница 8: ...ard is properly aligned as indicated by the marking next to the card slot To release and remove the card press the card in 3 it will spring out of the slot Grasp the card by its edge to remove it Toav...

Страница 9: ...era Modes Your video camera includes three modes Press to toggle between them The mode icon displayed on the upper left corner of the screen indicates the current camera mode Icon Camera Mode Function...

Страница 10: ...utomatically when the memory card is full Zoom To use the camera s digital zoom function Press to zoom in Press to zoom out The magnification level is displayed on the screen Video Size The camera can...

Страница 11: ...the camera s digital zoom function Press to zoom in Press to zoom out The magnification level is displayed on the screen Photo Size The camera can record at a maximum photo size of 5 MP 2592 x 1944 T...

Страница 12: ...ess again to pause video playback Press and hold or to scan quickly through the video file Press or to zoom in or out of a photo file When a photo is enlarged press to enter Pan mode Press or to pan a...

Страница 13: ...ng Setup mode respectively To adjust the setup options Press or to select an option Press to start adjusting the selected option Press to leave setup mode Menu Item Function Drive Mode Photo only Off...

Страница 14: ...computer for transferring data USB MSC Printer Set the USB mode to connect to a printer for direct photo printing Direct photo printing requires a printer that supports Direct Print Standard DPS To l...

Страница 15: ...he small end of the HDMI cable to the 2 HDMI output connector of the camera connec tor type C Turn on the TV Set the TV s input source mode 3 to display the HDMI signal HDTV HDMI If your TV has compos...

Страница 16: ...reen will turn off Use the playback mode controls to play videos 2 or view photos on the TV If the TV source mode has been set properly you will see the camera s display on the TV screen If you need h...

Страница 17: ...side of 1 the camera Slide the switch down to release the USB plug Connect the USB plug to a USB port on the 2 computer If the camera is off turn it on Your computer 3 should automatically recognize t...

Страница 18: ...iate drivers for the camera A USB extension cable has been provided for your convenience Use this cable to connect if the only available USB ports are located on the back of your computer or if the ca...

Страница 19: ...os and video select a style and let it automatically create and sync a movie to the beat of your music The minimum system requirements for this soft ware are A computer running Windows 7 Windows Vista...

Страница 20: ...utoProducer 6 1 Basic Load the included software CD into your computer s optical DVD CD ROM drive When the AutoPlay window appears click Open folder to view files Note If an AutoPlay window does not a...

Страница 21: ...Using The Included Software Page 21 English Double click the folder muvee to view its contents then double click the folder Installer to view its con tents CAM5002 IB CAM5002 CAM5002...

Страница 22: ...Page 22 Using The Included Software English Double click the file setup to start the installer CAM5002...

Страница 23: ...Using The Included Software Page 23 English Follow the on screen instructions to install muvee autoProducer Restart your computer to complete the installation...

Страница 24: ...plicity to the task To learn more about muvee autoProducer press the F1 key on your keyboard to view the Help files or select Help from the menu bar ThehelpdocumentationreferstothefullversionofautoPro...

Страница 25: ...e Start the program 1 From your computer s Start menu click All Programs muvee muvee autoProducer 6 1 Home movies made easy Turn on the CAM5002 and connect it to your 2 computer Add videos and photos...

Страница 26: ...Page 26 Using The Included Software English Click From My Camera Device b Use the drop down menu to choose the c CAM5002 The SD card will appear as a removable drive Click OK d...

Страница 27: ...Included Software Page 27 English To add a soundtrack to the project click the 4 music icon Click on a style to choose a visual style for this 5 project Click the make muvee icon to finish creating 6...

Страница 28: ...Software English To save and share your finished muvee click 7 the muveeShare icon To upload videos to YouTube you must have a valid YouTube account To sign up for a free account please visit http www...

Страница 29: ...hite Balance Auto Exposure Auto Memory 32 MB Removable Memory Support SD SDHC up to 16GB Video Format AVI Motion JPEG Photo Format JPEG A V Output Mini HDMI 720p 2 5mm Composite Video Mono 480i PC Con...

Страница 30: ...com for Frequently Asked Questions FAQ and firmware updates If these resources do not resolve the problem please contact Technical Support Address COBY Electronics Technical Support 150 Knowlton Way S...

Страница 31: ...ure that you are using an SD or SDHC memory card 16GB or less in size The memory card format may not be sup ported Make sure that you are using a FAT formatted card Image is blurry or out of focus Blu...

Страница 32: ...the user to the presence of important operation and servicing instructions in the literature accompanying the appliance For Customer Use Enter below the serial number that is located on the rear of th...

Страница 33: ...o radio communications However there is no guarantee that interference will not occur in a particular installation If this equipment does cause harmful interference to radio or television reception wh...

Страница 34: ...hen sink laundry tub in wet basements or near a swimming pool and the like Ventilation Slots and openings in the cabinet are pro 8 vided for ventilation to ensure reliable operation of the product and...

Страница 35: ...he operating instructions Adjust only those controls that are covered by the operating instructions as improper adjustment of other controls may result in damage and will often require extensive work...

Страница 36: ...ng lenses optical devices If necessary use lens cleaner ONLY Never use organic solvents to clean the camera When storing the camera for a long period of 5 time remove the battery and keep the camera i...

Страница 37: ...Important Information Page 37 English...

Страница 38: ...Carga de la Bater a 43 Instalaci n de la Tarjeta de Memoria 44 Utilizaci n de la C mara 45 Encendido Apagado de la C mara 45 Cambio de los Modos de la C mara 45 Modo Video 45 Para Grabar Videos 46 Zo...

Страница 39: ...nstalaci n de muvee autoProducer 58 Uso de muvee autoProducer 62 Realizaci n de un muvee 63 Especificaciones 67 Soluci n de Problemas y Soporte 68 Informaci n Importante 70 Declaraci n de la FCC 71 In...

Страница 40: ...ura Este paquete incluye Una c mara CAM5002 Un cable A V Un cable de extensi n USB Bater a recargable Un CD de instalaci n Una correa para mano desmontable Un estuche Si faltara cualquiera de los elem...

Страница 41: ...Panorama De La C mara Page 41 Espa ol Panorama de la C mara Vista Frontal 1 Pantalla LCD 2 Modo 3 Borrar 4 Izquierda 5 Derecha 6 Arriba 7 Abajo 8 Grabar Aceptar 1 2 5 6 3 4 7 8...

Страница 42: ...V 3 Alimentaci n 4 Puerto HDMI Vista Posterior 5 Lente 6 Micr fono 7 Luz de iluminaci n LED 8 Altavoz 9 Tapa de la bater a Vista Lateral Derecha 10 Interruptor del enchufe USB 11 Ranura para tarjetas...

Страница 43: ...metal deben estar orientados hacia la izquierda Vuelva a colocar la tapa del compartimiento de 3 bater as hasta que encaje en su sitio La bater a utilizada en este dispositivo puede producir incendios...

Страница 44: ...one la tarjeta hasta que escuche un clic Aseg rese de que la tarjeta se encuentre apro piadamente alineada de la manera que lo indica la marca a un lado de la ranura de tarjetas Para liberar y retirar...

Страница 45: ...odos de uso Presione el bot n modo para alternar entre ellos El icono de modo que se muestra en la esquina superior izquierda de la pantalla indica el modo de uso en el que se encuentra actualmente Ic...

Страница 46: ...andolacapacidaddelatarjetadememo ria est completa Zoom Acercar Alejar Para utilizar la funci n zoom digital acercar alejar de la c mara Presione el bot n para acercar la imagen Presione el bot n para...

Страница 47: ...funci n zoom digital acercar alejar de la c mara Presione el bot n para acercar la imagen Presione el bot n para alejar la imagen El nivel de ampliaci n se muestra en la pantalla Tama o de la Fotogra...

Страница 48: ...ucci n Presione y mantenga presionado el bot n o para realizar una b squeda r pida en el archivo de video Presione los botones o para acercar o alejar la imagen en un archivo de fotograf a Cuando aume...

Страница 49: ...Para borrar todos los archivos Presione el bot n Cuando se muestre el mensaje Delete this file Borrar este archivo presione o para seleccionar All Todo Presione el bot n para eliminar todos los archi...

Страница 50: ...iones de configuraci n est n relacionadas con el modo Video o Foto nicamente Para acceder a estas opciones espec ficas coloque la c mara en el modo Video o Foto antes de ingresar al modo Configuraci n...

Страница 51: ...ioma de la pantalla para men s y otros elementos de la interfaz Ingl s Fran c s Espa ol Elemento del Men Funci n Salida de TV NTSC ConfiguralasalidadeTVparaquesea compatibleconelest ndardeTVNTSC NTSCe...

Страница 52: ...produce un sonido cuando se presiona una tecla Formato S Reinicia la memoria interna de la c mara Esto destruir todas las fotos los videos y los datos guardados en la memoria No Cancela y regresa a la...

Страница 53: ...ipo C Encienda el televisor Configure el modo de 3 fuente de entrada del televisor para que se muestre la se al HDMI Si el televisor tiene entrada de video compuesta conectores amarillo rojo blanco Ub...

Страница 54: ...de reproducci n 2 para reproducir videos o ver fotograf as en el televisor Si el modo de fuente del televisor se ha con figurado correctamente ver la pantalla de la c mara en la pantalla del televisor...

Страница 55: ...enchufe USB Conecte el enchufe USB a un puerto USB en la 2 computadora Si la c mara se encuentra apagada enci ndala 3 La computadora debe reconocer autom ti camente la c mara de video como un disco ex...

Страница 56: ...s apropiados para la c mara Para su conveniencia la c mara incluye un cable de extensi n USB Utilice este cable para la conexi n en el caso de que los ni cos puertos USB disponibles se encuentren en l...

Страница 57: ...ilo y deje que autom ticamente cree y sintonice una pel cula al ritmo de la m sica Los requisitos m nimos del sistema para este soft ware son Una computadora con Windows 7 Windows Vista o Windows XP U...

Страница 58: ...ncluido en la unidad ptica de DVD CD ROM en la computadora Cuando la ventana de reproducci n autom tica aparezca en pantalla haga clic en Abrir car peta para ver los archivos Nota Si no aparece ningun...

Страница 59: ...Uso Del Software Incluido Page 59 Espa ol Haga doble clic en la carpeta muvee para ver su contenido luego doble clic en la carpeta Installer para ver su contenido CAM5002 IB CAM5002 CAM5002...

Страница 60: ...Page 60 Uso Del Software Incluido Espa ol Haga doble clic en el archivo setup para comenzar el proceso de insta laci n CAM5002...

Страница 61: ...Uso Del Software Incluido Page 61 Espa ol Siga las instrucciones en pantalla para instalar el controlador Reinicie la computadora para comple tar la instalaci n...

Страница 62: ...er m s sobre muvee autoProducer presione la tecla F1 en el teclado para ver los archivos de ayuda o seleccione Ayuda en la barra de men La documentaci n de ayuda se refiere a la versi n completa de au...

Страница 63: ...e la computadora haga clic en All Programs todos los programas muvee muvee autoProducer 6 1 Home movies made easy Encienda la CAM3002 y con ctela a la com 2 putadora usando el cable USB provisto Para...

Страница 64: ...o Espa ol Haga clic en From My Camera Device b Desde el dispositivo de la c mara Use el men desplegable para seleccionar c la CAM3002 La tarjeta SD en caso de estar cargada aparecer como un disco extr...

Страница 65: ...yecto haga 4 clic en el icono de m sica Haga clic en un estilo para elegir un estilo visual 5 para este proyecto Haga clic en el icono make muvee Hacer 6 muvee para finalizar la creaci n de su muvee P...

Страница 66: ...66 Uso Del Software Incluido Espa ol Para subir videos a YouTube usted debe contar con una cuenta de YouTube v lida Para inscribirse y obtener una cuenta gratuita visite http www youtube com create_ac...

Страница 67: ...tico Memoria Flash 32 MB Soporte de Memoria Extra ble SD SDHC hasta 16GB Formato de Video AVI MJPEG Formato de Foto JPEG Salida A V Mini HDMI 720p Video compuesto mono de 2 5 mm 480i Conexi n a la Com...

Страница 68: ...ntes FAQs y las actualizaciones de firmware Si estos recursos no resuelven el problema comun quese con el Soporte t cnico Address COBY Electronics Corporation Soporte t cnico 150 Knowlton Way Savannah...

Страница 69: ...arjeta de memoria SD o SDHC de tama o igual o menor a 16GB El formato de la tarjeta de memoria puede no ser compatible con la c mara Aseg rese de que se encuentre utilizando una tarjeta con formato de...

Страница 70: ...suario de la presencia de instrucciones de funcionamiento y reparaci n importantes en el material impreso que acompa a al artefacto Para uso de los clientes Ingreseacontinuaci neln merodeseriequeseenc...

Страница 71: ...erencia perjudicial para las comunicaciones de radio Sin embargo no hay ninguna garant a de que no ocurrir en una instalaci n en particular Si este equipo causa interferencia perjudicial para la recep...

Страница 72: ...8 para asegurar la correcta ventilaci n del producto y para protegerlo del recalentamiento Nunca se debe bloquear estos orificios al colocar el producto sobre una cama sof alfombra u otras superficie...

Страница 73: ...ionar da os y requerir con frecuencia un trabajo extenso por parte de un t cnico calificado para restaurar el funcio namiento normal del producto e si el producto se ha ca do o ha sufrido alg n da o f...

Страница 74: ...sa rio utilice NICAMENTE limpiador de lentes Nunca use solventes org nicos para limpiar la c mara Nunca toque el lente 4 Si piensa guardar la c mara durante un per odo 5 prolongado qu tele la bater a...

Страница 75: ...Informaci n Importante Page 75 Espa ol...

Страница 76: ...en marche arr t de la Cam ra 83 Changement des Modes de Cam ra 83 Mode Vid o 83 Pour Enregistrer une Vid o 84 Zoom 84 Taille Vid o 84 Mode Photo 85 Pour Prendre une Photo 85 Zoom 85 Taille Photo 85 M...

Страница 77: ...Table Des Mati res Page 77 Fran ais Renseignements Importants 108 D claration FCC 109 Consignes de S curit Importantes 110 Entretien et Soins 111...

Страница 78: ...M5002 Batterie rechargeable C ble A V C ble d extension USB Dragonne d tachable Pochette CD d installation Si l un des l ments ci dessus est manquant veuillez contacter le revendeur aupr s duquel vous...

Страница 79: ...La Cam ra En Un Coup D oeil Page 79 Fran ais La Cam ra en un coup d oeil Vue de Face 1 Ecran ACL 2 Mode 3 Delete Supprimer 4 Gauche 5 Droite 6 Haut 7 Bas 8 Enregistrer OK 1 2 5 6 3 4 7 8...

Страница 80: ...Prise de sortie A V 3 Alimentation 4 Port HDMI Vue Arri re 5 Objectif 6 Micro 7 Voyant LED DEL 8 Haut parleur 9 Cache du compartiment piles Vue de Droite 10 Commutateur de prise USB 11 Fente de carte...

Страница 81: ...tacts m talliques devraient faire face la gauche Remettez le couvercle du compartiment piles 3 et fixez le en place La pile utilis e dans cet appareil peut pr senter un danger d incendie ou de br lure...

Страница 82: ...ente de carte sur le c t de la cam ra vid o Poussez la carte jusqu ce qu elle s enclenche en place Assurez vous que la carte est proprement align e comme indiqu par la marquage c t de la fente de cart...

Страница 83: ...m ra vid o comprend trois modes Appuyez sur le bouton pour alterner entre ceux ci L ic ne de mode affich e sur le coin gauche sup rieur de l cran indique le mode actuel de cam ra Ic ne Mode de la Cam...

Страница 84: ...t estim di sponible est affich L enregistrement s arr tera automatique ment lorsque la carte m moire est pleine Zoom Pour utiliser la fonction de zoom num rique de la cam ra Appuyez sur pour faire un...

Страница 85: ...te m moire est affich sur le coin su p rieur droit de l cran Zoom Pour utiliser la fonction de zoom num rique de la cam ra Appuyez sur pour faire un zoom avant Appuyez sur pour faire un zoom arri re L...

Страница 86: ...r vid o est s lectionn l ic ne vi d o sera affich sur le coin inf rieur gauche de l cran Appuyez sur pour lire un fichier vid o Appuyez sur de nouveau pour mettre la lecture vid o en pause Appuyez sur...

Страница 87: ...Delete this file Supprimer ce fichier appuyez sur pour supprimer ou appuyez de nouveau sur pour annulerto Pour supprimer tous les fichiers Appuyez sur A l invitation Delete this file Supprimer ce fich...

Страница 88: ...configuration sont li es au mode Vid o ou Photo seulement Pour acc der ces options sp cifiques placez la cam ra en mode Vid o ou Photo avant d entrer en mode Configuration re spectivement Pour ajuste...

Страница 89: ...inutes Langue R gler la langue d affichage pour les menus et autres l ments d interface Anglais Fran ais Espagnol El ment du Menu Fonction Sortie TV TV Out NTSC R gler la sortie TV pour qu elle soit c...

Страница 90: ...activ Emet un son quand une touche est appuy e Format Oui R initialiselam moireinternedela cam ra Celad truiratouteslesphotos vid os etdonn esstock esdansla m moire Non Annuleretretourner l cranpr c d...

Страница 91: ...ecteur de sortie HDMI de la cam ra con necteur type C Mettez en marche la TV R glez le mode source 3 d entr e de la TV pour qu il affiche le signal HDMI Si votre t l viseur a une entr e vid o composit...

Страница 92: ...mandes de mode lecture pour 2 lire des vid os ou visualiser des photos sur le t l viseur Si le mode source de la TV est r gl propre ment vous verrez l affichage de la cam ra sur l cran du t l viseur S...

Страница 93: ...bas pour rel cher la prise USB Connectez la prise USB un port USB sur 2 l ordinateur Si votre cam ra est teinte allumez la Votre 3 ordinateur devrait automatiquement recon na tre la cam ra vid o comme...

Страница 94: ...ur la cam ra Un c ble d extension USB a t fourni pour votre commodit Utilisez ce c ble pour le branchement si les seuls ports USB disponibles sont situ s l arri re de votre ordinateur ou si la cam ra...

Страница 95: ...le cr er et synchroniser automatiquement un film au rythme de votre musique La configuration minimale requise pour ce logiciel est Un ordinateur ex cutant Windows 7 Windows Vista ou Windows XP Un ord...

Страница 96: ...D CD ROM optique de votre ordinateur Lorsque la fen tre de Lecture Automatique AutoPlay appara t cliquez sur Open folder to view files Ouvrir le dossier pour visualiser les fichiers Remarque Si une fe...

Страница 97: ...u Logiciel Inclus Page 97 Fran ais Double cliquez sur le dossier mu vee pour visualiser son contenu puis double cliquez sur le dossier Installer Installateur pour visualiser son contenu CAM5002 IB CAM...

Страница 98: ...Page 98 Utilisation Du Logiciel Inclus Fran ais Double cliquez sur le fichier setup pour lancer l installateur CAM5002...

Страница 99: ...Utilisation Du Logiciel Inclus Page 99 Fran ais Suivez les instructions de l cran pour installer le lecteur Red marrez votre ordinateur pour terminer l installation...

Страница 100: ...sur muvee autoProducer appuyez sur la touche F1 de votre clavier pour visualiser les fichiers d aide ou s lectionnez Help Aide partir de la barre de menu La documentation d aide fait r f rence la vers...

Страница 101: ...r cliquez sur All Programs Tous les Programmes muvee muvee autoProducer 6 1 Home movies made easy Films maison cr s facilement Allumez le CAM5002 et connectez le votre 2 ordinateur en utilisant le c b...

Страница 102: ...iciel Inclus Fran ais Cliquez sur From My Camera Device A b Partir De Mon Dispositif Cam ra Utilisez le menu d roulant pour choisir le c CAM5002 La carte SD si charg e appara tra en tant que un disque...

Страница 103: ...Fran ais Pour ajouter une bande sonore au projet 4 cliquez sur l ic ne de musique Cliquez sur un style pour choisir un style visuel 5 pour ce projet Cliquez sur l ic ne make muvee cr er muvee 6 pour t...

Страница 104: ...der et partager vos muvees films 7 termin s cliquez sur l ic ne muveeShare Part age de muvee Pour t l verser des vid os sur YouTube vous devez avoir un compte YouTube valide Pour vous abonner un compt...

Страница 105: ...xposition Auto M moire Flash 32 Mo Support M moire Amovible SD SDHC jusqu 16 Go Format Vid o AVI MJPEG Format Photo JPEG Sortie A V Mini HDMI 720p Mini vid o composite mono 480i Connexion PC USB 2 0 H...

Страница 106: ...et des mises jour micro programmes Si ces ressources ne vous aident pas r soudre le probl me veuillez contacter le service d assistance technique Address COBY Electronics Corporation Tech Support Ass...

Страница 107: ...ire SD ou SDHC de taille 16 Go ou inf rieur Le format de carte m moire peut ne pas tre pris en charge Assurez vous que vous utilisez une carte format e FAT L image est floue Des images ou des vid os f...

Страница 108: ...urniesdansla documentationquiaccompagneleproduit Information client Notez ci apr s le num ro de s rie situ sur l appareil Conservez ces informations pour pouvoir vous y r f rer ult rieurement Num ro d...

Страница 109: ...ourrait causer des interf rences n fastes aux communications radio Cependant il n y a aucune garantie qu il n y aura pas d interf rences Si cet appareil cause des interf rences sur la r ception radio...

Страница 110: ...vues pour la ventilation afin d assurer le fonctionnement fiable du produit et de le prot ger contre une ventuelle surchauffe Ces ouvertures ne devraient jamais tre bloqu es par un lit un canap un tap...

Страница 111: ...b ou endommag f l appareil vous semble net tement moins performant qu auparavant indiquant ainsi la n cessit de recourir une r paration Pi ces d tach es Si des pi ces d tach es sont 14 requises assure...

Страница 112: ...pendant une longue 5 p riode de temps retirez la batterie et main tenez la cam ra dans un endroit sec et sombre Cette cam ra vid o num rique est adapt e 6 pour des environnements entre 0 40 32 104 Ne...

Страница 113: ...Renseignements Importants Page 113 Fran ais...

Страница 114: ...nics Corp 1991 Marcus Ave Suite 301 Lake Success NY 11042 www cobyusa com www ecoby com Coby is a registered trademark of Coby Electronics Corporation Printed in China COBY es la marca registrada de C...

Отзывы: