background image


17 

11. WARRANTY 

This product is warranted in accordance with legal regulations for a 24 month period effective from the date of 

purchase by the first user. 


This product will not be covered if used in a commercial application. 

This warranty covers all material or production failures, it does not include: defects from normal wear and tear, 

parts  such  as,  bearings,  brushes,  cables,  air  cleaning  elements,  brake  pad,  clutch  disc,  tyre,  wheel,  recoil 

starter rope, belts, cutter blades, plugs, lubricant oils and grease or accessories. Damage or defects resulting 

from  abuse,  accidents  or  alterations,  natural  fading  of  painted  or  plated  surfaces,  sheet  peeling  and  other 

natural deterioration. 


Any damage that occurs from the use of non-genuine Cobra parts will not be covered. 

We  reserve  the  right  to  reject  any  claim  where  the  purchase  cannot  be  verified  or  when  it  is  clear  that  the 

product was not maintained properly. (Clean ventilation slots, carbon brushes and serviced regularly) 


Expenses incidental to the warranty claim that are not covered; 

-Compensation for loss of time, commercial loss or rental costs of substitute product. 

-Costs incurred for transportation to and from the dealership. 

Any damage that occurs from the following will not be covered; exposure of the product to smoke and soot, 

chemical  agents,  bird  droppings  or  other  animal  waste,  seawater,  sea  breeze,  salt  or  other  environmental 

phenomena. Any damage resulting from opera

ting methods other than those indicated in the owner’s manual 

will not be covered. 


Your  purchase  receipt  must  be  kept  as  proof  for  date  of  purchase.  Your  un-dismantled  mower  must  be 

returned to your dealer in an acceptably clean state, accompanied by your proof of purchase. 


Please Register Your Mower 

If your dealer did not collect registration information from you, please take a few minutes and register your 

purchase with Cobra. You can register by completing the online registration at:   

www.cobragarden.co.uk

 and clicking on Product Registration. 

12. ENVIRONMENTALLY FRIENDLY DISPOSAL   

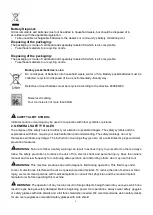
According  to  EU  directive  2012/19/EU  on  electric  and  electronic  equipment  and  its 

implementation  into  national  law,  all  electric  tools  must  be  separately  collected  and 

environmentally friendly recycled. Alternative disposal: If the owner of the power tool does not 

return  the  tool  to  the  manufacturer,  he  is  responsible  for  proper  disposal  at  a  designated 

collection point that prepares the device for recycling according to national recycling laws and 

regulations. This does not include accessories and tools without electric or electronic components. 

Содержание Airmow5180V

Страница 1: ...machine the safety rules must be followed For your own safety and bystanders please read these instructions before operating the machine Please keep the instructions safe for later use Cobra Garden Machinery Henton and Chattell Ltd London Road Nottingham NG2 3HW UK www cobragarden co uk ...

Страница 2: ...ICATION 7 SECTION 4 TECHNICAL DATA 7 SECTION 5 ASSEMBLY 8 SECTION 6 OPERATION INSTRUCTIONS 11 SECTION 7 BLADE 14 SECTION 8 MAINTENANCE AND CARE 15 SECTION 9 STORAGE 15 SECTION 10 TROUBLESHOOTING 16 SECTION 11 WARRANTY 17 SECTION 12 ENVIRONMENTALLY FRIENDLY DISPOSAL 17 SECTION 13 EC DECLARATION OF CONFORMITY 18 ...

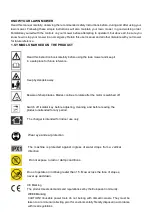
Страница 3: ...e for future reference Keep bystanders away Beware of sharp blades Blades continue to rotate after the motor is switched off Switch off isolator key before adjusting cleaning and before leaving the product unattended for any period CE Marking The product meets demands and regulations set by the European Community WEEE Marking CAUTION Unusable power tools do not belong with domestic waste They must...

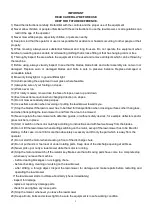
Страница 4: ...quire your careful attention and understanding The safety warnings do not by themselves eliminate any danger The instruction or warnings they give are not a substitutes for proper accident prevention measures WARNING Failure to follow a safety warning can result in serious injury to yourself or to others Always follow the safety precautions to reduce the risk of fire electric shock and personal in...

Страница 5: ... when reversing or pulling the lawnmower towards you 17 Stop the blades if the lawn mower has to be tilted for transportation when crossing surfaces other than grass and when transporting the lawn mower to and from the area to be mowed 18 Never operate the lawnmower with defective guards or without safety devices for example deflectors and or grass catchers in place 19 Start or switch on the motor...

Страница 6: ...mmediately Liquid ejected from the battery may cause irritation or burns Safety Advice for Rechargeable Battery and Charger Use only the battery provided with the lawn mower and the provided charger Protect the battery and the battery charger from humidity and damp conditions Do not operate the battery charger outdoors When it is not in use or before cleaning and servicing disconnect the battery c...

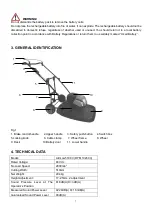
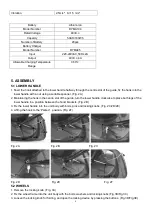
Страница 7: ...s suitably marked Used Battery 3 GENERAL IDENTIFICATION Fig 1 1 Brake control handle 2 Upper handle 3 Safety push button 4 Switch box 5 Locking knob 6 Cable clamp 7 Wheel frame 8 Wheel 9 Deck 10 Battery door 11 Lower handle 4 TECHNICAL DATA Model Airmow5180V DYM192603 Rated Voltage 80V d c No Load Speed 2800min 1 Cutting Width 510mm Net Weight 20 4kg Height Adjustment 17 25mm 2 adjustment Sound Pr...

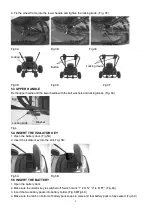
Страница 8: ...ntaining the hook in the centre slot of the guide turn the lower handle clockwise to place both legs of the lower handle in a position between the hood brackets Fig 2B 3 Fix the lower handle into the unit body with bolts pins and locking knobs Fig 2C 2D 2E 4 Lifting the hook to the Parked position Fig 2F Fig 2A Fig 2B Fig 2C Fig 2D Fig 2E Fig 2F 5 2 WHEELS 1 Remove the locking knob Fig 3A 2 Fix th...

Страница 9: ...e battery door Fig 5A 2 Insert the isolator key into the slot Fig 5B Fig 5A Fig 5B 5 5 INSERT THE BATTERY 1 Open the battery door 2 Make sure the isolator key is switched off Switch mark 1 is ON 0 is OFF Fig 6A 3 Insert the two battery packs into battery holder Fig 6B Fig 6C 4 Make sure the latch on bottom of battery pack snaps in place and that battery pack is fully seated Fig 6C Wheel frame Wash...

Страница 10: ...THE BATTERY 1 Open and hold up the battery door 2 Press and hold the battery latch button at the bottom of the battery pack Fig 7 3 Remove battery pack from the product Fig 7 Fig 7 5 7 HEIGHT OF CUT Remove or add a washer to adjust the height of the cutting blade Fig 8 Fig 8 ...

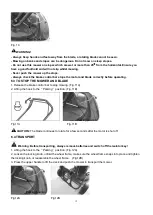
Страница 11: ...on the isolator key FIg 9C 3 Lifting the hook to the Mowing position Fig 9D 4 Press the safety push button FIg 9E 5 And meanwhile grasp the brake control bar and hold it against the upper handle FIg 9E 6 If you release the brake control bar the motor will stop Fig 9A Fig 9B Fig 9C Fig 9D Fig 9E 6 2 HOW TO MOW Warning Before using the lawnmower always visually inspect to see that blades and bolts a...

Страница 12: ...DE 1 Release the brake control bar to stop mowing Fig 11A 2 Lifting the hook to the Parking position Fig 11B Fig 11A Fig 11B CAUTION The blade continues to rotate for a few seconds after the motor is shut off 6 4 TRANSPORT Warning Before transporting always remove batteries and switch off the isolator key 1 Lifting the hook to the Parking position Fig 12A 2 Loosen the locking knob unfold the wheel...

Страница 13: ...ts Do not cut wet grass For effective mowing do not cut wet grass because it tends to stick to the underside of the deck preventing proper collection of the grass clippings Cut no more than 1 3 the length of the grass The recommended cut for mowing is 1 3 the length of the grass Ground speed will need to be adjusted so the clippings can be dispersed evenly into the lawn When mowing long grass you ...

Страница 14: ...as possible It is extremely important that each cutting edge receives an equal amount of grinding to prevent an unbalanced blade Improper blade balance will result in excessive vibration causing eventual damage to the mower Be sure to carefully balance the blade after sharpening The blade can be tested for balance by balancing it on a round shaft screwdriver Remove metal from the heavy side until ...

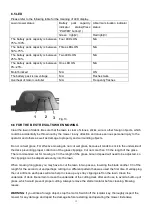
Страница 15: ... stops suddenly c if the blade is bent do not align d if the motor shaft is bent do not align e if a short circuit occurs when the cable is connected f Use only manufacturer s recommended replacement parts and accessories 9 STORAGE The following steps should be taken in order to prepare the lawn mower for storage 1 Remove the battery pack from the mower and store it at room temperature in a dry lo...

Страница 16: ...derside of the deck Have mower blade re sharpened or replaced See a Cobra dealer Machine leaves ragged finish Height of cut too low increase height of cut Cutting blade blunt have the blade re sharpened or replaced Warning Before performing any maintenance or cleaning work always remove batteries and switch off the isolator key Only with a stopped motor and stationary blade CAUTION Faults which ca...

Страница 17: ... damage that occurs from the following will not be covered exposure of the product to smoke and soot chemical agents bird droppings or other animal waste seawater sea breeze salt or other environmental phenomena Any damage resulting from operating methods other than those indicated in the owner s manual will not be covered Your purchase receipt must be kept as proof for date of purchase Your un di...

Страница 18: ...ess Lawn Mower Machine Type Airmow5180V DYM192603 Rated voltage 80Vd c Measured sound power level 92 8dB A Guaranted sound power level 96dB A Notified Body for EC Directive 2000 14 EC 0359 Intertek Testing Certification Ltd Davy Avenue Knowlhill Milton Keynes Mk5 8NL Applicable EC Directives 2014 30 EU 2006 42 EC 2000 14 EC 2011 65 EU Applicable Harmonized Standards EN 60335 1 EN 60335 2 77 EN 622...

Отзывы: