Evaluation Kit for CMX979 (engineering samples)
EV9790
2017 CML Microsystems Plc
15
UM9790/1
7.3.2
The C-BUS Control Extended Tabs (C-BUS Ctrl Ext. 1 / Ext. 2)
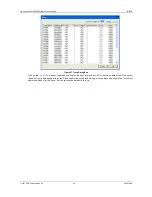
These tabs provide multiple C-BUS read and write functions. Each row in the table represents a single action on a C-BUS
register. Select the C-BUS register type from the drop down list. The Update button and the Data edit box will be
configured according to the selection. Each character entered into the Address and Data edit boxes is checked to ensure
that it is a valid hexadecimal value. The lengths of the entered values are limited to 2 characters (1 byte) for register
addresses and 2 or 4 characters (1 or 2 bytes) for the register data. Click the Update button to read or write a single C-
BUS register. For multiple C-BUS read or write operations, select the C-BUS registers using the Enable check boxes and
click on the ‘Wr all’, ‘Rd all’ or ‘Wr\Rd all’ buttons. Click on the ‘Wr all’ button to write all the selected write type C-BUS
registers. Click on the ‘Rd all’ button to read all the selected read type C-BUS registers. Click on the ‘Wr\Rd all’ button to
read or write all of the selected C-BUS registers. Two separate tabs are used as one may be used to control a device on
the other PE0003 C-BUS port.
Figure 11 C-BUS Control Extended Tab
The C-BUS actions in the table are executed sequentially, starting at “1” (top left of the table). The ‘Delay by instruction
(ms)’ box introduces a delay between the execution of each C-BUS action (default = no delay).
Click on the ‘Clear all’ button to reset the table. Click on the ‘Clear data’ button to reset the Data edit boxes.
The ‘Lock’ button may be used to disable the Description, Address and Type controls, preventing accidental changes. Click
on the ‘Lock’ button again to re-enable these controls.
Use the ‘Save Config…’ button to save the current table. The Description, Address, Type, Data and Select columns are
saved in the specified file. Use the ‘Open Config…’ button to load a previously saved table.


