


8
P/N 192047138 Rev AA November 2017
INSTALLATION
UNPACKING
After opening the carton, carefully inspect the hoist frame, cords,
hooks, chain and control station for damage that may have occurred
during shipment. If there is damage, refer to the packing slip
envelope.
Make sure that the power supply to which the hoist is to be
connected is the same as that shown on the identification plate
located on bottom of hoist.
Operating a unit with obvious external damage may cause load to
drop and that may result in personal injury and/or property damage.
TO AVOID INJURY:
Carefully check unit for external damage prior to installation.
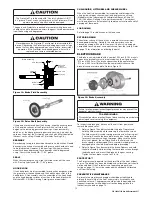
MOUNTING THE HOIST
Hang the hoist from its intended support. The structure used to
support the hoist must have sufficient strength to withstand several
times the load imposed. If in doubt consult a registered engineer
and local building codes.
Suspending the hoist from an inadequate support may allow the
hoist and load to fall and cause injury and/or property damage.
TO AVOID INJURY:
Make sure the attachment point has sufficient strength to hold
several times the hoist and its rated load. Using the upper hook,
hang the hoist from the support.
Be sure hoist is solidly held
in the uppermost part of the hook arc and the latch is tightly
against the hook tip.
POWER SUPPLY SYSTEM
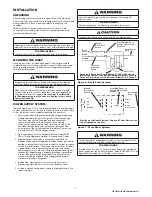
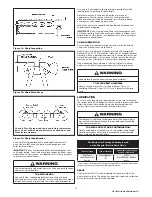
(Refer to Figure 6 or 7). To insure proper operation, to avoid damage
to hoist and electrical system and to reduce the risk of electric shock
or fire, the branch circuit supplying power to the hoist must:
1. Have ample capacity to prevent excessive voltage drop during
starting and operation (refer to Figure 8). When determining
the size of branch circuit components and conductors,
special consideration should be given to the starting
current-amps (approximately three times that shown on the
hoist identification plate) and the length of the conductors.
As a minimum, the system should be rated for 15 amps and
it should have #16 AWG, or larger, wiring.
2. Be in accordance with the National Electrical Code (ANSI/
NFPA-70) and applicable National, State and Local Codes.
3. Effectively ground the hoist in accordance with National
Electrical Code and other applicable codes. Proper grounding
provides a path of least resistance for electric current to reduce
the risk of electric shock. The power cord of the hoist includes
a green-yellow wire for grounding the hoist to the external
power supply system. Be sure that the receptacle opening that
receives the longest prong is properly grounded. If grounding
is to be through the trolley trackwheels, each section of the
runway must be grounded to the building ground system
using metal to metal connections.
4. Include slow blow type fuses or inverse trip time circuit
breakers to permit the hoist to start and accelerate load.
5. Include a disconnecting means capable of being locked in the
“open” position.
Failure to properly ground the hoist presents the danger of
electric shock.
TO AVOID INJURY:
Permanently ground the hoist as instructed in this manual.
To reduce the risk of electric shock or injury, use indoors only.
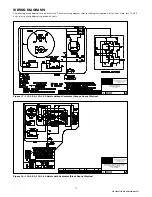
Figure 6 - Single Phase Systems
Black
Blue
Brown
Green-Yellow
White
Ground
Manual
Disconnect
Switch
Slow Blow Fuses or
Inverse Time Circuit
Breakers
Hoist Power
Cord
Thermal
Overload
Relay
Receptacle Rated for 15 amp Minimum (220-1-50 units do
not include Power Cord Plug). Wire Blue and Brown Wires to
Fuses or Circuit Breakers and Green-Yellow Wire to Ground.
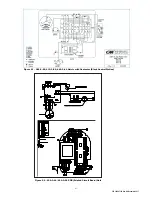
Figure 7 - Three Phase Systems
Black
Grey
Brown
Green-Yellow
Slow Blow Fuses or
Inverse Time Circuit
Breakers
Hoist Power
Cord
Incoming Power
Must be per National Electrical Code and These Devices are
to be Supplied by the User.
L1
L2
L3
Ground
Manual
Disconnect
Switch
Failure to provide a proper power supply system for the hoist may
cause hoist damage and offers the potential for a fire.
TO AVOID INJURY:
Provide the hoist with a 15 amp, minimum, overcurrent protected
power supply per the National Electrical Code (ANSI/NFPA 70) and
applicable local codes as instructed in this manual.


