background image

42

DIGITAL VIDEO RECORDER

PAN / TILT ZOOM CONTROL

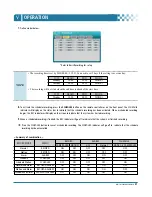
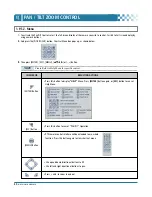
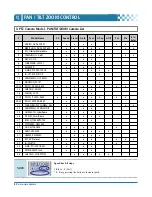
4. PTZ Camera Model - PAN/TILT/ZOOM Camera List

#

Model Name

3X

Speed

Preset

Go to

Tour

A. Pan

A.Tilt

Pat

Me

Esc/

Enter

1

NUVICO, NV 9600 BPS

o

o

o

o

o

o

o

o

2

MERIT LILIN, PIH-7000/7600

o

o

o

o

o

o

o

o

3

VCL, Orbiter Microsphere

o

o

o

o

4

SAMSUNG, SCC-641

o

o

o

o

o

o

o

5

NEC, NC-21D

o

o

o

o

6

SUNKWANG, SK2107

o

o

o

o

o

7

RESERVED

o

o

o

o

o

8

D-MAX, PTZ PROTOCOL

o

o

o

o

o

o

9

LG, LPT-A100L P/T/Z

o

10

HONEYWELL, GCC-655N

11

WONWOO, PT-101

o

12~14

PELCO, D 2400~9600

o

o

o

o

o

o

o

o

15

C&B TECH, AN200

o

o

o

16

CANON, VC-C4

o

o

o

17~19

PELCO, P  2400~9600

o

o

o

o

o

o

o

o

20~22

PELCO, EP 2400~9600

o

o

o

o

23

PANASONIC, WV-CS/W85x, 86x

o

o

o

o

o

o

24

HONEYWELL, HSDN-251N/P

o

o

o

o

25

GE/KALATEL, CyberDome 

o

o

o

o

o

26

DY ELEC, SmartDome

o

o

o

o

o

27

BOSCH, TC8560/TC700

o

o

o

o

28

SYSMANIA, ORX1000

29

AD, DELTADOME

o

o

o

o

o

30

HUNT, HTZ-2300

o

o

o

o

o

o

31

HAZEM, RESERVED

o

o

o

o

32

RVT, EZ Protocol

o

o

o

o

o

o

o

o

33

LG, MULTIX

o

o

o

o

o

34

ELMO, PTC-200C/400C

o

o

o

o

35

NICECAM, MP-1xxx

o

o

o

o

36

C&B TECH, CNB-PTZ102

o

o

o

o

o

NOTE

Speed has 0~8 steps

1 (Slow) – 8 (Fast)
* 0 – Keep pressing the button to increase speed.

Содержание CDR-4770

Страница 1: ...ained in this User Guide before you first use your Digital Video Recorder Please keep this User Guide handy for future use Before connecting and installing any third party cameras monitors alarms and...

Страница 2: ......

Страница 3: ...rous voltage within the product s enclosure that may be of sufficient magnitude to constitute a risk of electric shock to persons The exclamation point within an equilateral triangle is intended to al...

Страница 4: ...splay 17 2 2 Multi screen Display and Sequencing Display 17 2 3 Repositioning 17 3 Zooming 18 4 Spot Monitor 18 OPERATION 19 1 Main Menu Overview 19 2 Display 20 2 1 Display Setup 20 2 2 Sequential Se...

Страница 5: ...54 2 2 Functions 54 2 2 1 CLViewer client setup 56 2 2 2 Playback Control buttons 58 2 2 3 Pan Tilt Control buttons 59 2 2 4 Health 61 2 2 5 Health Report 62 2 2 6 DVR Property 63 2 2 7 Client Log Li...

Страница 6: ...d Do not strike or shake Failure to do so may result in fire or electrical shock Immediately turn off the unit or unplug the power cord from the power outlet Please consult your DVR distributor Do not...

Страница 7: ...ture evaporates completely before resuming use Do not place the batteries near a heat source or expose them to direct flame or heat Neither should you immerse them in water Such exposure may damage th...

Страница 8: ...ng do not attempt to use the unit contact the supplier immediately If the unit must be returned it must be shipped in the original packing box CONTENTS QUANTITY REMARK 4CH DIGITAL VIDEO RECORDER 1 UNI...

Страница 9: ...to move reverse field by field during STILL mode Fast Rewind This button is used to fast rewind during PLAYBACK mode 4 Clear Still or Playback Clear This button is used to hide the On Screen Display...

Страница 10: ...sword to choose channel camera selection or appropriate dates in schedule option mode To Decrease settings To Increase settings 6 Remote control signal receiver Do not block the receiver port on the u...

Страница 11: ...POT Spot out connector 4 AUDIO Input SPEAKER Output connectors RCA 5 VGA out connector 6 LAN RJ 45 Ethernet Port For connecting to remote PC via Ethernet network 7 RS 232C D SUB 9PIN Development purpo...

Страница 12: ...er TIME SEARCH PTZ FOCUS OUT BACK UP PAN TILT ZOOM FAST FORWARD STEP ESC OSD OFF MENU BUTTON CAMERA REPOSITIONING DISPLAY MODE ENTER BUTTON INFORMATION PTZ FOCUS IN PLAY REWIND SCHEDULE REC ON OFF ZOO...

Страница 13: ...r Microphone Alarm sensor and Power cord 1 1 System Configuration Diagram The following illustration is showing the fully installed system CAMERA BNC Main Monitor Audio Input Microphone Audio Output S...

Страница 14: ...d up to 4 cameras Connect cameras to the VIDEO IN BNC on the back panel of the system To connect a PTZ camera connect the PTZ camera s control line to the RS 422 TX RS 422 TX terminal and connect the...

Страница 15: ...plication 1 BNC for Main composite video output 1 BNC for Spot composite video output 1 VGA output 1 3 AUDIO The system has one channel audio input and output If you wish to record and playback audio...

Страница 16: ...ernet Port f RJ 45 Network Cable g CAT 5 UTP Cable for LAN Crossover cable for direct connect to PC h Microsoft DirectX 9 0c It is recommended to have DirectX 9 0c version in Client PC DirectX 9 0c is...

Страница 17: ...ime the date and time are set as default to January 1 2006 Sunday 01 00 00 Before commencing any operation of the Digital Video Recorder it is important to set the date and time Please refer to page 3...

Страница 18: ...nt panel 2 1 The indicator is on when a USB Device is connected The indicator glows in blue when the system is making light backups to the USB device 2 The indicator is on when Record mode is on 3 The...

Страница 19: ...and dwell time are programmable For more detailed information about the configuration see Sequence Setup on page 20 If the sequence mode is not activated Quad mode will be automatically selected inst...

Страница 20: ...gered that specific channel will go into Full Screen The default mode is set to Auto Sequencing 3 Zooming During the live view mode or playback mode it is possible to zoom a particular section of the...

Страница 21: ...nal buttons Items selected in the menu are shown in color Set the menu and display Sub Menu by pressing ENTER button Then select sub menu on TAP menu by using Left Right buttons Selected items will be...

Страница 22: ...e Show and below status bar will be displayed on Main Monitor CAMERA Select to view the On Screen Display information for Camera Number and Title BORDER LINE Users can choose the color of border line...

Страница 23: ...uded or excluded from the automatic sequencing ITEM DEFAULT ADJUSTMENT 2 2 Sequential Setup Auto Sequence 1 Press MENU button to access the MAIN SETUP menu 2 Select the CAMERA menu by using Directiona...

Страница 24: ...ra can be adjusted by pressing buttons COLOR 50 The color of each camera can be adjusted by pressing buttons CAMERA TITLE Camera A name of camera titles can be composed of characters and figures Maxim...

Страница 25: ...en shown below will overlay the current video image Motion Grid is divided into 16 distinctive grids and selected by Numeric buttons on IR Remote Select All by pressing Enter button after selecting th...

Страница 26: ...ot commence under normal conditions MOTION GRID Designate a motion grid by using numeric buttons on the remote controller and press Enter button Select smaller motion grids for more precise motion det...

Страница 27: ...e 9 1 General section of System Setup on page 36 Select audio recording ON or OFF AUDIO Audio is always recorded in real time whereas video can be recorded in various modes including real time There m...

Страница 28: ...MIDDLE 9 5 5 3 5 10 8 6 6 4 2 KB HIGH 13 8 5 15 6 9 6 6 KB SUPER 19 12 7 5 22 8 14 4 9 KB ULTRA 30 19 12 37 22 8 14 4 KB Actual file size may vary 1 Press MENU button to access the MAIN SETUP menu 2 S...

Страница 29: ...enabled channels if there any alarm is triggered 1 1 Records a channel for which alarm has been triggered ALARM BUZZER ON Buzzer indicates whether alarm has been triggered Buzzer will remain on for th...

Страница 30: ...rts recording only when an alarm is activated RECORDING STATUS USE MOTION ON OFF ALARM RECORDING STATUS ON Resulting Actions Press the REC button to commence continuous recording based on the configur...

Страница 31: ...d on this channel the configuration will be changed to Super picture quality at 15F S with Audio The system will revert back to stand by mode for Alarm or Motion once alarm recording is finished The D...

Страница 32: ...Up to 4 different recording modes can be preprogrammed MODE1 MODE4 1 Press MENU button to access the MAIN SETUP menu 2 Select the SCHEDULE menu by using Directional buttons Press ENTER button to displ...

Страница 33: ...HEDULE indicator will go off to indicate that the schedule recording has been cancelled NOTE The recording time is set by 24H 00 00 23 59 You need to set 2 days if the setting is over one day D W BEGI...

Страница 34: ...ction 8 3 DDNS for more information IP SETUP Edit IP ADDRESS GATEWAY or SUBNET MASK by using or numeric buttons Select 0000 9999 by using or numeric buttons PORT The DVR s connection port can be adjus...

Страница 35: ...the MAIN SETUP menu 2 Select the NETWORK menu by using Directional buttons Press ENTER button to confirm 3 Select Email on TAP menu by using Left Right buttons 4 Press Down button to navigate 5 Press...

Страница 36: ...thentication It is recognized as a small letter even it s displayed as a Capital Letter Password Enter a password if your server needs Authentication It is recognized as a small letter even it s displ...

Страница 37: ...dyndns com 4 Go back to www dyndns com and log in with the ID and the Password 5 After log in on dyndns com front page click on my services 6 Click on the Add Host Service Next to Host Level Service 7...

Страница 38: ...ality OFF Better picture quality for still image but image flickering for moving picture If the system is interrupted or shut down during recording the system will preserve the previous recording sett...

Страница 39: ...from User 1 5 in the user box shown below By setting the activate option on administrator may control individual settings for each user Monitoring Playback Back up Network Configuration Main Menu Setu...

Страница 40: ...t file when the HDD is full OFF Stop recording after your HDD is full It stops automatically if HDD failure happens It starts to Monitoring again after DVR reboot Press the Enter button to select the...

Страница 41: ...ion of the system Indicator CONDITION 7 Plug USB memory stick into the front USB port and check if USB icon shows up on the Status bar 8 Select START by using down button and pressing ENTER button 9 W...

Страница 42: ...ESC MENU or button NOTE Please Refer to Help Menu for specific control Press this button to display HELP Menu Press ENTER Button again or ESC button to cancel Help Menu Press this button to cancel PAN...

Страница 43: ...r of 1 5 presets of the PTZ Camera Button Function The layout of the PTZ interface conforms to the layout of the front of the DVR or the remote controller Menu button is the guide anchor position for...

Страница 44: ...T 101 o 12 14 PELCO D 2400 9600 o o o o o o o o 15 C B TECH AN200 o o o 16 CANON VC C4 o o o 17 19 PELCO P 2400 9600 o o o o o o o o 20 22 PELCO EP 2400 9600 o o o o 23 PANASONIC WV CS W85x 86x o o o...

Страница 45: ...Hour and Minute or the camera you wish to playback by using directional buttons 5 Press ENTER button to start playback NOTE Users will not be able to choose a month if there is no stored data i e past...

Страница 46: ...g List menu as shown below 2 Select Time to play by using Up Down buttons Proceed to next page by using Left Right buttons 3 Press ENTER button to start playback ALL Lists all events since the initial...

Страница 47: ...Stick Backup Recommended USB memory stick for backup no Brand Capacity 1 HP 1G 2 2G 3 256M 4 LG X XTIC 1G 5 2G 6 4G 7 BUFFALD Clip Drive 512M 8 512M 9 Sandisk Cruzer 1G 10 2GB 11 512M 12 Kingston 1G 1...

Страница 48: ...RM and MOTION data 5 Enter the numbers as required in 24 hour format then move to 6 Press ENTER button to start BACKUP USB icon will be highlighted in blue during the backup If there is not enough spa...

Страница 49: ...e installation is required Double click on Mcdplayer in the window as shown above and will play as follows 2 Backup data can also be played by CLViewer Please refer to the page 78 in the CLViewer manu...

Страница 50: ...d in the BACKUP menu as follows Select START by using down button and press ENTER button to start BACKUP It is possible to set up backup range automatically on the Time Search Menu by selecting Month...

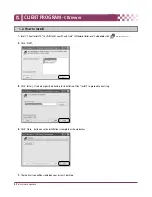
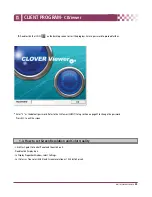
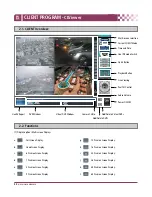
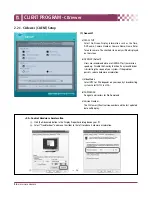
Страница 51: ...CLIENT PROGRAM CLViewer...

Страница 52: ......

Страница 53: ...ou to view live video search through archived video control PTZ camera and have full setup control The CLViewer Software is a kind of Central Management Software for DVR users to fully control up to 1...

Страница 54: ...D to CD ROM of your PC and Find CLViewerinstaller exe and double click 2 Click NEXT 3 Click Install Users may specify a directory for installation Click Install to proceed to next step 4 Click Close b...

Страница 55: ...ult password Refer to the CLViewer CLIENT Setup section on page57 to change the password Press ESC to exit the screen Click Start point to Control Panel and then click on it Double click Display icon...

Страница 56: ...Quad Screen Display h 16 Division Screen Display c 6 Division Screen Display i 25 Division Screen Display d 7 Division Screen Display j 36 Division Screen Display e 8 Division Screen Display k 49 Divi...

Страница 57: ...Location C Program Files CLViewer Download b Save a snap image or print current monitoring images c OSD On Off button d CLViewer CLIENT Setup 6 Audio Volume Adjust audio volume by clicking audio level...

Страница 58: ...alid driver is distorting the screen of your system If the problem persists reduce hardware acceleration c Video Mode Select NTSC or PAL depends on your country s broadcasting system Select NTSC in U...

Страница 59: ...function c Log Check the box to limit the display of logs NOTE The password setup process shown above is for the CLViewer client program only This is different from your DVR password 3 Password Changi...

Страница 60: ...notification when an alarm is triggered Motion Check the box to enable the CLIENT to make a sound notification when a motion is detected Video Loss Check the box to enable the CLIENT to make a sound n...

Страница 61: ...ol a channel specific PTZ camera click on the channel where the PTZ camera is connected a Pan and Tilt Switch to Full Interface Zoom IN Zoom OUT To tilt up To tilt down To pan left To pan right To go...

Страница 62: ...is Auto Indicator Resulting Actions c Iris Set Tour by clicking Total address is depends on connected Pan Tilt Camera Go To Calls up preset Start Automatic Tour Indicator Resulting Actions d Tour Set...

Страница 63: ...nect Power Fail System Fail HDD Fail Power Fail Recover System Fail Recover HDD Fail Recover In order to go back to normal color blue Double click the Health icon and click OK button on the Health Rep...

Страница 64: ...onnection error or power failure DVR Number and DVR Name on the Health Report will blink in red a HDD FAIL Notify Hard Drive Disk failure during the operation b EVENT a AL Alarm b MO Motion c VL Video...

Страница 65: ...a DVR MODEL b SYSTEM TIME Display the time and date of DVR c RECORD Configure current Normal recording channel d ALARM Configure current Alarm recording channel e MOTION Configure current Motion reco...

Страница 66: ...ation of the system Set the Begin and End time and click the Search button on the DVR Log List To view the Client CMS Log List right click a DVR icon in the DVR window and then click the Client CMS Lo...

Страница 67: ...to add a DVR to the CLViewer Set Name Enter a DVR title to be displayed on Monitoring window Health window and DVR Window IP Enter an IP address e g 65 60 84 40 or Host Name followed by dvrhost com e...

Страница 68: ...DVR from CLIENT List 4 SETUP The menu settings of selected DVR display and can be changed remotely in the SETUP menu Click SETUP button and then the whole menu will be displayed 5 PROPERTY Provides in...

Страница 69: ...rnet Explorer type an IP address or the Host name and the Port number of the DVR system You should type the protocol http the IP address or the Host name in the System menu Info and the Port number 70...

Страница 70: ...ebsite and add on and want to install it click here Click on the click install ActiveX Control on the pop up screen and the following window will be displayed 5 Click the Install button and live image...

Страница 71: ...icon to view the connection progress and users may cancel the connection by clicking the cancel button Pink DVR icon indicates that the DVR s connection has been disrupted by a network error or an in...

Страница 72: ...with channel number when the DVR S is selected by clicking the corresponding DVR 1 Click the DVR when a DVR is connected 2 Select a DVR by clicking a DVR in the DVR window when more than two DVRs are...

Страница 73: ...ndicators OSD ON or OFF can be selected on the CLViewer 1 Camera Title Displayed in the following orders Camera Number Camera title 2 Time Displays time 3 DVR Status Displays REC Network connection Vi...

Страница 74: ...camera to the desired camera position to change its position 6 Full Screen Display There are two ways to enable Full Screen display 1 Select any camera for Full Screen display by double clicking the...

Страница 75: ...To view a channel in full screen right click your mouse or double click the desired channel 2 There are 6 items in the context menu for each DVR 1 LIVE Live display for a selected DVR 2 PROPERTY DVR...

Страница 76: ...SET LIST MANAGER can be accessed in Playback Mode for remote playback or for downloading files to the remote PC Unlike the live mode only one DVR can be accessed at a time 1 To start playback press P...

Страница 77: ...e CLIENT Press button and select a DVR Remote Search shows a graphical representation of the recorded video stored on the DVR The Data are organized in color by category Alarm Red Motion Green Normal...

Страница 78: ...hoose a DVR Remote Search shows a graphical representation of the recorded video stored on the DVR Select desired date and time by clicking the mouse Click and drag Hour or Minute s Bar toward right h...

Страница 79: ...nload has been completed as shown below Click 3 LOCAL Local Menu is mainly used to review downloaded data from a DVR through the CLViewer Select button Local Search shows a graphical representation of...

Страница 80: ...in USB memory will display By MCD Player See section 2 How to play back up data in USB memory stick in your PC on page 47 3 7 DVR Menu Setup DVR Menu Setup allows modification of various system setti...

Страница 81: ...the warning notifications If you would like to access only one DVR system through the CLViewer it won t be necessary for setting up the following steps skip the following section 4 2 Virtual Set List...

Страница 82: ...zed and arranged automatically in either Auto Arrange or Auto Insert Arrange 2 ADD VIRTUAL DVR Click Add Virtual Set button to create Virtual DVR Avoid using the same name for the sets 3 Save changes...

Страница 83: ...ing on the number of connected cameras on your DVR In the following examples 4 Ch DVR has been dragged to channel Number 4 2 Any selected camera on DVR Click any DVR in the DVR Window while Virtual DV...

Страница 84: ...wo ways delete a camera from the CLViewer 1 Select any camera during live monitoring Right click to display Context Menu Select REMOVE 2 Select a camera and drag it to the DVR window or the Virtual DV...

Страница 85: ...additional SATA HDD Hard Disk Drive as secondary Master 1 Turn the power off and unplug the AC adapter 2 Remove the cover by using driver Remove the screws on both side and back of the product 3 Attac...

Страница 86: ...NOTE Be sure that the Serial ATA power connector and the Signal cable are properly connected NOTE After installing the additional SATA HDD formatting should be performed on the two HDDs simultaneousl...

Страница 87: ...s CLViewer 2 Codec ffdshow 3ivx How to change CMS file to AVI file 1 Double click AviConverter in C Program Files CLViewer Choose a file to convert and click Open button 2 Choose a folder to save 3 Ch...

Страница 88: ...amera Title 12 Characters per Channel Recording Mode Manual Schedule Alarm Motion Recording Method 5 Levels of Compression Rate Record Frame Rate Adjustment Recording Adjustments Pre Alarm 3 sec Post...

Страница 89: ...ntial damages APPENDIX 5 How to Obtain Factory Service 1 Original purchaser must fill out a warranty card and mail it to the factory with model number serial number and the date of purchase 2 We will...

Страница 90: ...88 DIGITAL VIDEO RECORDER...

Отзывы: