background image

17

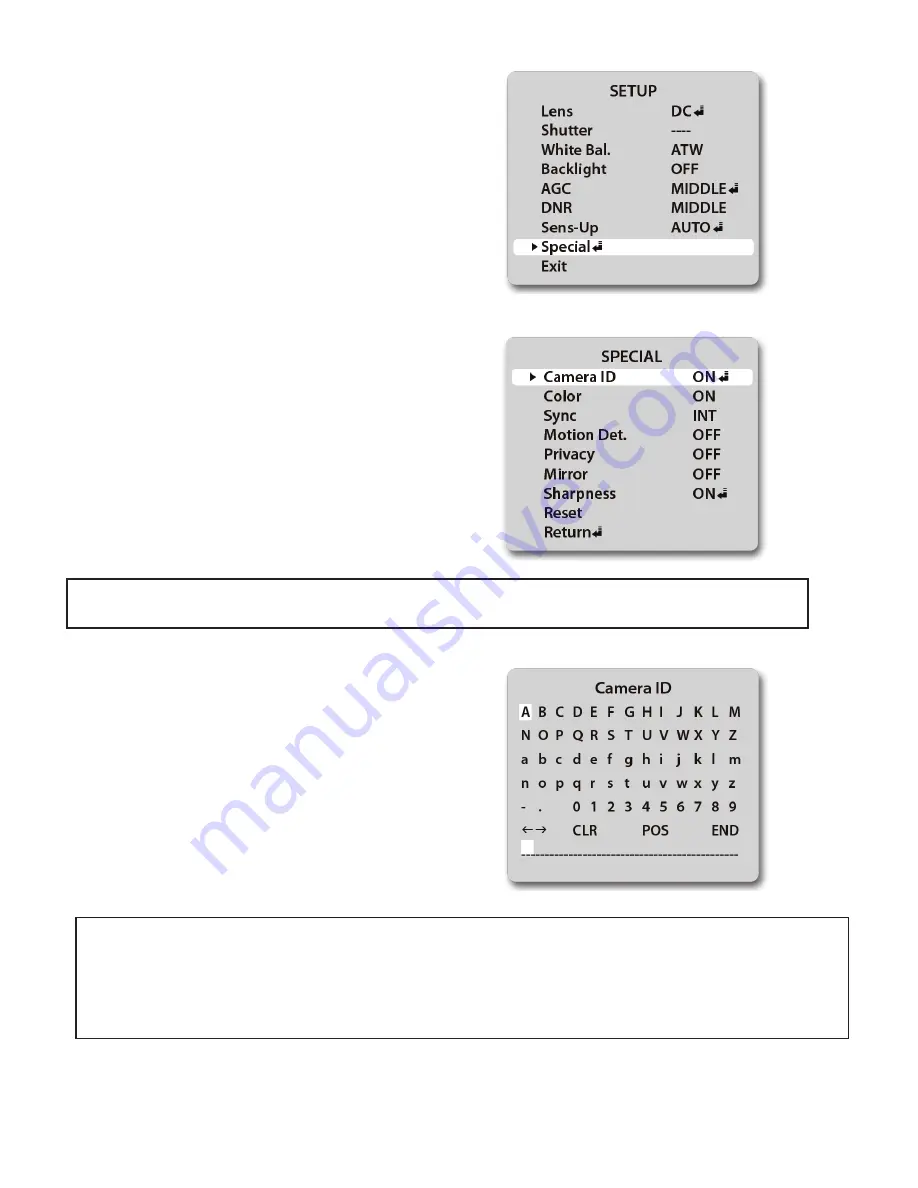
Special

1. Position the arrow to point to SPECIAL on the SETUP  

    menu by using the UP or DOWN button.

2. Enter the SPECIAL options menu by pressing the  

    SETUP button. 

CAMERA ID

: Use this function to input the 

camera’s ID/name and have it appear on the 

monitor.

• If  “OFF” is selected, the ID/name does not appear on the monitor even if it has been entered.

1. Position the arrow to point to CAMERA ID by

     using the UP or DOWN button.

2. Select ON by pressing the LEFT or RIGHT button.

3. Press the SET button to enter the ID menu.

4. Use the UP, DOWN, LEFT, and RIGHT buttons to    

    navigate to desired characters, and press SET to enter.                  

    You can enter up to 15 characters.

• If the wrong name has been entered....

If you press the SET button after moving the cursor to CLR, all characters will be erased.

If you wish to correct a single character, move the cursor to the arrow at the bottom left of the screen, 

and press SET as many times as needed until the cursor is over the character you wish to replace.

Next, position the cursor above the character you wish to replace it with, and press SET.

Содержание CE-20DVRPVM-HD

Страница 1: ...DVRPVM HD CE 8DVRPVM HD User Manual CLINTON Electronics 6701 Clinton Road Loves Park IL 61111 1 800 447 3306 Sales 1 800 549 6396 Support 1 800 633 8712 Fax www clintonelectronics com v 02 16 10 POWER AUTO UP DOWN MENU ...

Страница 2: ...ght AGC Auto Gain Control DNR Digital Noise Reduction SENS UP Special Function DVR Controls Settings Playback Menu Date Time Motion Setup Manual Record Schedule Record Schedule Setup Alarm Record Motion Record Continue Record SD Card Options System Status Power On Setup Factory Default Troubleshooting Table of Contents 3 4 5 6 7 8 9 10 11 12 13 14 15 16 17 20 21 22 23 24 25 26 27 28 29 Display DVR...

Страница 3: ...st perform all service To avoid electrical shock do not disassemble the unit Any attempt to disassemble the unit will void the warranty Verify DC power supply before installation This unit requires an external AC to DC power supply capable of supplying sufficient DC voltage to the display Install the monitor in a location that is suitable for the display Make sure there is adequate ventilation aro...

Страница 4: ...acket and details of how to install Connecting the display This display requires a 24V DC power supply Locate the applicable AC to DC power supply in a suitable location where there is an AC power source and access to run the low voltage cable to the display For single unit power supplies you will need to keep the distance from the power supply to the display less than 25 ft For multiple unit powe...

Страница 5: ... parameters of the display OSD Buttons Power Button On Off function This will power off both the display and the internal camera simultaneously Menu Button To adjust audio video signal tools language use up down buttons a Push menu button once b Push up or down button to pick category c Push menu button for sub category d Push up or down button for movement within sub category e When sub category ...

Страница 6: ...or Switch Sensitivity Dial Dwell Time Dial Power Supply Input OSD Board Camera Controls SD Card Inserted Light behind glass CE 8DVRPVM HD CE 20DVRPVM HD Camera LED Flasher PIR Sensor OSD menu buttons BNC Output Audio Switch Sensitivity Dial Sensor Switch Dwell Time Dial DVR SD card slot Video SD card slot Power Supply Input VGA Input Features OSD Board Controls bottom ...

Страница 7: ...given parameter of display When adjustment of selected parameter is done press MENU again to go back to the previous screen or simply wait for the menu screen to time out Sleep ZZZ Used to set a sleep timer from 10 90 minutes This will turn the display off after the programmed amount of time Continue pressing the sleep button to select the desired time or to turn the function off TV source Switche...

Страница 8: ... appearance 2 Set the CONTRAST control to set the white level so that the images are at their brightest without losing definition in the white portions of the image 3 Adjust the COLOR control to achieve a realistic image of the items within the viewing area 4 Adjust the TINT control if the image has bluish or reddish tint to the white portions of the image 5 Adjust the SHARPNESS lower if the image...

Страница 9: ...ed on or off using the LED CONTROL function 5 In the MESSAGE CONTROL setting you can turn the message on the bottom of the screen on or off as well as select the message to read WELCOME or RECORDING IN PROGRESS You can also control the message to flash on and off or be steady on 6 Pressing the left VOL or right VOL buttons under the FACTORY RECALL selection will return all display settings back to...

Страница 10: ... NOT FORCE IT IN WHEN SD CARD IS INSERTED YOU MUST POWER CYCLE THE UNIT You can do this by pushing the POWER button on the long remote or by unplugging the power cord from the wall An SD Card MUST be inserted or you will see a Settings Menu when the device is powered on 1 CHANGE THE DURATION OF CAMERA IMAGE ON SCREEN t ODSFBTF UVSO DMPDLXJTF UIF i XFMM 5JNFw EJBM UP BMMPX UIF UP EJTQMBZ UIF DBNFSB...

Страница 11: ... be adjusted by loosening the two adjustment dials on the lens Fig C When the desired Zoom and Focus settings are reached finger tighten the dials do not over tighten LENS Selection SHUTTER Condition and Speed Control WHITE BALANCE Control BACKLIGHT Backlight Compensation AGC Auto Gain Control DNR Digital Noise Reduction SENS UP Low Illuminance SPECIAL EXIT MANUAL ESC ATW OFF OFF OFF OFF CAMERA ID...

Страница 12: ...displayed Note Some menu selections may not have multiple modes to select Keep pressing the button until you get the mode you wish to operate 4 Press SET to enter the value settings if applicable and adjust as necessary with the LEFT and RIGHT buttons 5 Press SET to apply the value and exit the current value settings screen 6 Repeat steps 2 5 to adjust the appropriate settings 4 Select EXIT from t...

Страница 13: ... screen position the arrow to point to SHUTTER by using the UP or DOWN button 2 Select the shutter mode by pressing the LEFT or RIGHT button FLK Select FLK mode when flickering occurs on the screen due to an imbalance between illumination and frequency NTSC Model 1 100 PAL Model 1 120 ESC When ESC mode is on the shutter speed is controlled automatically according to the brightness of the screen 3 ...

Страница 14: ...t source is changed you will have to adjust the white balance again MANUAL This mode enables finer adjustment Select manual adjustment mode and press SETUP button Set the appropriate color temperature and then increase or decrease the red and blue color values while monitoring the color changes on an object 3 Press the SET button to return to previous menu The WHITE BALANCE function may not operat...

Страница 15: ...amount of backlight interference HIGH Select when there is a high amount of backlight interference 3 Press the SET button to return to previous menu AGC Auto Gain Control 1 Position the arrow to point to AGC on the SETUP menu by using the UP or DOWN button 2 Select the mode you wish to operate by pressing the LEFT or RIGHT button As the level of gain increases the screen gets brighter and the leve...

Страница 16: ...ate SENS Up Low illuminance SENS UP helps maintain a bright clear screen image by automatically detecting changes in the level of light in low light level conditions 1 Position the arrow to point to SENS UP on the SETUP menu by using the UP or DOWN button 2 Select the mode you wish to operate by pressing the LEFT or RIGHT button OFF The function does not operate AUTO Low light level auto mode 3 Pr...

Страница 17: ... ON by pressing the LEFT or RIGHT button 3 Press the SET button to enter the ID menu 4 Use the UP DOWN LEFT and RIGHT buttons to navigate to desired characters and press SET to enter You can enter up to 15 characters If the wrong name has been entered If you press the SET button after moving the cursor to CLR all characters will be erased If you wish to correct a single character move the cursor t...

Страница 18: ...view of how the ID name will appear on the screen 6 Press LEFT RIGHT UP or DOWN to position the ID name in the desired position on the screen 7 Press SET to lock the ID name in place and return to the previous CAMERA ID screen 8 Navigate the cursor to END and press SET to exit ...

Страница 19: ...lock mode PAL Models SYNC mode is fixed to INT in 12VDC input power INT Internal synchronization LL External line lock synchronization If you choose LL you can adjust the desired phase Press the SET button You can adjust the desired phase from 0 to 359 MOTION DETECTION This device has a feature that allows you to monitor movements of activity in 4 different areas on the screen The words MOTION DET...

Страница 20: ...a by using the UP DOWN LEFT and RIGHT buttons Press SET to enter the settings and return to the previous menu MIRROR OFF Normal mode ON Sets a horizontal image inversion SHARPNESS The outline of the video image becomes cleaner and more distinctive as the level of SHARPNESS increases If the level goes up excessively however it may affect the video image and generate noise The available range of sha...

Страница 21: ... used to Fast Forward or Fast Reverse in playback mode Menu OK Brings up menu and selects menu items Record Not used recording begins automatically when unit is on Recording View DVR Remote Control Device is Recording Data Low Quality LQ MQ HQ Quarter VGA Quality 320 x 240 320 240 640 480 VGA Quality 640 x 480 Medium Quality High Quality Loop Mode Overwrite is Active Stop Mode Shows of Storage Spa...

Страница 22: ... number of files belonging to the recording To navigate press the direction button up or down and press button to playback To return to the selection mode press the stop button Shows the number of pages Record Mode Manual Record Schedule Record Motion Detection Record Press the direction button right or left in order to show the first picture of the event Shows the time of the recording 1 2 3 4 5 ...

Страница 23: ...d level Third level Date time setup Date Format Here you can change the way the date is displayed Date Time Adjustment Here you can change the date and time 1 Press or buttons to navigate To confirm or select press button Press or buttons to change the value Press button to exit the menu Main Menu ...

Страница 24: ...the sensitivity of motion detection CELL EDIT Here you can de activate every single cell DEL BLOCK Here you can deactivate a complete block of cells DEL ALL Here you can deactivate all cells at once ADD BLOCK Here you can activate a complete block of cells ADD ALL Here you can activate all cells at once MD ENERGY Shows the current recognized motion MD THRESHOLD By pressing the buttons or you can s...

Страница 25: ...ng qualities High Medium Low Schedule record Here you can see a short a summary of the settings for motion and continuous recording Video size 320 x 240 640 x 480 Max frame rate 30 fps 12 fps SCHEDULE SETUP Activate Deactivate the schedule and the recording settings MOTION RECORD Settings for the motion detection CONTINUE RECORD Settings for continuous recording ...

Страница 26: ...ere you can set the recording quality DURATION Here you can set how long the device shall record after motion has been detected ALARM RECORD ALARM INPUT N C SCHEDULE 00 23 Alarm record Here you can change the settings for the alarm recording VIDEO SIZE Here you can set the recording resolution FRAME RATE Here you can set up how many fps shall be recorded QUALITY Here you can set the recording qual...

Страница 27: ...oose what happens when the total capacity of the SD Card is reached STOP The recording is stopped LOOP The recording continues The oldest files are replaced by the new recordings FORMAT Here you can format the SD Card All recordings will be deleted VIDEO SIZE Here you can set the recording resolution FRAME RATE Here you can set up how many fps shall be recorded QUALITY Here you can set the recordi...

Страница 28: ... main menu Power on Setup Factory Default Here you can reset all settings except Date and time to factory default Press button to reset to factory default Press button to cancel factory default and return to the main menu LANGUAGE Here you can set the OSD menu language COMPOSITE Here the video standard for the video output is shown ...

Страница 29: ...anel to the camera and press SET on the OSD keypad If the OSD menu ap pears on the screen make sure the LENS setting is set to DC If the OSD menu appears but the im age is still blank cycle down to the SPECIAL setting and enter SET on the keypad go to the RESET setting and press SET again This will reset the camera to the factory settings Image is out of Focus 1 Open the access panel to the camera...

Страница 30: ...30 v 01 25 10 ...

Отзывы: