VST-2735 / VST-2745 / VST-2752
IP/GSM+GPRS Alarm System
User Manual
Mar-26-2020
Страница 1: ...VST 2735 VST 2745 VST 2752 IP GSM GPRS Alarm System User Manual Mar 26 2020...
Страница 2: ...________________________________ 6 2 4 Test Report _____________________________________________________________ 8 2 5 Record Message _________________________________________________________ 8 2 6 GS...
Страница 3: ..._____________ 26 4 10 Keypad Lockdown _____________________________________________________ 27 4 11 Tamper Protection _____________________________________________________ 27 4 12 Stop the Alarm and A...
Страница 4: ...rent screen and returning to the previous screen etc 7 OK Key To confirm the keyed in data or confirm the selection 8 Numeric Keys 9 Away Arm Key Use this key to Away Arm the system 10 Home Arm Key Us...
Страница 5: ...To use the GSM GPRS function a SIM card is required NOTE Please disable the SIM card PIN code before inserting into the Control Panel Please make sure the SIM card GPRS and MMS functions are activated...
Страница 6: ...ces Power Switches etc do not have this limit and can be used with any Router 1 5 How to Install the Control Panel The easiest way to get to know the system and get it up and running quickly is to get...
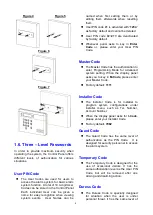
Страница 7: ...ode or please enter your User PIN Code Master Code The Master Code has the authorization to enter Programming Mode for advanced system setting When the display panel asks you to key in M Code please e...
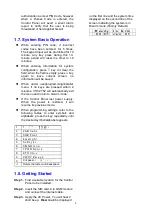
Страница 8: ...ally exit the menu and return to disarm mode If the Control Panel lost power supply When the power is restored it will resume its previoius mode When programming settings refer to the following tables...
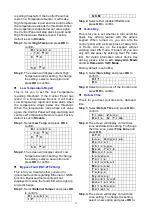
Страница 9: ...d in devices Please refer to 2 7 Device for device learning detail Step 1 Select Walk Test and press OK to confirm You will enter Walk Test mode Wa l k T e s t Step 2 Press the learn test button on yo...
Страница 10: ...group fails the Control Panel will retry the report group for 2 times before moving on to the next group If the Control Panel fails to report to all reporting groups it will restart reporting from Gr...
Страница 11: ...e the system will play default alarm message when reporting The default message is Alarm System 2 6 GSM Setting The GSM function allows you to program GRPS network and MMS settings This function is di...
Страница 12: ...nt GSM strength in RSSI value Step 1 Select GSM Signal and press OK to confirm G S M S i g n a l R S S I 9 Step 2 The screen will display GSM strength in RSSI value from 1 to 9 GSM Reset This is for y...
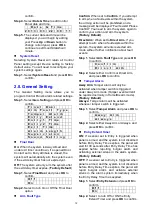
Страница 13: ...terval time the Control Panel waits before making a regular check in report to the programmed reporting destination Factory Default is set to 12 hours Step 1 Select Auto check in and press OK to confi...
Страница 14: ...garding Ethernet or GSM function Bypassed fault events will not displayed or cause the fault LED will to light up and emit beeps Step 1 Select External Tamper and press OK to confirm D i s a b l e I P...
Страница 15: ...ction will be prohibited and a message will be displayed Fault exists Please Confirm You need to arm the system again to confirm your action and arm the system Factory Default Direct Arm When set to D...
Страница 16: ...Step 3 The screen will display current setting To change the setting select a new option and press OK to confirm Exit Time When you arm the system the Control Panel will begin an Exit Delay countdown...
Страница 17: ...ff the Control Panel s built in siren will be activated to sound alarm when an alarm is triggered 2 9 Device Devices menu allows you to add change delete all available devices A total of 40 devices ca...
Страница 18: ...ed Perimeter Follower Away and Home Arm Mode When the system is in Away and Home Arm mode if a Perimeter Follower device is triggered a Burglar Alarm will be activated immediately and reported Away an...
Страница 19: ...r according to Entry 1 Delay setting programmed for the user to disarm the system please refer to 5 4 Area for detail If the delay period expires and no correct PIN code has been entered the Control P...
Страница 20: ...e if a Home Delay device is triggered a Burglar Alarm will be activated immediately and reported When the system is in Home Arm mode if a Home Delay device is triggered the Control Panel will start an...
Страница 21: ...rmed when Door Contact is closed NOTE Please refer to Normal Open Normal Close section below for further detail Silent Panic If the device attribute is set to Silent Panic when the device is activated...
Страница 22: ...display learnt in device list Select the device you want to remove press OK to confirm Program Siren The program siren functions allows you to learn in siren bellbox and program their behaviour L e a...
Страница 23: ...VST 2745 You only need to configure these settings if DHCP is set to Off Step 1 To edit the setting select the option to edit and press OK to confirm Step 2 Enter a new setting press OK to confirm SN...
Страница 24: ...p 1 Select one of the upload destination from 1 5 press ok to confirm Step 2 Select to either edit or delete the setting press OK to confirm E d i t D e l e t e Step 3 If you choose to edit the settin...
Страница 25: ...dividual User can be given a name for easy recognition User PIN Code 1 is set to 1234 by Factory Default Step 1 Select Pin Code press OK to confirm Step 2 You will enter the PIN code menu Select the P...
Страница 26: ...and press OK to confirm You will be prompt to enter a new Temporary Code E n t e r n e w c o d e Step 2 Enter the new code and press OK you will be asked to repeat the code again R e p e a t n e w c O...
Страница 27: ...he LCD will display XX after current mode The XX represents the number of fault event in system A w a y A r m X X 0 0 0 1 J a n 0 1 View Fault Events When fault event exists in system press Down key t...
Страница 28: ...with their attribute set to Interior Follwer or Interior will not be triggered under Home Arm mode Entering Home Arm mode Step 1 Select Home Arm under User Menu and press OK When under Disarm mode en...
Страница 29: ...sensor you want to bypass and press OK The sensor will be marked with a to indicate it is bypassed You can also remove the bypass condition by selecting the sensor and press OK again D C Z 0 1 I R Z...
Страница 30: ...nd enable Siren Tamper again 4 12 Stop the Alarm and Alarm Display During an alarm the Control Panel wil sound the siren and report to programmed telephone number The screen will display ALARM ALARM t...
Страница 31: ...R T Step 2 Press Down key to scroll through the fault events When all fault events are displayed the screen will show E N D Step 3 You can press Up key to scroll back through the fault events or press...
Страница 32: ...ogle Play and search for Vesta EZ Home to find the application Download and start the application 5 1 For iPhone The iPhone version of Vesta EZ Home Application supports all SMS command functions exce...
Страница 33: ...the panel The factory default PIN code in the Control panel is 1234 for User PIN Code 1 You can change both SMS Keyword and PIN code later by editing panel information VST 2745 and VST 2752 does not h...
Страница 34: ...the system for the first time please check both application and Control Panel settings for discrepancies If there are discrepencies please enter the correct setting in the application and press Save...
Страница 35: ...send the SMS command to panel NOTE You can delete the User PIN code by keeping the Pin Code field blank and save the setting User PIN Code 1 cannot be deleted IMPORTANT NOTE When you change SMS Keywo...
Страница 36: ...to return to menu when done When you are satisfied with all of your alarm settings press Save A SMS message edit screen will appear for you to confirm Press Send to send the SMS command to panel Repor...
Страница 37: ...ption allows you to edit a device name and attribute for Door Contact PIR and EIR Sensor Select the Zone number of the device you want to edit and enter a new name For Door Contact PIR Sensor PIR Came...
Страница 38: ...for you to confirm Press Send to send the SMS command to panel PSS Control The PSS Control option allows you to turn on off your Power Switch groups Select the Power Switch group you want to control t...
Страница 39: ...ress Capture Image A SMS message edit screen will appear for you to confirm Press Send to send the SMS command to panel Home Automation Rules Set Home Automation rules Select the condition you will en...
Страница 40: ...Power Switch group from 1 4 5 2 For Android Phone The Android version of Vesta EZ Home Application supports complete SMS command functions including the commands to inquire Control Panel setting and u...
Страница 41: ...luded in every SMS command sent with the app for the Control Panel to verify the SMS command The PIN code must be identical to a User PIN Code in the panel The factory default PIN code in the Control...
Страница 42: ...sing Edit Enter the new panel name panel SIM card number and PIN Code and the SMS keyword you desired Press Save to confirm when finished Away Arm Home Arm Disarm To change system mode Press the Arm H...
Страница 43: ...nel Vesta EZ Home app will update the current system mode accordingly for you to view Please remember to sync your Vesta EZ Home app with all your panel setting when you first create the panel PIN Set...
Страница 44: ...ation Select the option you want to edit to change the setting When you are satisfied with all of your alarm settings press Save The phone will send a SMS command to panel You can press the Menu butto...
Страница 45: ...rting Select the top column to select the reporting priority you want to edit Enter the telephone number for reporting and select report type and events Only SMS CID SMS Text GSM CID Voice reporting o...
Страница 46: ...ync options and choose to sync either Reporting 1 3 or 4 6 Device Setting The Device Setting Menu allows you to edit device control Siren PSS and request PIR Camera image Select the top column to choo...
Страница 47: ...it and Entry attributes are available For other devices without attribute you can select any attribute as it will not affect the device setting Press Save The phone will send a SMS command to panel Yo...
Страница 48: ...one will send a SMS command to panel PSS Control The PSS Control option allows you to turn on off your Power Switch Select the Power Switch group you want to control then choose to turn on off the Pow...
Страница 49: ...Select Area 1 then specify the zone number of the PIR Camera you want to take picture then press Save The phone will send a SMS command to panel Home Automation Rules Set Home Automation rules Select...
Страница 50: ...r for you to confirm The phone will send a SMS command to panel NOTE For system mode change Arm Home Disarm the Power Switch group selection is limited to 1 only For High Low Temperature and Time sett...
Страница 51: ...l s cover is opened and not properly sealed Battery Dead Missing The panel cannot detect backup battery this means the battery is either dysfunctional or the battery switch is not slid to ON position...
Страница 52: ...eter 2 1234 New User PIN Code Parameter 3 JOHN For User Name Parameter 4 1 Latch Report On The final SMS message is PROG 7982 USRS 1 1234 JOHN 1 NOTE Some parameters can be left blank to indicate no c...
Страница 53: ...le VRPT 1 80 1 1 0987654321 5 Parameter 1 Follow on function 0 disable 1 enable Parameter 2 leave blank Parameter 3 Hands free function 0 disable 1 enable Parameter 4 Callback timer in minutes 0 10 1...
Страница 54: ...utes 0 1440 0 always PSDM Switch dimmer Send SMS Example PSDM 1 1 80 Parameter 1 Enter 1 Parameter 2 Zone number 1 40 Parameter 3 Switch level 0 10 20 30 100 RQMD Request media Send SMS Example RQMD 1...
Страница 55: ...er in seconds 0 70 ASND Change area sound setting Send SMS Example ASND 1 2 2 2 2 2 2 Parameter 1 Enter 1 Parameter 2 Door chime sound 0 Silent 1 Low 2 Medium 3 High Parameter 3 Away entry sound 0 Sil...
Страница 56: ...MS APN Parameter 2 MMS user name Parameter 3 MMS password Parameter 4 MMS server Parameter 5 MMS proxy Parameter 6 MMS proxy port 1 65535 RSTG Reset GSM Send SMS Example RSTG UPLD Change media upload...
Страница 57: ...tart Entry 1 Delay No Response Delayed Burglar Alarm Delayed Burglar Alarm Entry 2 No Response Door Chime Start Entry 2 Delay Start Entry 2 Delay No Response Delayed Burglar Alarm Delayed Burglar Alar...
Страница 58: ...lent Panic Alarm Instant Silent Panic Alarm Instant Silent Panic Alarm Instant Silent Panic Alarm Instant Silent Panic Alarm Personal Attack Instant Panic Alarm Instant Panic Alarm Instant Panic Alarm...
Страница 59: ...m device is triggered during Home Entry Time and the timer expires without disarming the system 133 24 Hours When a device set as 24 Hour is triggered 136 Burglar Outdoor When a Burglar Outdoor Alarm...
Страница 60: ...he system is armed or disarmed by entering the PIN code 408 Set Unset Disarm 407 Disarm Away Arm Home Arm by Remote Keypad 465 Alarm Reset 570 Zone Bypass When fault exists in system and the system is...