OPERATION MANUAL
8
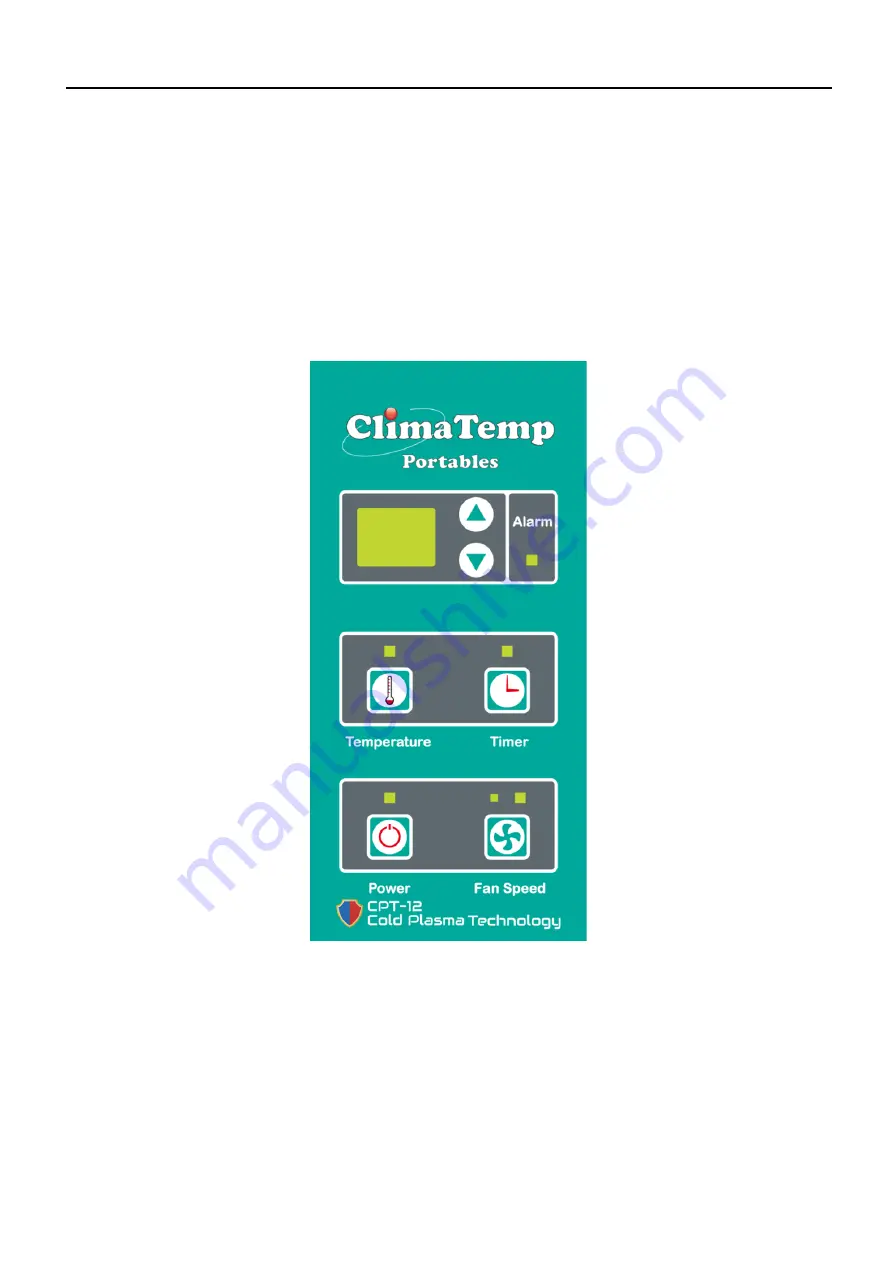
OPERATION
Control Panel Before operating the unit, it is important to familiarize yourself with the basic controls located on the control panel.
Страница 1: ...OPERATION MANUAL 1 OPERATION MANUAL CPT 12 READ THIS MANUAL CAREFULLY FOR INSTRUCTIONS ON CORRECT INSTALLATION AND USAGE AND READ ALL SAFEGUARDS PORTABLE SPOT AIR CONDITIONER ...
Страница 2: ...OPERATION MANUAL 2 SERIAL NUMBER LOCATION AND IDENTIFICATION The serial number and name plate can be located near the lower right side of the unit Nameplate Label ...
Страница 3: ...d out of the way Stylish and functional side bump guards to protect the unit from dents and scratches Features Cold Plasma Technology Needlepoint Bipolar Ionization Dual mode operation Cooling with purification or fan with purification Provides 12 000 Btu h of cold air ETL Listed and Certified Soft touch programmable LED Controller Self diagnostic LED controller displays error codes for quick trou...
Страница 4: ...e spot air conditioner 2 Operation Manual 3 Kick Plate Foot Pedal located under the unit Please attach to bottom rear of unit 4 Metal Cord Wrap Holder located under the unit Please attach to back of unit Note If any of these items were not included in the box or appear damaged please contact your ClimaTemp Portable spot air conditioner reseller for replacement ...
Страница 5: ...or place hands or fingers inside of the unit while in operation Install unit on smooth level ground Lock the castors breaks to minimize rolling and movement Always power off unit by the control panel do not turn off by removing plug from power source Condenser exhaust should always be ducted to the exterior or outside the area for maximum cooling Do not pinch minimize or constrict the duct size of...
Страница 6: ...ATION MANUAL 6 INSTALLATION cont Moving the Unit Unlock the casters and push the Portable spot air conditioner unit using the side handles to a flat level surface and set the casters to the LOCKED position ...
Страница 7: ...ng Device The CPT 12 is equipped with a LCDI power cord This device is non serviceable and opening the device may cause electric shock or void the warranties of the product 1 Plug into grounded appropriate 115v receptacle 2 If unit does not operate press the test button followed by the reset button 3 If test fails then do not use and contact your ClimaTemp reseller for replacement CAUTION The powe...
Страница 8: ...OPERATION MANUAL 8 OPERATION Control Panel Before operating the unit it is important to familiarize yourself with the basic controls located on the control panel ...
Страница 9: ...t 15 seconds and your preferred temperature will be set The display will show the temperature of the environment as default The range is 18 35 64 113 When the environment temperature is higher than the setting temperature the compressor will engage producing cold air When the environment temperature is lower than the setting temperature the compressor will disengage and shut off 5 Fan Only Mode To...
Страница 10: ...pressor problem Relay problem P Pressure too high in cooling system Surrounding Temperature too high Hot air exhaust is obstructed Surrounding Temperature to low tc Evaporator Frost Protection Cold air exhaust system is obstructed FL Water level warning Water Tank Full t1 Inlet air sensor problem Connector problem or sensor damaged t3 Evaporator temperature sensor problem Connector problem or sens...
Страница 11: ... heard and LED displays FL then the unit will cut off the power supply and stop Note If you want to empty the drain tank please wait after the unit stops 1 Open the drain tank door 2 Pull the drain tank from the unit 3 Remove the cap and empty the drain tank 4 Replace the cap and return the drain tank to the unit 5 Close the drain tank door 6 Press the Power button to restart the unit ...
Страница 12: ...mponents on the top of water tank Make sure the water tank is in correct position otherwise it may cause water to leak and damage the unit and surroundings Note The condensed water can be directly discharged through a gravity drain Remove the drain tank connect the drain outlet directly to the machine through the bottom side discharge hose or out through the right side discharge hose outlet Option...
Страница 13: ...crease in the cooling capacity and damage to the compressor and components Filter Removal Method 1 Turn the unit off by pressing the Power button 2 Remove the two air filters Note To remove the front evaporator filter slide the filter by pulling the filter out of the machine s front evaporator panel To replace the filter slide filter back into evaporator panel To remove the rear condenser filter p...
Страница 14: ...rgent 2 After the element has been cleaned rinse with clean running water allow to dry then reinstall filters into unit End of Season Maintenance 1 Wrap power cord on rear cord wrap holder 2 Remove all water from condensate bucket 3 After cleaning the unit completely dry with scratch resistant cloth 4 Unit should be operated in fan mode bring unit to highest set point to dry for 2 3 hours 5 Cover ...
Страница 15: ...particulate are on the front filter 3 Clean the front filter 4 The water lever of drain tank is too high 4 Pull out the drain tank and empty it No cooling 1 The surface of the condenser is dirty 1 Clean vacuum the surface of the condenser Do not use water or coil cleaner 2 Exhaust fan malfunction 2 Repair replacement of exhaust fan motor 3 Temperature of the external environment is too high 3 Use ...
Страница 16: ...OPERATION MANUAL 16 Parts List Breakdown Optional Accessory 88 HEPA Kit 89 Bipolar lonizer ...
Страница 17: ...sport is not covered under this warranty DISCLAIMER OF WARRNTY EXCEPT AS EXPRESSLY PROVIDED IN THIS STANDARD WARRANTY POLICY STATEMENT CLIMATEMP PORTABLES HEREBY EXPRESSLY DISCLAIMS ALL REPRESENTATIONS CONDITIONS AND WARRANTIES WHETHER EXPRESS OR IMPLIED INCLUDING BY WAY OF EXAMPLE AND NOT LIMITATION THE IMPLIED WARRANTIES OF TITLE MERCHANTABILITY NONINFRINGEMENT AND FITNESS FOR A PARTICULAR PURPO...
Страница 18: ...OPERATION MANUAL 18 ...