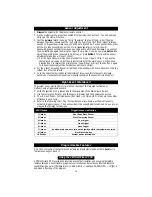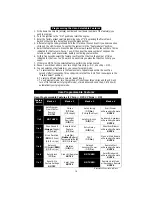
Ta ble of Installer- Programmable Fea tures (1 chirp = OFF, 2 chirps = ON)
Fea ture
Select
Blank x 1
Blank x 2
Blank x 3
✱
x 1
Single
/Double
Lock Pulse (
1
/2 chirps)
NOT USED
Door Ajar Warning
/Delayed Courtesy Lights
(
1
/2 chirps)
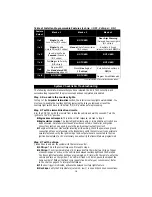
✱
x 2
Single
/Double
Unlock Pulse (
1
/2 chirps)
Manual
/Auto Transmission
(
1
/2 chirps)
Auxiliary A (trunk
release) Interlock
Off/
On
✱
x 3
Lock/Unlock Pulse
1 second
/3 second
(
1
/2 chirps)
NOT USED
NOT USED
✱
x 4
Pos/
Neg
Lock Polarity
(1/
2
chirps)
NOT USED
NOT USED
✱
x 5
Program RPM
See
Mandatory RPM
Programming
page 13)
Diesel/
Gas
Engine*
(1/
2 chirps
)
AutoActivate Auxiliary A
Off/
On
✱
x 6
NOT USED
NOT USED
Program SmartWindows 4
* You must pro gram RPMs af ter chang ing this set ting.
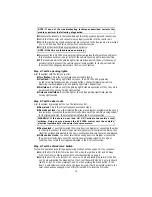
Sys tem Check list & Trou ble shoot ing
The fol low ing check list will as sure that you have in stalled the ACE 7500 cor rectly. Each
suc ces sive step re quires that the pre vious step has been com pleted as in di cated.
Step 1: Re- enable the cour tesy lights.
In step 1 of the
Important
Information
sec tion, the in te rior cour tesy lights were disabled. You
must now re-enable the courtesy lights by re placing the fuse you re moved or re set the
cour tesy light switch back to its nor mal “DOOR” po si tion bef ore pro ceed ing.
Step 2: Test the im mo bi li za tion cir cuits.
Arm the ACE 7500 with the remote from inside the vehicle and wait 10 seconds. Turn the
ignition to the “ON” position.
n
Engine does not respond.
This is the correct response, proceed to step 3.
n
Engine starts or cranks.
The starter/ig ni tion/fuel pump or immobiliza tion cir cuits have
been mis wired. Care fully re test the ve hi cle wires as noted in the
Starter and Ig ni tion
Connections
section
on page 6. Be sure the ignition input/output is correct!
n
If engine still starts or cranks after retesting all the wiring, check the power and ground
connections. Make sure fuses are in the fuseholders, verify the control unit connectors are
securely fastened, verify the ignition input and output wires are connected to the true
ignition line instead of a 12V or accessory line, and verify the transmitters are programmed.
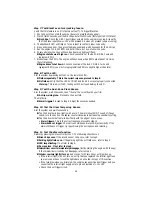
Step 3: Test the chirps.
Close all doors and arm the sys tem with the remote control.
n
2 Chirps:
This is the correct response. Proceed to step 4.
n
4 Chirps:
If 4 chirps im me di ate ly or 5-10 sec onds af ter the ini tial two chirps, a trig ger
or sen sor is open or active, or the ve hi cle has de layed cour tesy lights and the De layed
Cour tesy Lights fea ture has not been programmed on. Dis arm with the re mote, en ter the
ve hi cle and turn on the ig ni tion. The LED will flash 1–10 times, pause, then re peat the
same number of flashes (the flash cy cle re peats five times for your con ven ience). Refer
to the chart on page 15 to interpret the flashes.
n
If the
door trig ger
is in di cated, ac ti vate the de layed cour tesy lights fea ture.
n
No chirps.
Ver ify the Chirps fea ture (col umn 2, row 1) is on and check siren connections.
18


