APOLLO 20 LP SUPPLIED-AIR RESPIRATOR
Page 10
9.1.7
Slide one end of the gasket (with lens) onto the
window opening flange, so the holding tab on the opening
is inserted into the gasket retaining slot.
9.1.8
Push the gasket against the flange, while working
from inside the helmet, push the gasket toward the tab,
until the tab is fully inserted into the retaining slot.
9.1.9
Repeat the process on the opposite side. The
gasket must be pushed beyond the holding tab in order to
insert it into the slot.
9.1.10 Repeat the process on the top and bottom to lock
the gasket in place.
9.1.11 Place perforated cover lenses and one middle
lens in the lens frame per Section 9.2 before closing the
frame.
9.1.12 To maximize the wear life of the inner and middle
lenses, do not remove the last perforated cover lens (See
Section 9.2). The respirator must never be used without
the inner and middle lenses in place.
9.2
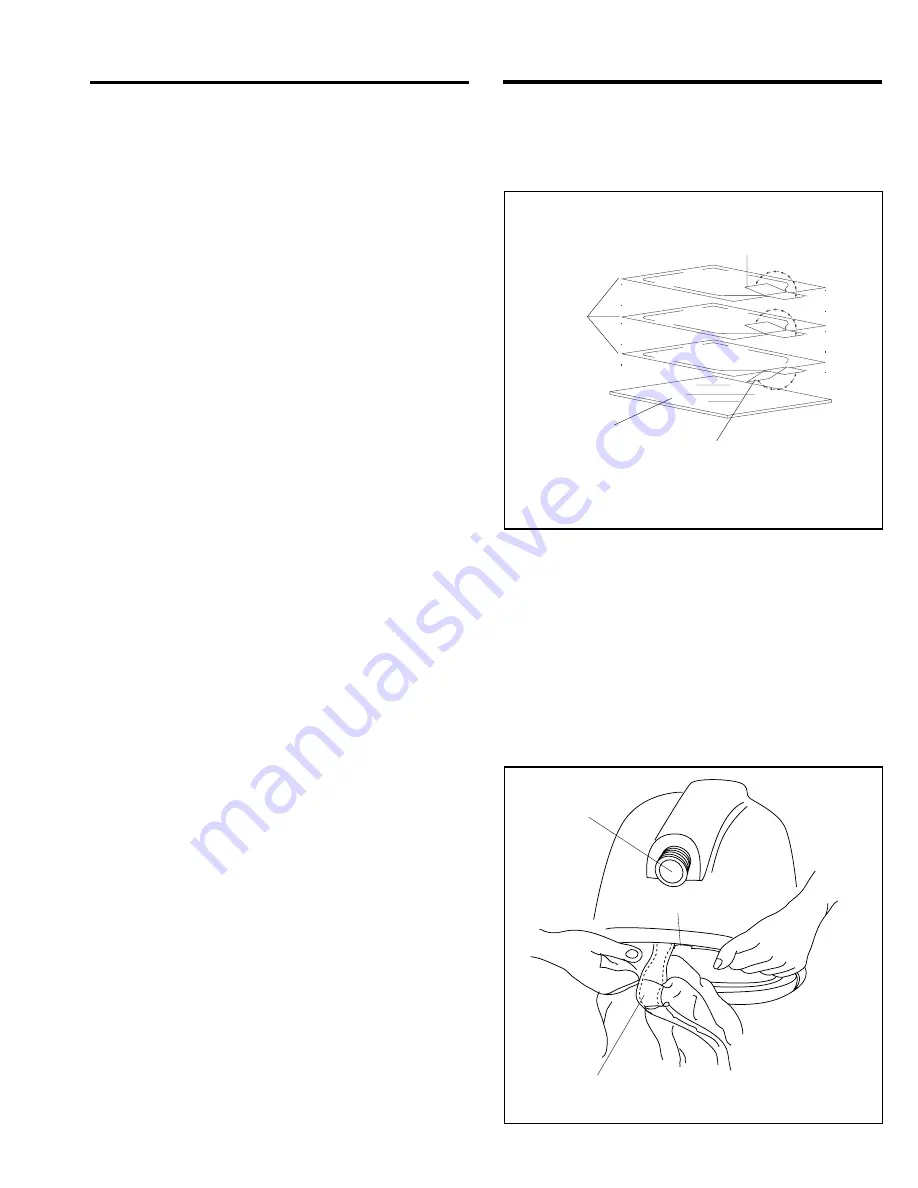
Replacing Perforated Cover Lenses, Figure 4
9.2.1
Unlatch and open the lens frame, and remove
remnants of old lenses. If the middle lens is not damaged,
save it for reuse.
9.2.2
Inspect the lens frame gasket and replace if worn
or damaged.
9.2.3
Up to three cover lenses may be installed at one
time. For maximum visibility, install only enough lenses to
last during a work period.
9.2.4
Preparing lenses in the following manner will
permit lenses to be pulled off easily by a user wearing
heavy gloves.
9.2.5
Place the middle lens on a clean flat surface.
Place up to three cover lenses on top of it.
9.2.6
Fold the tab of the bottom lens down as shown in
Figure 4.
9.2.7
Fold the tabs of the second, and top lens up.
9.2.8
Place the stack of prepared lenses into the lens
frame so the folded tab of the top lens sticks through the
front of the lens opening. When placed correctly, the
perforated lenses will be against the frame, and the middle
lens will be behind them offering additional support.
9.2.9
Installing the lenses in this manner will prevent
unintentional removal of the last perforated lens and
prolong the life of the middle and inner lenses. It will be
easier to remove the cover lens while wearing heavy
gloves, if the tab is bent outward slightly.
9.3
Suspension
9.3.1
To replace and adjust suspension, see Section 6.1
9.4
Outer Cape
9.4.1
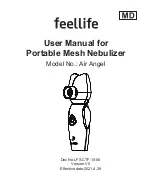
When the cape becomes soiled or requires re-
placement, it can easily be removed as follows.
9.4.2
Separate the Velcro tabs on the back of the cape.
See Figure 5.
Figure 4.
Fold all tabs except the one
closest to the middle lens, "up"
Perforated
Outer Lens
Middle Lens
Fold the tab closest to the
middle lens, "down"
Figure 5.
Air Inlet
Fitting
Notch
Cape Removal
Velcro Tab


