


Copyright © 2012 Clayton Associates Inc.
17
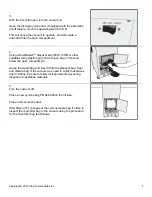
Vacuum Maintenance
Always check the air pressure of the vacuum and the pneumatic tool system using the gauges on the side of the unit.
Never allow the air pressures to exceed recommended specifications.
Always connect hoses before operating the system. Keep at least one inlet open or one hose connected at all times while
vacuum is running to prevent stress on the vacuum motors.
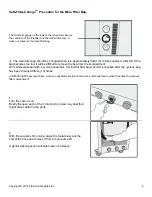
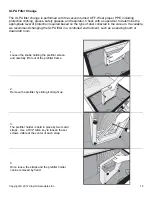
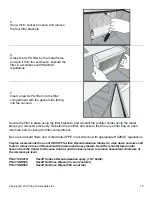
Check the Cyclone collection bags regularly during operation, and before every use. Follow Safe-Filter-Change
procedures outlined above to check filter bag levels. If filters are not changed at the recommended levels, a decrease in
system performance will be realized.
Keep the unit away from moisture or harsh environments whenever possible. Store unit in a dry location.
Never use the Clayton Vacuum for wet vacuuming. The Clayton System is designed to extract dry dust, and is not
equipped for fluid extraction. Vacuuming wet material can ruin the filter system, and void the warranty.
No field adjustment or calibration is required on vacuum system air pressure gages.
Tool Maintenance
Always check the condition of a pneumatic tool before use. Ensure that the backup pad is in good condition. Replace the
backup pad at the first sign of wear. An old or damaged backup pad can break apart at high speeds, causing personal
injury or property damage.
Oil the tools regularly. Before each use, place a drop of pneumatic tool oil directly into the air intake of each tool. Always
disconnect the pneumatic tool from the air supply when the tool is not in use. Change abrasives whenever a decrease in
sanding performance is noticed. Failure to change abrasives regularly can cause more rapid degradation of backup pads.
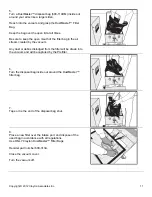
To remove the backup pad from circular random orbital sanders, choose the proper wrench from the CTK-1 tool tray.
Insert the wrench into the sander between the pad and the shroud. Push the wrench to the center of the sander, until you
feel it lock onto the shaft. Once the wrench is holding the shaft in place, turn the pad counterclockwise by hand until it
spins freely off. Reverse these directions to install a new pad.
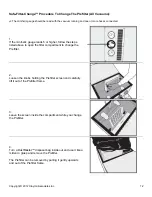
To remove the backup pad from the rectangular orbital sanders, simply peel the backup pad from the tool. The backup
pad is affixed with an adhesive backing. Be sure to remove any old adhesive from the sander. Peel the backing paper
from a new pad, line it up to the tool, and press firmly. Note that the 3” x 4” pads have a tapered front edge. Be sure to
position this rounded edge to the front of the sander.
Use only Clayton DustMaster Supreme backup pads, and only use the proper size for the sander. Each tool is calibrated
for a specific size pad. Using an under- or over-sized pad will most likely result in heavy vibration, and a shortened
lifespan for the tool and the backup pad. Excess vibration can cause personal injury.
Hose Maintenance
Never use the Clayton Air/Vacuum hoses for suctioning liquids.
Always visually examine the air lines and disconnect plugs before using the Clayton Air/Vacuum Hoses. If a leak is
detected, discontinue use immediately and discard the hose.


