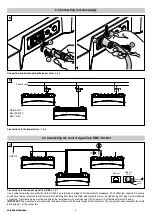
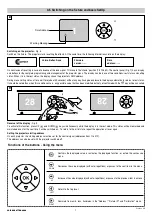
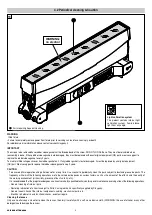
background image

VOLERO BATTEN AQUA

7

Continue  

Switching on the projector

- Fig. 8

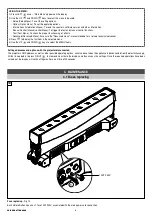
Switch-on the fixture. The projector starts resetting the effects. At the same time, the following information scrolls on the display:


Volero Batten Aqua                       Firmware                                         Dmx 


version: ......                                    address: ......

On conclusion of resetting in case of absence of the dmx signal, Tilt move to the “Home” position (Tilt 128 bit). The control panel (Fig. 7) has a display

and buttons for the complete programming and management of the projector menu. The display can be in one of two conditions: rest status and setting

status. When it is in the rest status, the display shows the projector’s DMX address. 

During menu setting status, after a wait time (about 30 seconds) without any key having been pressed, the display automatically returns to rest status.

It should be noted than when this condition occurs, any possible value that has been modified but not yet confirmed with the

F

key will be cancelled.

1

Dmx Address

Warning Message

8

3.5 Switching on the fixture and basic SetUp

28

28


Reversal of the display 

- Fig. 9

To activate this function, press UP 

B

and DOWN 

C

keys simultaneously while the display is in the rest mode. This status will be memorised and

maintained even for the next time it will be switched on.  To return to the initial state, repeat the operation all over again.

Setting the projector starting address

On each projector, the starting address must be set for the control signal (addresses from 1 to 512). 

The address can also be set with the projector switched off.

9

Functions of the buttons - Using the menu

Confirms the displayed value, or activates the displayed function, or enters the successive

menu. 

Decreases the value displayed (with auto-repetitions) or passes to the next item in the menu.

Increases the value displayed (with auto-repetitions) or passes to the previous item in a menu.

Return to the top level.

Commute from units, tens, hundreds, in the "Address", "Fixture ID" and "Calibration" menù.

F
C

DOWN

B

UP

D

LEFT

E

RIGHT

Содержание CL3002

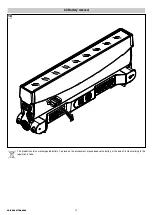
Страница 1: ...d requirements INDEX ENGLISH Page Contents 2 1 Safety information 3 2 Unpacking and preparation 3 3 Installation and start up 3 3 1 Fixture overview 4 3 2 Installing the fixture 6 3 3 Connecting to mains supply 6 3 4 Connecting the control signal line DMX Art Net 7 3 5 Switching on the fixture and basic SetUp 8 4 Maintenance 8 4 1 Fuses replacing 9 4 2 Periodical cleaning Caution 10 4 3 Battery re...

Страница 2: ...endem Link auffindbar www claypaky com Ref FIS02F Safety Information Volero Batten Aqua INFORMACIONES DE SEGURIDAD IMPORTANTE Claypaky recomienda leer detenidamente y conservar la información de seguridad relativa a este producto Además está disponible una versión digital de la misma en el siguiente enlace www claypaky com Ref FIS02F Safety Information Volero Batten Aqua CONSIGNES DE SÉCURITÉ IMPO...

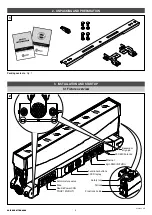
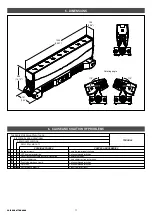
Страница 3: ...AND PREPARATION Neutrik PowerCON TRUE1 IN OUT LCD Display Functional buttons 5pin DMX IN THRU Ethernet Safety loop Fuse Anti moisture valve Basament align pin W DMX Antenna Tilt lock Frost lock holder 2 3 INSTALLATION AND START UP 3 1 Fixture overview Continue ...

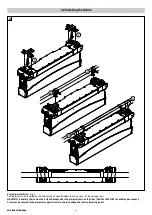
Страница 4: ... on specific rubber feet on a truss on the ceiling or wall WARNING the safety chains must be installed except when the projector rests on the floor Code 2x 105041 801 available upon request This must be secured to the projector support structure and then hooked to the two fastening points 3 2 Installing the fixture ...

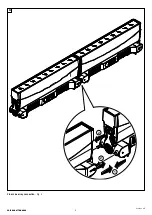
Страница 5: ...5 VOLERO BATTEN AQUA Continue 2 2 1 4 Floor Line array connection Fig 4 ...

Страница 6: ...ce 22 24 AWG low capacity Do not use microphone cable or other cable with characteristics differing from those specified End connections must be made using XLR type 5 pin male female connectors A terminating plug must be inserted on the last projector with a resistance of 120 minimum 1 4 W between terminals 2 and 3 IMPORTANT The wires must not make contact with each other or with the metal casing ...

Страница 7: ... confirmed with the Fkey will be cancelled 1 Dmx Address Warning Message 8 3 5 Switching on the fixture and basic SetUp 28 28 Reversal of the display Fig 9 To activate this function press UP B and DOWN C keys simultaneously while the display is in the rest mode This status will be memorised and maintained even for the next time it will be switched on To return to the initial state repeat the opera...

Страница 8: ...rried out the display will switch off again after a wait time of 30 seconds USING THE MENU 1 Press LEFT D once Main Menu appears on the display 2 Use the UP B and DOWN C keys to select the menu to be used Setup Setup Menu To set the setting options Option Option Menu To set the operating options Informations Informations Menu To read the counters software version and other information Manual Contr...

Страница 9: ...clean the parts subject to dust and grease deposits The frequency with which the following operations are to be carried out depends on various factors such as the amount of the effects and the quality of the working environment air humidity presence of dust salinity etc It is recommended that the projector undergoes an annual service by a qualified technician for special maintenance involving at le...

Страница 10: ...0 VOLERO BATTEN AQUA This product contains a rechargeable battery To preserve the environment please dispose the battery at the end of its life according to the regulation in force 12 4 3 Battery removal ...

Страница 11: ...CKS AND REMEDIES No power supply LED burnt out or defective Signal transmission cable faulty or disconnected Incorrect addressing Fault in the electronic circuits Optic fault Dust or grease deposits Check the power supply voltage Call an authorised technician Replace the cables Check addresses see instructions Call an authorised technician Call an authorised technician Clean see instructions 6 CAU...

Страница 12: ...IST02R EN Rev 0 11 2022 CLAYPAKY S p A Via Pastrengo 3 b 24068 Seriate BG Italy Tel 39 035 654311 www claypaky com ...

Отзывы: