Clavia Nord Wave 2 Скачать руководство пользователя страница 36

36 |  nORd WAve 2 USeR MAnUAL OS v1.0x

II


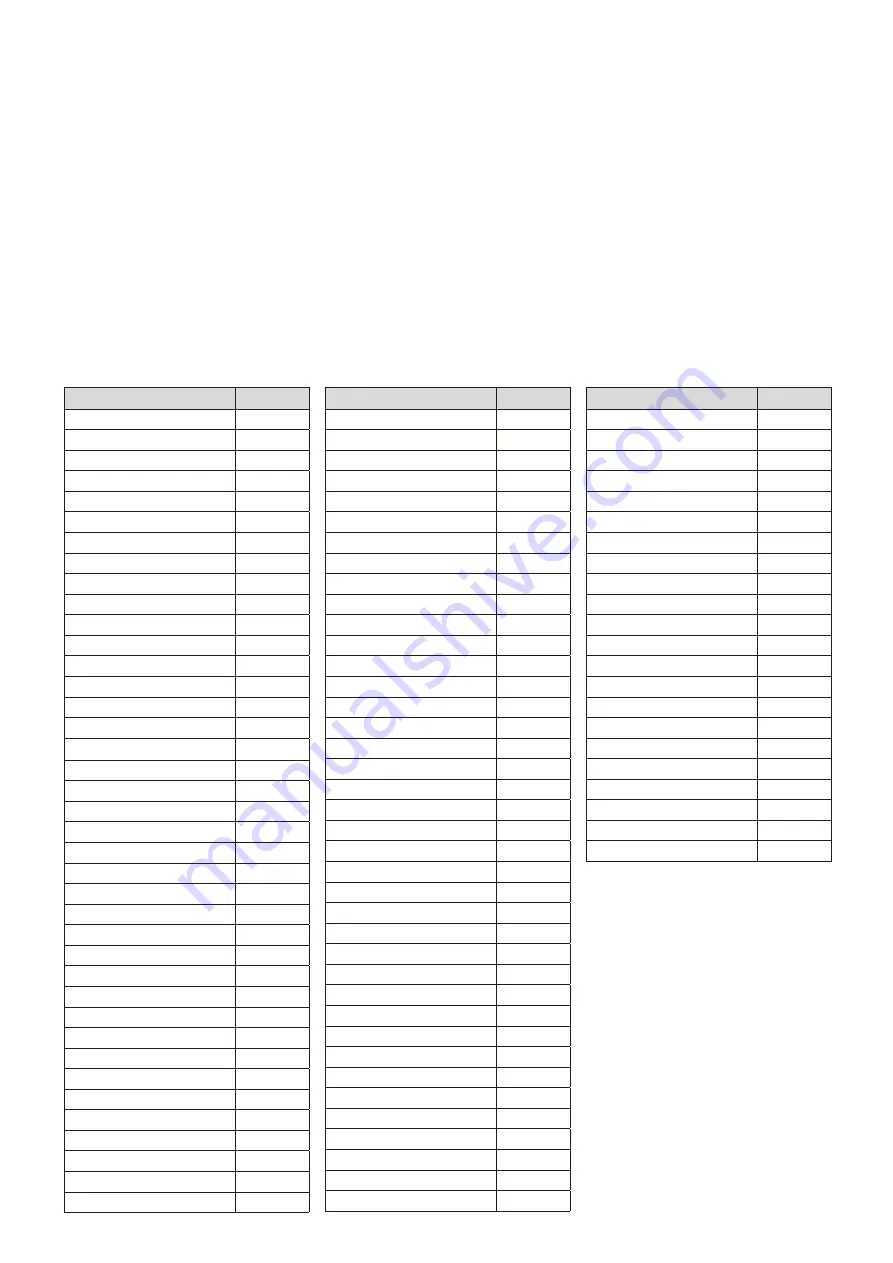
Appendix: Midi COnTROLLeR LiST

nord Wave 2 parameter

Midi CC #

Bank Select MSB

0

Bank Select LSB

32

Sustain

64

Ctrl pedal (expression)

11

KB Hold

23

KB Hold enable

27

pStick enable

26

Octave Shift

24

program Level

3

vibrato

51

Glide

48

voice Mode

49

Arp/Gate Rate

74

Arp/Gate Range/env

76

Arp/Gate Mode

72

Arp/Gate direction

75

Arp/Gate Zig-Zag

69

Arp/Gate Run

77

Arp/Gate KB Sync

71

Arg/Gate Mst Clk

68

LFO Amount

78

LFO Rate

79

LFO Mst Clk

110

LFO Waveform

80

LFO destination

109

Osc Mod env Attack

42

Osc Mod env dec/Rel

43

Osc Mod env Amount

45

Osc Mod env destination

44

Osc Mod env vel

46

Osc Mod env AR mode

47

Osc Unison

39

Osc Semitones

37

nord Wave 2 parameter

Midi CC #

Osc Fine Tune

36

Layer A Level

12

Layer B Level

13

Layer C Level

14

Layer d Level

15

Layer A pan

16

Layer B pan

17

Layer C pan

18

Layer d pan

19

Amp env Attack

82

Amp env Attack Transient

81

Amp env decay

83

Amp env Sustain

84

Amp env Release

85

Amp env velocity

86

Filter env Attack

52

Filter env decay

53

Filter env Sustain

54

Filter env Release

55

Filter KB Track

63

Filter drive

61

Filter Freq

59

Filter Resonance

60

Filter Type

65

Filter env Amount

62

Filter env velocity

56

Filter env invert

57

Filter On/Off

58

effects On/Off

91

effects Type

87

effects Amount

89

effects Rate

90

effects Rate Mst Clk

88

eQ/drive On/Off

105

nord Wave 2 parameter

Midi CC #

drive Amount

101

eQ Bass/Gain

102

eQ Treble/Freq

104

eQ parametric On/Off

106

delay On/Off

97

delay Mst Clk

92

delay dry/Wet

93

delay Tempo Tap/Set

94

delay Analog On/Off

96

delay Rate

94

delay Feedback effect Type

108

delay Feedback effect deep

100

delay Feedback

95

delay Feedback Filter Type

99

delay ping-pong

98

Reverb On

116

Reverb Type

115

Reverb Chorale

118

Reverb Bright/dark

117

Reverb dry/Wet

113

Содержание Nord Wave 2

Страница 1: ...USER MANUAL Nord Wave 2 English OS version 1 0x Edition E Part number 50502 Copyright Clavia DMI AB Edition E...

Страница 2: ...flash with the arrowhead symbol within an equilateral triangle is intended to alert the user to the presence of uninsulated voltage within the products en closure that may be of sufficient magnitude t...

Страница 3: ...uttons 14 Value dial 14 List options 15 Numeric 15 Abc 15 Category 15 Live Mode 15 Layer Init 15 Layer Swap 15 Program Buttons 15 What is a program 15 System Sound MIDI Menus 15 Organize 16 Enter the...

Страница 4: ...channels 30 Program Change operations 30 other Message types 30 Control Change messages 30 Pedal Control Change 30 Volume 30 Pan CC 30 MIDI Local 30 MIDI Clock 30 USB MIDI 30 Panic 30 6 MENUS 31 Soft...

Страница 5: ...use the different features in a musical context READING THE MANUAL IN PDF FORMAT This manual is available as a digital PDF file It can be downloaded free of charge from the Nord Wave 2 section on our...

Страница 6: ...yer by pressing DISABLE Shift KB Hold OCTAVE SHIFT allows for shifting a layer up or down in one octave steps When the GLOBAL option is turned on Shift Octave Down the octave shift is performed on all...

Страница 7: ...ovide both subtle over drive for warming up a sound or extreme distortion if desired The Delay effect can go anywhere from expressively vintage to modern and atmospheric sounding with its Analog mode...

Страница 8: ...controlling the Pan setting for each layer Hold the MONITOR button found in the Program section and turn a knob to view the stored setting of a parameter in the display without changing it BUTTONS Se...

Страница 9: ...T and turning the WAVEFORM dial Use Shift again to EXIT the list view Note that changing any parameter on the Nord Wave 2 panel causes an E to appear next to the current program number in the display...

Страница 10: ...s left of split points 1 2 3 Layer B is always right of split point 1 and left of 2 3 Layer C is always right of split points 1 2 and left of 3 Layer D is always right of split point 1 2 3 Here is to...

Страница 11: ...sure the new layer is initialized by pressing LAYER INIT Shift Live Mode and Ok using the display soft button 4 Set the new layer to SAMPLES in the Oscillator section and select the Mellotron Flute s...

Страница 12: ...and notice how the Gate becomes softer at 0 setting and very hard at the maximum Env amount MASTER CLOCK Set up an arpeggio according to the previous section and let s try the Master Clock feature to...

Страница 13: ...f the ABC button moves the cursor to the next position The dial or PAGE 3 4buttons can be used to move the cursor freely The Ins soft button is used for inserting a blank space at the current position...

Страница 14: ...ays reset after lifting all keys and then playing the keyboard again Soft When set to Soft the Master Clock is only reset if waiting longer than one quarter note in relation to the current tempo to pl...

Страница 15: ...or selection is not reset LAYER SWAP From the Layer Init screen use the PAGE 4 button to access the Layer Swap function From here any layer can load the contents of another layer in the loaded program...

Страница 16: ...the button corresponding to the layer morph pattern or program the settings should be pasted into Layers and morphs can either be pasted within the program they were copied from or into any other prog...

Страница 17: ...Octave Shift Reverb Size VIBRATO The DLY1 DLY2 and DLY3 settings add a delayed vi brato their respective delay times being 0 5 1 0 and 1 5 seconds When WHEEL is selected the depth of the vibrato is c...

Страница 18: ...nced to the Master Clock in the entire program Note that you can choose which layer or layers should reset the Master Clock when played For instance an arpeggio sound on the left side of a split could...

Страница 19: ...istinct tremolos etc Sawtooth Used for linear ramp type modulations Inverted Sawtooth Inverted linear ramp S H Stepped Random Recreates a stepped random modulation OSC MOD ENV The PITCH Semitones or O...

Страница 20: ...lators which can be added to the basic sound for those fat classic synthesizer sounds Note that using Unison does not reduce the po lyphony A UNISON setting of 1 equals a classic dual oscillator de tu...

Страница 21: ...king it softer than the White Noise option Red A noise signal with more energy in the low frequencies and more dampened high frequencies than the Pink Noise option WAVETABLE These waveforms have been...

Страница 22: ...PLE PRESETS AND RAW SAMP Samples from the Nord Sample Library come with preset filter and Amp Envelope settings in order to make them instantly playable M Preset filter settings are applied using an a...

Страница 23: ...d without keeping the Multi Edit button pressed down Exit the sticky Multi Edit mode either by pressing Multi Edit Shift Solo again or by pressing Shift Exit KB SPLIT The Nord Wave 2 has 3 split point...

Страница 24: ...e sound level of the transient decreases gradually between the 0 and 2 settings of the knob The 2 setting of the knob corresponds to 0 Attack in non Transient mode DECAY Decay is the time it takes for...

Страница 25: ...han the LP24 setting A 12 dB filter is also known as a 2 pole filter The LP24 setting with an attenuation slope of 24 dB octave is a more classic synth filter It cuts out frequencies rather drasticall...

Страница 26: ...his ringing occurs depends on the Frequency value When the LP HP filter setting is used the RES knob instead controls the high pass cut off frequency as indicated by the FREQ HP text KB TRACK The reas...

Страница 27: ...AS PHASER The Phaser PHAS effect produces a characteristic sweeping sound which is created by splitting the audio signal into two paths One path passes through a filter that alters the phase The amoun...

Страница 28: ...ilter removing low frequency con tent This can be useful for making long delay tails sound less muddy The BP setting adds a Band Pass filter which dampens both high and low frequencies making for a fa...

Страница 29: ...dividual sound sources from a sequencer E A Layer does not have to be active in a Program to receive MIDI it will always respond to incoming MIDI on its MIDI Channel This makes it possible to control...

Страница 30: ...ge 0 124 0 127 0 4 M A Program Change message that reaches the Nord Wave 2 unaccompanied by Bank Select messages will take effect in the currently focused Program bank exiting Live mode if active In t...

Страница 31: ...to select the type of pedal connected to the SUSTAIN PEDAL jack in case the functionality of the pedal is reversed when the pedal is up sustain is on and vice versa The Auto setting can automati cally...

Страница 32: ...ntrol of the entire Wave 2 When set to Off the text Send on Lay er Channel is displayed indicating that the Layer Channels in this mode can be used for sending MIDI Range 1 16 Off Default 1 3 MIDI LAY...

Страница 33: ...rograms from the Nord Wave 2 to a computer Uploading bundles containing programs and their associated sample files Performing backups of the entire instrument Restoring the entire instrument to a prev...

Страница 34: ...sampled song intro to a single key the Nord Sample Editor 3 opens up many possibilities together with the Nord Wave 2 Here are some of the key features Intuitive user interface Drag and drop single o...

Страница 35: ...MIDI IN The 5 pin MIDI In connection is used for receiving MIDI data sent from external devices such as controller keyboards sequencers or computers MIDI OUT The 5 pin MIDI Out connection will send M...

Страница 36: ...evel 15 Layer A Pan 16 Layer B Pan 17 Layer C Pan 18 Layer D Pan 19 Amp Env Attack 82 Amp Env Attack Transient 81 Amp Env Decay 83 Amp Env Sustain 84 Amp Env Release 85 Amp Env Velocity 86 Filter Env...

Страница 37: ...Pedal 31 G Gain Ctrl Pedal 31 Gate 18 Getting started 8 Glide 17 Global MIDI Channel 29 Global Transpose 32 Group 23 H Harmonic FM 21 Headphones 35 HP Delay 28 HP High Pass 25 I Impulse Morph 17 Inhar...

Страница 38: ...20 Shift Pattern 18 Skip Atk 20 Soft buttons 31 Solo Layer 23 Sound Menu 31 Split Menu 23 Split Position 23 Store 13 Store As 13 Subdivision Mst Clk 14 Sustain Amp Env 24 Sustain Pedal 31 Swap Organiz...

Страница 39: ...to be the source of interference to radio or television reception which can be determined by turning the equipment off and on the user is encouraged to try to correct the interference by one or more o...

Страница 40: ......

Отзывы: