3.
Switches, Plugs and Connectors
1)
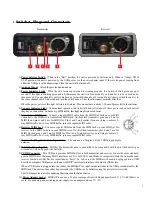
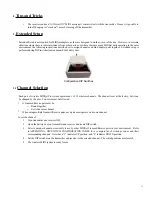
Power Selector Switch
- When in the “Batt” position, the unit is powered by batteries only. When in “Adapt/ Off &
USB” position, the unit is powered by the USB port or via the power adapter input. If there is no power coming from
either the USB port or the adapter input, then the unit will be turned off.
2)
Antenna Mount
- Attach the provided antenna here.
3)
Power Indicator Light
- When the unit receives power and is working properly, this light will blink green once per
second. If this light is blinking green and red, that means the unit is in bind mode. If you intend for it to be in bind mode,
then proceed. If you accidentally put it in bind mode, just switch the units off, use the dip switches to switch the unit(s) to
the same channel out of bind mode, and turn the units back on. They should connect normally after that.
When the power gets low, this light will start to blink red. This means there is about 1/2 hour of power left in the batteries.
4)
Connect Indicator Light
- Under normal operation, this light will blink yellow about 3 times per second on both units if
they have a connection. Under heavy MIDI traffic, this light may blink much faster.
5)
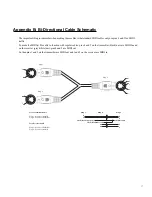
Transmitter MIDI Jack
- Connect a regular MIDI cable from the MIDI Out Jack on your MIDI
controller to the MIDIjet Pro transmitter’s MIDI jack. On this black transmitter, pins 4 and 5 are for
MIDI In and pins 1 and 3 are for MIDI Out. Pins 1 and 3 only matter if you are trying to achieve 2-
way MIDI traffic. For 1-way MIDI traffic, just use a regular MIDI cable.
6)
Receiver MIDI Jack
- Connect a regular MIDI cable from the MIDI Jack on your MIDI jet Pro
receiver to the MIDI In jack on your MIDI device. On this black transmitter, pins 4 and 5 are for
MIDI Out and pins 1 and 3 are for MIDI Im. Pins 1 and 3 only matter if you are trying to achieve 2-
way MIDI traffic. For 1-way MIDI traffic, just use a regular MIDI cable.
7)
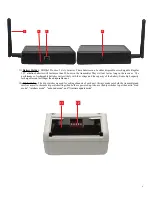
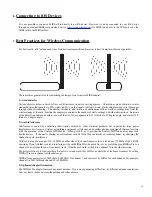
Detachable Hinged and Swiveling Antenna
- The antenna is a Taoglas 2.4Ghz 2 DBI hinged dipole
antenna.
8)
Belt Clip Mounting Hole
- MIDIjet Pro transmitter pack is pre-drilled to be compatible with the provided belt clip or
with the a ULX1 body pack wire belt clip.
9)
USB B Connector
- This USB port provides MIDI In/Out on both transmitter and receiver. It uses the same standard,
generic MIDI driver that many MIDI interfaces use. It is both OS X and Windows compatible. Both the transmitter and
receiver function as USB Devices rather than as “hosts”. So, to be used, the MIDIjet will need to be plugged into a USB
host like a computer USB port or an iConnect MIDI™ interface to interface with mobile iOS devices.
When a USB cable is plugged into the socket, the MIDIjet Pro’s input/output switches to the USB port and disables the
MIDI jack. The unit can then either be powered by the USB bus or by batteries using the power selector switch.
The USB connector is also for updating firmware should that need arise.
10)
Power Adapter Socket
- MIDIjet Pro can use a 2.1mm, center-positive switching adapter from 5V - 9V with 200mA or
more. For an analog, non-switching power supply, use an adapter between 7V - 9V.
5
1
2
3
4
5
6
Transmitter
Receiver

