


AC 5247
READER DEFAULT CODE OBDII
•
LED lamps not working
If you turn on the scan tool and perform the I/M Readiness test but the LED lamps are not
working, there may be several possible causes, including bad connection and ignition off . In
this case, follow these steps to check the scan tool.
- Make sure the OBDII cable is connected to the DLC securely.
- Verify the ignition key is in the KOER position.
- Run the LED Test in the System Setup menu. If the scan tool did not pass this test, there is
a problem with the LED lamp. Please contact the Tech Support or your local selling agent.
•
Can’t use the diagnostics function :
When you select the Diagnostics function in the main screen, it only shows the I/M Readiness
status, the scan tool may be in Ready Test Mode. All you have to do is to select Scan Tool
Mode in the System Setup menu.
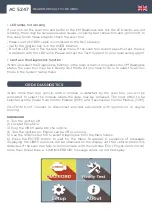
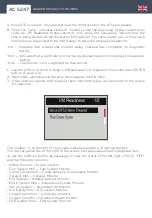
ORDII DIAGNOSTICS
When more than one vehicle control module is detected by the scan tool, you will be
prompted to select the module where the data may be retrieved. The most often to be
selected are the Power train Control Module [PCM] and Transmission Control Module [TCM].
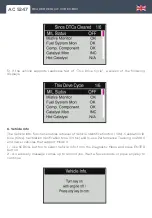
CAUTION: Don’t connect or disconnect any test equipment with ignition on or engine
running.
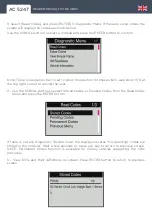
Connexion
1) Turn the ignition off .
2) Locate the vehicle
3) Plug the OBDII cable into the vehicle
4) Turn the ignition on. Engine can be off or running.
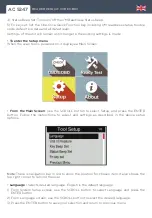
5) Use the SCROLL button to select Diagnostics from the Main Screen.
6) Press the ENTER button to wait for the Menu to appear. A sequence of messages
displaying the OBDII protocols will be observed on the display until the vehicle protocol is
detected. If the scan tool fails to communicate with the vehicle’s ECU (Engine Control Unit)
more than three times, a “LINKING ERROR!” message shows up on the display.
Содержание AC 5247
Страница 1: ...clas com LECTEUR CODE DEFAUT OBDII READER DEFAULT CODE OBDII AC 5247...
Страница 51: ......


