background image

7

English

6

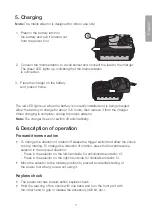
5. Charging

Note:

 The mains adaptor is designed for indoor use only.

1.  Press in the battery latch on 

the battery and pull it forward out 
from the power tool.

3.  Place the charger on the battery 

and press it home.

The red LED lights up when the battery is correctly installed and is being charged.
Allow the battery to charge for about 3–5 hours, then remove it from the charger. 
When charging is complete, unplug the mains adaptor.

Note:

 The charger does not switch off automatically.

6. Description of operation

Forward/reverse action

•  To change the direction of rotation: Release the trigger switch and allow the chuck 

to stop rotating. To change the direction of rotation, press the forward/reverse 
selector in the required direction:


- Press in the selector on the left-hand side for anticlockwise rotation 

Q

.


- Press in the selector on the right-hand side for clockwise rotation 

P

.

•  Move the selector to the midway position to prevent accidental starting of  

the power tool when you are not using it.

Keyless chuck

•  The power tool has a rapid-action keyless chuck.
•  Hold the rear ring of the chuck with one hand and turn the front part with  

the other hand to grip or release the accessory (drill bit, etc.).

2.  Connect the mains adaptor to a wall socket and connect the lead to the charger. 

The green LED lights up, indicating that the mains adaptor  
is connected.

Содержание DJC123-120

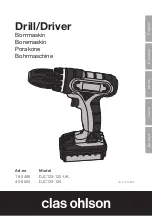
Страница 1: ...E ngl i sh S ve n sk a N orsk S uomi Deut s ch Ver 20130903 Art no Model 18 3466 DJC123 120 UK 40 8554 DJC123 120 Drill Driver Borrmaskin Boremaskin Porakone Bohrmaschine...

Страница 2: ...d hand tool KEEP THIS USER GUIDE 1 Work area a Keep the work area clean and well lit Accidents are more likely to happen in cluttered and dark areas b Do not use power tools in explosive environments...

Страница 3: ...ions f Wear suitable clothing Do not wear loose clothing or jewellery Keep your hair clothing and gloves away from moving parts Loosely fitting clothes jewellery or long hair may get trapped in moving...

Страница 4: ...act with the acid rinse the affected area with water If the acid gets into your eyes seek medical assistance Acid from the battery may cause irritation and burns 6 Servicing a Servicing and repairs mu...

Страница 5: ...tool Read the entire user guide follow the safety rules and observe the warnings Wear ear protectors and safety glasses 2 Care and maintenance Keep the ventilation openings of the motor free from debr...

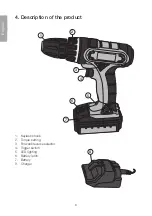
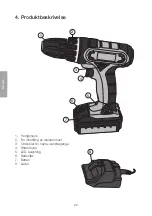
Страница 6: ...6 E ngl i sh 8 1 2 3 4 7 6 5 4 Description of the product 1 Keyless chuck 2 Torque setting 3 Forward reverse selector 4 Trigger switch 5 LED lighting 6 Battery latch 7 Battery 8 Charger...

Страница 7: ...Release the trigger switch and allow the chuck to stop rotating To change the direction of rotation press the forward reverse selector in the required direction Press in the selector on the left hand...

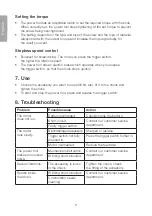
Страница 8: ...ory you want to use drill bit etc fit it to the chuck and tighten the chuck To start and stop the power tool press and release the trigger switch 8 Troubleshooting Problem Possible cause Action The mo...

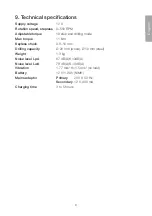
Страница 9: ...d drilling mode Max torque 11 Nm Keyless chuck 0 8 10 mm Drilling capacity 20 mm wood 10 mm steel Weight 1 3 kg Noise level LpA 67 dB A K 3dB A Noise level LwA 78 dB A K 3 dB A Vibration 1 77 m s2 K 1...

Страница 10: ...mmet a H ll arbetsutrymmet rent och v l upplyst Belamrade och m rka utrymmen inbjuder till olyckor b Anv nd inte elektriska handverktyg i explosiva milj er som i n rheten av l ttant ndliga v tskor gas...

Страница 11: ...ktriska handverktyget kan resultera i personskada e Str ck dig inte f r l ngt Se till att du st r stadigt med god balans hela tiden Detta m jligg r b ttre kontroll i ov ntade situationer f B r l mplig...

Страница 12: ...erktyg endast tillsammans med d rf r mnade batterier Anv ndning av annat batteri kan orsaka skade och brandrisk d N r batteriet inte anv nds f rvara det p avst nd fr n andra metallf rem l som gem mynt...

Страница 13: ...etalldetektor St ll alltid omkopplaren f r h ger v nsterg ng i l st l ge innan verktygsbyte Produktm rkning med s kerhetssymboler p produkten L s hela bruksanvisningen f lj s kerhetsreglerna och beakt...

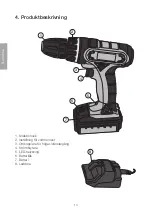
Страница 14: ...14 S ve n sk a 8 1 2 3 4 7 6 5 4 Produktbeskrivning 1 Snabbchuck 2 Inst llning f r vridmoment 3 Omkopplare f r h ger v nsterg ng 4 Str mbrytare 5 LED belysning 6 Batteril s 7 Batteri 8 Laddare...

Страница 15: ...rotationsriktning genom att trycka omkopplaren t nskat h ll Tryck in omkopplaren p v nster sida f r h gerrotation P Tryck in omkopplaren p h ger sida f r v nsterrotation Q St ll omkopplaren i mellanl...

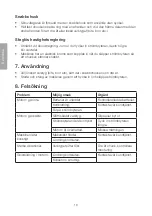
Страница 16: ...g bits borr etc s tt det i snabbchucken och dra t Starta och st ng av maskinen genom att trycka in och sl ppa str mbrytaren 8 Fels kning Problem M jlig orsak tg rd Motorn g r inte Batteriet r urladdat...

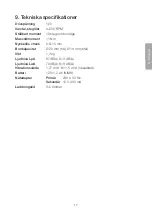
Страница 17: ...och borrl ge Maxvridmoment 11 Nm Nyckell s chuck 0 8 10 mm Borrkapacitet 20 mm tr 10 mm st l Vikt 1 3 kg Ljudniv LpA 67 dB A K 3 dB A Ljudniv LwA 70 dB A K 3 dB A Vibrationsv rde 1 77 m s2 K 1 5 m s2...

Страница 18: ...n a Hold arbeidsplassen ren ryddig og godt opplyst Rot og d rlig opplyst arbeidsplass kan for rsake ulykker b Ikke bruk elektriske h ndverkt y i eksplosjonsfarlige omgivelser som for eksempel n r lett...

Страница 19: ...ner oppst r f Bruk fornuftige arbeidskl r Ikke bruk l stsittende kl r og smykker Hold kl r hansker og smykker unna bevegelige deler L stsittende kl r smykker eller langt h r kan feste seg i bevegelige...

Страница 20: ...kontakt med batterisyre m du straks skylle deg med vann Dersom syren kommer i kontakt med ynene m du opps ke lege Syre fra batteriet kan for rsake irritasjon og brannskader 6 Service a La profesjonell...

Страница 21: ...advarsler 2 R d om vedlikehold Hold alltid motorens ventilasjons pninger fri for spon og smuss Rengj r maskinen regelmessig med oppvaskmiddel p en lett fuktet klut Bruk aldri sterke rengj ringsmidler...

Страница 22: ...22 N orsk 8 1 2 3 4 7 6 5 4 Produktbeskrivelse 1 Hurtigchuck 2 For innstilling av dreiemoment 3 Omkobler for h yre venstregange 4 Str mbryter 5 LED belysning 6 Batteril s 7 Batteri 8 Lader...

Страница 23: ...toppe helt opp Skift rotasjonsretning ved trykke omkobleren til nsket posisjon Trykk omkobleren inn p venstre side for h yrerotasjon P Trykk omkobleren inn p h yre side for venstrerotasjon Q Still omk...

Страница 24: ...gchucken og trekk til Maskinen startes stoppes ved trykke inn slippe opp str mbryteren 8 Feils king Problem Mulig rsak Tiltak Motoren g r ikke Batteriet er utladet Kontroller og lad batteriet Kortslut...

Страница 25: ...g boreposisjon Maks dreiemoment 11 Nm N kkell s chuck 0 8 10 mm Borekapasitet 20 mm tre 10 mm st l Vekt 1 3 kg Lydniv LpA 67 dB A K 3 dB A Lydniv LwA 70 dB A K 3 dB A Vibrasjonsverdi 1 77 m s K 1 5 m...

Страница 26: ...ynn tavaraa olevat ja pime t tilat lis v t onnettomuusriski b l k yt s hk k ytt isi k sity kaluja r j hdysherk ss ymp rist ss kuten helposti syttyvien nesteiden kaasujen tai p lyn l hell S hk k ytt is...

Страница 27: ...kuvan osan p lle saattaa johtaa onnettomuuteen e l kurota liian pitk lle Varmista ett ty asentosi on tasapainoinen ty n jokaisessa vaiheessa N in olet paremmin varustautunut mahdollisen onnettomuuden...

Страница 28: ...i tulipaloon d Kun et k yt akkua s ilyt sit poissa metalliesineiden ulottuvilta esim paperiliittimet kolikot avaimet naulat ruuvit tai muut metalliesineet jotka saattavat muodostaa kontaktin akun napo...

Страница 29: ...ihtoa Tuotteen merkinn t ja turvallisuussymbolit Lue koko k ytt ohje noudata turvallisuusohjeita ja varoituksia K yt kuulosuojainta ja suojalaseja 2 Hoito ohjeet Pid moottorin tuuletusaukot puhtaina p...

Страница 30: ...30 S uomi 8 1 2 3 4 7 6 5 4 Tuotekuvaus 1 Pikaistukka 2 V nt momentin s din 3 Suunnanvaihdon valitsin 4 Virtakytkin 5 LED valo 6 Akun lukitus 7 Akku 8 Laturi...

Страница 31: ...py rimissuuntaa painamalla valitsinta Py rimissuunta oikealle P paina valitsimen vasenta puolta Py rimissuunta vasemmalle Q paina valitsimen oikeaa puolta Aseta valitsin keskiasentoon est ksesi tahatt...

Страница 32: ...ja kirist K ynnist ja sammuta kone painamalla ja p st m ll virtakytkin 8 Vianetsint Ongelma Mahdollinen syy Toimenpiteet Moottori ei k y Akku tyhjentynyt Tarkasta akun tila lataa akku Oikosulku Ota yh...

Страница 33: ...ustila V nt momentti maks 11 Nm Avaimeton istukka 0 8 10 mm Porauskapasiteetti 20 mm puu 10 mm ter s Paino 1 3 kg Melutaso LpA 67 dB A K 3 dB A Melutaso LwA 70 dB A K 3 dB A T rin taso 1 77 m s2 K 1 5...

Страница 34: ...rohandwerkzeug im nachstehenden Sicherheitshinweis bezieht sich auf Handwerkzeuge die an das Stromnetz angeschlossen sind oder mit Akkus betrieben werden Diese Anleitung aufbewahren 1 Arbeitsraum a De...

Страница 35: ...rohandwerkzeug kann ernsthafte Verletzungen herbeif hren b Mit Schutzausr stung arbeiten Immer einen Augenschutz tragen Die bedarfs gerechte Verwendung von Schutzausr stung wie Atemschutz rutschfesten...

Страница 36: ...Unf lle sind auf schlecht gewartete Elektrohandwerkzeuge zur ckzuf hren f Die Werkzeuge sind scharf und sauber zu halten Ordnungsgem gewartete Schneidwerkzeuge mit scharfen Klingen verursachen wenige...

Страница 37: ...die das Werkzeug besch digen k nnen Der Akku darf nicht bei Temperaturen ber 40 C geladen werden Der Akku bringt seine volle Leistung erst nach etwa 5 Aufladungen Entladungen Das Ladeger t vor der Lad...

Страница 38: ...angefeuchteten Tuch reinigen niemals starke Reinigungsmittel verwenden Den Akku regelm ig aufladen die h ufige Nutzung ist von Vorteil 3 Hinweise zur Entsorgung Bitte das Produkt entsprechend den loka...

Страница 39: ...9 Deut s ch 8 1 2 3 4 7 6 5 4 Produktbeschreibung 1 Schnellfutter 2 Einstellung des Drehmomentes 3 Umschalter f r Rechts Linksdrehung 4 Einschalter 5 LED Beleuchtung 6 Akku Sicherung 7 Akku 8 Ladeger...

Страница 40: ...g freigeben und das Futter ganz zum Stillstand kommen lassen Danach wird die Drehrichtung durch Dr cken des Umschalters in die gew nschte Richtung ge ndert nach links f r Rechtsdrehung P nach rechts f...

Страница 41: ...utter schnell zum Stillstand kommt 7 Handhabung Das gew nschte Werkzeug Bits Bohrer etc ausw hlen in das Futter einsetzen und festziehen Die Maschine ber die Bet tigung bzw Freigabe des Abzugs ein ode...

Страница 42: ...g H chstdrehmoment 11 Nm Schl sselloses Futter 0 8 bis 10 mm Bohrleistung 20 mm Holz 10 mm Stahl Gewicht 1 3 kg Schalldruckpegel LpA 67 dB A K 3 dB A Schallleistungspegel LwA 70 dB A K 3 dB A Vibratio...

Страница 43: ...i samsvar med f lgende direktiver og standarder Vakuuttaa ett t m tuote t ytt seuraavien direktiivien ja standardien vaatimukset Erkl rt hiermit dass dieses Produkt die Anforderungen und Bestimmungen...

Страница 44: ...oks 485 Sentrum 0105 OSLO Suomi Asiakaspalvelu puh 020 111 2222 s hk posti asiakaspalvelu clasohlson fi Internet www clasohlson fi Osoite Clas Ohlson Oy Maistraatinportti 4 A 00240 HELSINKI Great Brit...

Отзывы: