5
E
N
G
L
IS
H
Print a test page
1. Turn on the print server (connect the DC plug) and make sure that
the printer is ready for printing.
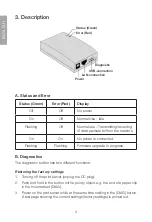
2. Push and hold in the button for 2 sec. with a pointy object e.g. the end
of a paper clip in the hole marked [DIAG].
3. A test page is printed showing the current settings.
N.B.
PostScript-printers are not able to print the test page. No page will be
printed if you have such a printer.
C. USB connection
Connection for the printer cable.
D. LAN connection
Connection for CAT -5 cable to the Access Point, used during basic setup.
E. Power
Connection for the adaptor’s DC plug.
4. Setup
The wireless print server supports a variety of operating systems and can
be setup differently accordingly:
• The wireless print server normally needs to be configured, however if your
network has a DHCP server you merely need to connect it to the network
(Plug-and-play). On the included CD you will find instructions on this.
• The PC which will be connected to the print server must always
be configured.
4.1 Using the guide
The guide which is found on the CD is designed for Windows XP and Vista.
This is the recommended method for configuration. The guide can be used
to configure the wireless print server for your network, even if the print server
does not have a valid IP address.
Содержание 38-2945
Страница 2: ......


