background image

2

English

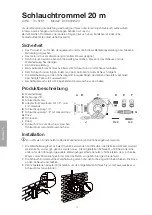
A B

C

D

E

F

G

J

H x4

x4

I

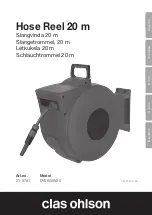
Hose Reel 20 m

Art. 

no 31-8781  Model DY6600W20

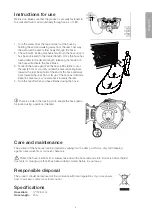
Please read the entire instruction manual before using the product and then save it for future reference.
We reserve the right for any errors in text or images and any necessary changes made to technical data.
In the event of technical problems or other queries, please contact our Customer Services (see address 
details on the back).

Safety

•  The hose reel is only intended for personal domestic use and only in the manner described in this 

instruction manual.

•  The hose is only designed for use with cold water.
•  Do not pull the hose with excessive force when unreeling it. Doing so may damage the wall bracket or 

housing of the reel.

•  Never let children use or play with the hose reel.
•  Keep children away from the hose and reel while reeling the hose in.
•  Always hold the end of the hose and walk it back to the reel while it is reeling in.
•  Check the wall bracket and locking pin on a regular basis. Replace any damaged parts.
•  Always turn the water off when the hose is not in use. 

Product description

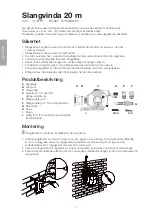
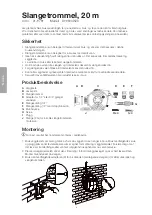
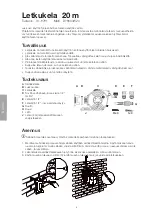
A

   Wall bracket

B

   Locking pin

C

   Hose reel

D

   Adapter for 1/2" BSP or 3/4" BSP  


threaded tap

E

   1/2" hose connector

F

   1/2" water stop hose connector

G

   Nozzle

H

   Screw

I

   Wall plug

J

   Hose (2 m) for connecting the hose  


reel to a tap

Installation

  The hose reel should be installed at around waist height.

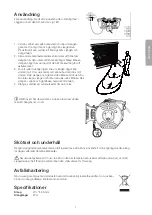
1.  Use the wall bracket as a template and mark out where you need to drill on the wall. Use the included 

screw and wall plug or use another appropriate fastening method to attach the bracket to the wall. 
Ensure that there are no electrical wires or water pipes in the wall where you intend to drill/screw.

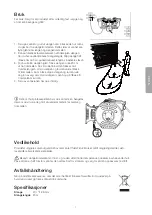
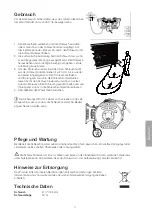
2.  Place the hose reel onto the bracket and insert the locking pin. Fit the nozzle onto the hose.
3.  Using the supplied adapter (D), connect the hose reel to the tap using the connection hose (J). 

Содержание 31-8781

Страница 1: ...E ngl i s h Sv e ns ka Nor s k Suo mi D e ut s ch Hose Reel 20 m Slangvinda 20 m Slangetrommel 20 m Letkukela 20 m Schlauchtrommel 20 m Art no Model 31 8781 DY6600W20 Ver 20201026...

Страница 2: ...in Always hold the end of the hose and walk it back to the reel while it is reeling in Check the wall bracket and locking pin on a regular basis Replace any damaged parts Always turn the water off wh...

Страница 3: ...the reel Keep hold of the end of the hose and walk back towards the reel Do not let go of the hose as it retracts Keep the hose taut as you walk back towards the reel 4 Turn the tap off when you have...

Страница 4: ...med den till vindan n r den rullas in Kontrollera v ggf stet och l ssprinten med j mna mellanrum Byt ut ev skadade delar St ng alltid av inkommande vatten till produkten n r den inte anv nds Produktbe...

Страница 5: ...ch g med den tillbaka till vindan Du kan inte sl ppa slangen och l ta den sj lv rullas tillbaka H ll slangen i sp nn och g tillbaka med den till vindan 4 St ng av vattnet vid vattenutkastet n r du r k...

Страница 6: ...l trommelen mens den rulles inn Kontroller veggfestet og l sesplinten med jevne mellomrom Bytt ut eventuelle skadde deler Skru alltid av vanntilf rselen n r produktet ikke er i bruk Produktbeskrivelse...

Страница 7: ...lippe slangen og la den rulle seg inn av seg selv Hold slangen i spenn og g tilbake til trommelen med den 4 Skru av vannkranen n r du er ferdig Det er et hull p l sesplinten hvor du kan feste en henge...

Страница 8: ...ulje aina letkun vieress kun se kelataan sis n Tarkista sein kiinnike ja lukkosokka s nn llisin v liajoin Vaihda mahdollisesti vahingoittuneet osat Sulje vesihana aina kun tuotetta ei k ytet Tuotekuva...

Страница 9: ...sta kiinni ja kulje sen kanssa takaisin kelalle l p st irti letkusta l k anna sen kelautua itsekseen Pid letkusta tiukasti kiinni ja kulje sen kanssa takaisin kelalle 4 Sulje vesi vesihanasta kun olet...

Страница 10: ...fen Eventuell besch digte Teile sofort auswechseln Bei Nichtgebrauch stets den eingehenden Wasseranschluss abschalten Produktbeschreibung A Wandhalterung B Sicherungsstift C Schlauchtrommel D Adapter...

Страница 11: ...t den Schlauch loslassen und ihn von selbst zur ckrollen lassen Den Schlauch gespannt halten und und ihn langsam zur ck in die Schlauchtrommel fahren lassen 4 Abschlie end den Wasserhahn zudrehen Der...

Страница 12: ...lvelu clasohlson fi Internet www clasohlson fi Osoite Clas Ohlson Oy Kaivokatu 10 B 00100 HELSINKI United Kingdom Customer Service contact number 020 8247 9300 e mail customerservice clasohlson co uk...

Отзывы: