background image


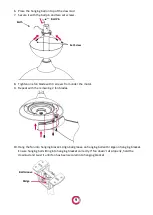
6.


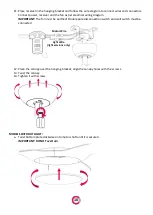
Place the hanging ball on top of the downrod  

7.


Secure it with the ball pin and two set screws.  


8.


Tighten one fan blade with 3 screws from under the motor.  

9.


Repeat with the remaining 2 fan blades.  


10.


Hang the fan into hanging bracket. Align ball groove on hanging ball with ridge on hanging bracket. 

Ensure hanging ball sitting into hanging bracket correctly. If fan doesn’t sit properly, hold the 

downrod and twist it until fan has been secured into hanging bracket.   


Ball Pin 

Set Screw 

Earth 

Ball Groove 

Ridge 

Содержание GLIDER DC

Страница 1: ...GLIDER DC Installation Manual VER 0 1...

Страница 2: ...h any object and that there is enough space from the blade tip to the wall or ceiling Please note that insufficient clearance distances might cause wobbling and the bigger this clearance is the better...

Страница 3: ...isit clarofans com au IMPORTANT NOTE The important safeguards and instructions given in this manual are not meant to cover all possible conditions and situations that may occur It must be understood t...

Страница 4: ...d components and lay on a cloth or soft surface to avoid damage DO NOT lay the motor housing on its side as the housing may get damaged 2 Before commencing installation check that all parts are includ...

Страница 5: ...ed Ensure that at least 30mm of the screw is threaded into the support NOTE The fixing screws included are designed for use when ceiling fan is secured onto timber joists For all other surfaces additi...

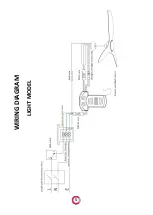
Страница 6: ...5 WIRING DIAGRAM LIGHT MODEL...

Страница 7: ...6 NO LIGHT MODEL...

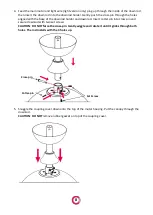
Страница 8: ...is capable of carrying a load of at least 45kg CAUTUION Ensure building cable is able enter the canopy close to terminal block 2 Remove cotter pin and cross pin from downrod and loose two set screws...

Страница 9: ...od holder and downrod Insert cotter pin into cross pin and secure downrod with two set screws CAUTION DO NOT force the cross pin Gently wiggle and rotate it until it glides through both holes The rod...

Страница 10: ...tor 9 Repeat with the remaining 2 fan blades 10 Hang the fan into hanging bracket Align ball groove on hanging ball with ridge on hanging bracket Ensure hanging ball sitting into hanging bracket corre...

Страница 11: ...T The fan must be earthed Double pole disconnection switch and wall switch must be connected 12 Place the canopy over the hanging bracket align the canopy holes with the screws 13 Twist the canopy 14...

Страница 12: ...blades now move in a clockwise direction CARE CLEANING Periodic cleaning approximately 6 months of your ceiling fan is the only maintenance required Use a soft brush or lint free cloth to avoid scratc...

Страница 13: ...hen will start rotating slowly whilst building up to the correct speed This is normal behaviour for DC fans THINGS TO NOTE If the receiver is not receiving a signal from the remote control a Please ch...

Страница 14: ...ted Check RCD Switch board and wiring on premises Fan keeps beeping but will not start Loose wire connections or plugs to fan receiver Check wire connections and ensure plugs are positively connected...

Страница 15: ...age Motor Consumption Rated Light Power C4500 101A 220 240Vac Max 35 W DC Motor n a C4500 202A 220 240Vac Max 35 W DC Motor n a C4501 101A 220 240Vac Max 35 W DC Motor 24 W LED C4501 202A 220 240Vac M...

Страница 16: ......

Отзывы: