background image

6

The stove must have a minimum clearance of 1200 mm to a combustable
ceiling above.

Due to the heat of a hot stove, a suitable fire guard should be used to
provide additional protection.

Note; All stoves should be installed in accordance with the local building
regulations.

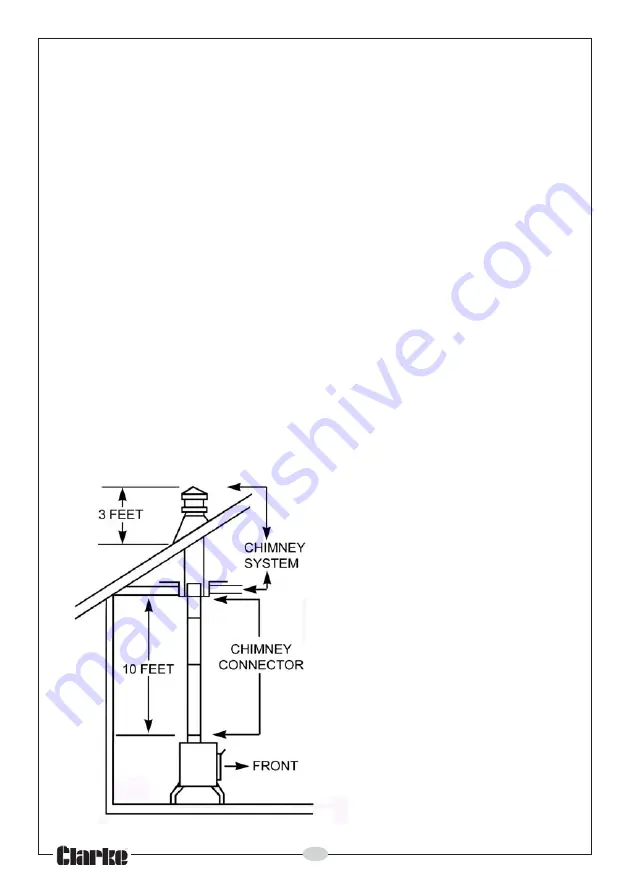
THE CHIMNEY

The stove is supplied with a  flue pipe for top mounting with the fixing screws
supplied. The stove should never be connected to a shared chimney/flue
system.

When sections of the flue pipe fit into one another, the end facing upwards
must be the end with the larger internal dimensions with the downward
facing pipe fitting into it such that deposits do not collect on the joint or allow
condensation to weep at the joints. Flue pipes with a smaller cross-sectional
area than that of the stove outlet should never be used. Flue pipes must not
project into the chimney connector, such as to cause a restriction to the gas
flow.

Ensure the joints are completely sealed as air leakage will lead to poor
performance. Avoid having more than two bends in the flue system. Any
offset between bends should be minimised and the flue should be equipped
with suitable access doors for inspection & cleaning.

A range of suitable flue pipes,
cowls and fire cement are
available from your Clarke
dealer.

Special methods are required
when passing through a wall or
ceiling. Please refer to your local
building regulations and/or fire
department.

Assuming that when the stove is
first installed, the chimney is
clean, and sound, then the
chimney & flue should be
inspected part way through the
burning season to establish the
regularity of sweeping required.
This should always be less than
one year.

Fig 5

Содержание 6910120

Страница 1: ...USER GUIDE GC0909 Classic Cast Iron Stove JUNIOR FRANKLIN PART NO 6910120 ...

Страница 2: ...ve been abused or tampered with in any way or not used for the purpose for which it was intended Faulty goods should be returned to their place of purchase no product can be returned to us without prior permission This guarantee does not effect your statutory rights SPECIFICATION Please note that the details and specifications contained herein are correct at the time of going to print However CLAR...

Страница 3: ...and any other condition that may affect the stoves performance Any damage should be properly repaired or the part replaced If in doubt DO NOT use the stove Consult your local dealer 5 ALWAYS keep children and visitors at a safe distance from the stove 6 NEVER direct water or any other liquid on to the stove particularly when it is hot 7 NEVER use gasolene or other flammable liquids for fire starti...

Страница 4: ...ht and attach the flue adaptor as shown in Fig 2 using the screws supplied Ensure the fireproof gasket is correctly seated in the base of the flue adaptor 4 Check that the blanking plate is installed in the rear panel of the stove when the normal flue exit is required If the rear mounting flue configuration is to be used the blanking plate will be fitted to the top of the stove andthe flue connect...

Страница 5: ... protective metal plate at least 5mm thick or other non flammable floor protector such as 20mm ceraform board or other non combustable material having a conductivity of K 0 84 BTU FT2 HR IN degF Combustable materials such as carpet or linoleum must be removed from beneath the stove When the stove is positioned near a wall constructed of flammable material the distances shown on Fig 4 must be adher...

Страница 6: ...ller cross sectional area than that of the stove outlet should never be used Flue pipes must not project into the chimney connector such as to cause a restriction to the gas flow Ensure the joints are completely sealed as air leakage will lead to poor performance Avoid having more than two bends in the flue system Any offset between bends should be minimised and the flue should be equipped with su...

Страница 7: ...l away from the sides 2 Allow the stove to warm up slowly and evenly with the air controls almost closed avoiding intense flames 3 Keep the fire burning for three hours or so gradually increasing the size of the fire using larger logs which will burn naturally but slowly keeping the stove on a low setting 4 After a couple of days burning at this level increase the brightness intensity of the fire ...

Страница 8: ... and close the doors 4 When the fire is burning strongly add further fuel 5 When the stove is hot close the top air controls 6 The burn rate can be reduced by partially closing the lower air controls REFUELLING 1 Open the doors and add fuel Always open the doors slowly to avoid a sudden rush of intake air and smoke escaping into the room 2 Open the air controls and leave open for a few minutes to ...

Страница 9: ...o burn too quickly Such materials can produce excessive tar or creosote which can be damaging and in extreme cases cause a fire inside the chimney The dryness of wood can be assessed by looking at the end of the log Radial cracks deep enough to be considered as splits should be present in dry seasoned logs This level of dryness may take up to two years to achieve The maximum length of fuel suitabl...

Страница 10: ...t the top of the stove and working down to the bottom Particular attention should be given to the air inlet controls which can become obstructed GENERAL MAINTENANCE Take this opertunity to check for any damaged parts inside the stove In the event of damage or broken components replacements can be obtained from your Clarke dealer Unauthorised spare parts should on no account be used Inspect the fir...

Страница 11: ...care to tension these evenly or there is a risk of breaking the new glass pane During prolonged periods out of use the air inlets should be left open and the door left slightly ajar in order to circulate fresh air and discourage condensation from forming which could encourage corrosion If disposing of this product do not dispose of with general waste Metal products should be taken to your local ci...

Страница 12: ... e n t a s i m o o R e d i s t u o e h t o t e r u s s e r p l a c i n a h c e m h t i w d e p p i u q e s e s u o h n I e h t l i t n u w o d n i w a n e p o n o i t a l i t n e v d e h s i l b a t s e l l e w s i e r i f t a e h w o L t u p t u o s l e u f t c e r r o c n I s l e u f d e d n e m m o c e r e s U e l i h w s e k o m S g n i n r u b t n e i c i f f u s n i s i t h g u a r D k c e h...

Страница 13: ...13 PARTS DIAGRAM IMPORTANT The use of parts other than CLARKE replacement parts may result in safety hazards decreased appliance performance and may invalidate your warranty ...

Страница 14: ... i F 5 e t a l P e d i S t f e L 8 1 s s a l G w o d n i W 6 e t a l p e d i S t h g i R 9 1 l o r t n o C r i A y r a m i r P 7 e t a l P t n o r F 0 2 b o n K l o r t n o C 8 e t a l P p o T 1 2 g e L 9 e t a r G 2 2 e s a B e u l F 0 1 l e n a P k c i r b e r i F t f e L 3 2 e l d n a H r o o D 1 1 l e n a P k c i r b e r i F t h g i R 4 2 n w o h s t o n e u l F r e p p U 2 1 y l b m e s s A e...

Страница 15: ...___________________________________________________________________ __________________________________________________________________________ __________________________________________________________________________ __________________________________________________________________________ __________________________________________________________________________ ________________________________...

Страница 16: ......

Отзывы: