background image

14

English

M502

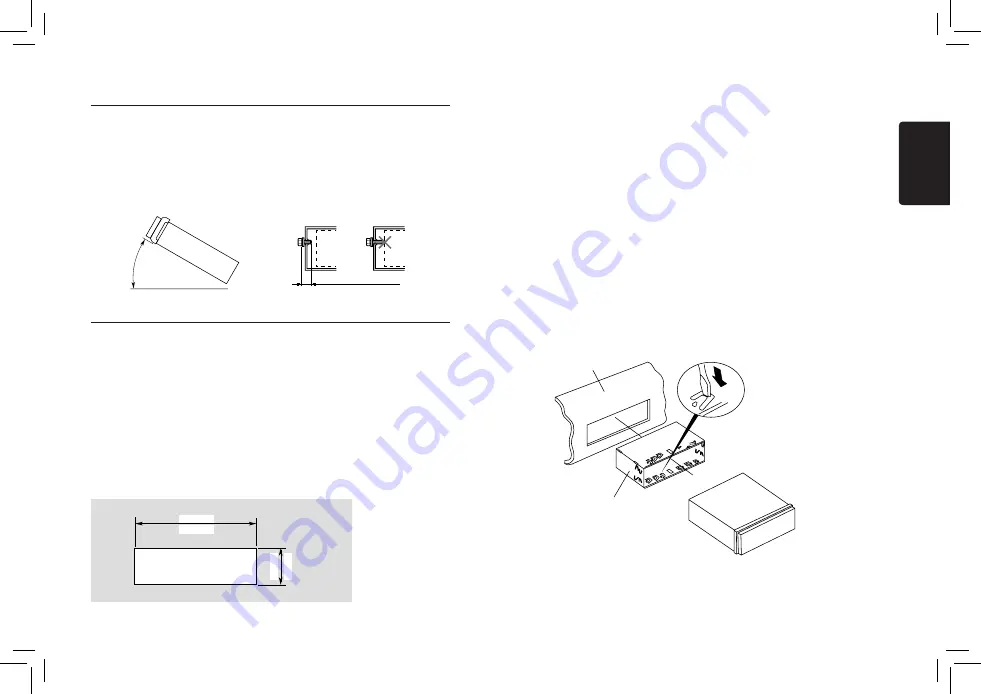
4) Cautions on Installation

5) Installing the Source Unit

1.  Place the mounting bracket into the instrument panel, use a screwdriver to bend 

each stopper of the mounting bracket inward, then secure the stopper.

2. Wire as shown in Section 7) .

3. Insert the source unit into the mounting bracket until it locks.

4.  Take care of the top and bottom of the trim ring and mount it so that all the hooks 

are locked.

Notes:

1.  Some car models require special mounting kits for proper installation.  Consult your 

Clarion

 dealer for details.

2. Fasten the front stopper securely to prevent the source unit from coming loose.

•  Console opening dimensions

Max 30˚

Chassis

Chassis

Damage

Max. 6 mm (M5 screw)

Figure 2

Figure 3

(182 mm)

7-3/16

"

2-1/8

"

53 mm

Hole

Notes of installation

1. Before installation, please make sure 

proper connections are conducted and 

the unit operates normally. Improper 

connection may result in  damage to the 

unit.

2. Use only accessories designed and 

manufactured for this unit and other 

unauthorized accessories may result in 

damage to the unit.

3. Before installation, please fasten all power 

cables.

4. DO NOT install the unit in the place where 

close to hot area to prevent damage to 

electrical components such as the laser 

head. 

5. Install the unit horizontally. Installing the 

unit more than 30 degree vertically may 

result in worse performance.

6. To prevent electric spark, connect the 

positive pole first and then the negative 

pole.

7. DO NOT block the cooling fan exit to 

ensure sufficient heating dissipation of this 

unit, or it may result in damage to this unit.

Unit installation

Method A

1. Insert mounting bracket into dash board, 

choose appropriate mounting tab according 

to the gap width, bending the mounting 

tab outwards with a screwdriver to fix the 

mounting bracket in place. 

2. Slide the unit into the bracket until you hear 

a click sound.

Dashboard

Mounting Bracket

Screwdriver

1.  Prepare all articles necessary for 

installing the source unit before 

starting.

2.  Install the unit within 30° of the 

horizontal plane. (Figure 2)

3.  If you have to do any work on the car 

body, such as drilling holes, consult 

your car dealer beforehand.

4.  Use the enclosed screws for 

installation. 

   Using other screws can cause 

damage. (Figure 3)

Содержание M502

Страница 1: ...Bluetooth CD USB MP3 WMA RECEIVER LECTEUR Bluetooth CD USB MP3 WMA RECEPTOR Bluetooth CD USB MP3 WMA M502...

Страница 2: ...dio Operations 6 SiriusXM Satallite Radio Operations 6 USB Operations 8 iPod iPhone Operations 9 Bluetooth Operations 10 AUX Operations 11 5 TROUBLE SHOOTING 12 6 ERROR DISPLAYS 12 7 SPECIFICATIONS 13...

Страница 3: ...munications However there is no guarantee that interference will not occur in a particular installation If this equipment does cause harmful interference to radio or television reception which can be...

Страница 4: ...SB memory stick or turning the power off during reading data When affected static electricity or electric noise Connect disconnect the USB memory stick when it is not accessed Connecting with the comp...

Страница 5: ...is unit Be careful about using this unit for a long time without running the engine If you drain the car s battery too far you may not be able to start the engine and this can reduce the service life...

Страница 6: ...ress the knob to confirm after input all 4 digit password UNLOCK SIRIUSXM mode Press the CONTROL knob to unlock all locked stations rotate the CONTROL knob to select a digit press the CONTROL knob lef...

Страница 7: ...atic station search To stop auto store press other buttons having radio functions Notes 1 After auto store the previous stored stations will be overwritten 2 The unit has 4 bands such as FM1 FM2 FM3 a...

Страница 8: ...ion The Replay feature allows you to pause rewind and replay up to 30 minutes of live SiriusXM Satellite Radio 1 While listening to a SiriusXM channel press on the remote control to enter Replay mode...

Страница 9: ...ote control again Selecting a track Track up 1 Press the CONTROL knob right on the panel or button on the remote control to move to the beginning of the next track 2 Each time you press the CONTROL kn...

Страница 10: ...cel repeat playback Random play This function allows you to play all tracks in a random order 1 Press the RDM button on the remote control once or more until RDM ALBUM appears on the LCD for album ran...

Страница 11: ...d Call History You can search any Dialled Missed Received Call History 1 Rotate the knob to select DIALED CALL MISSED CALL or RECEIVED CALL 2 Press the knob to enter the selected call history 3 Rotate...

Страница 12: ...b right is pressed playback proceeds to another track in the advancing direction Bluetooth Operations Track down 1 Press the CONTROL knob left to move to the beginning of the previous track 2 Each tim...

Страница 13: ...luetooth function of the device is not enabled Refer to the user manual of the device for how to enable the function The audio quality is poor after connection with a Bluetooth enabled device The inte...

Страница 14: ...idth 19 64 Height 3 11 32 Depth Weight of the Remote Control Unit 0 77oz 24g including battery Note Specifications and design are subject to change without notice for further improvement Power Output...

Страница 15: ...ories may result in damage to the unit 3 Before installation please fasten all power cables 4 DO NOT install the unit in the place where close to hot area to prevent damage to electrical components su...

Страница 16: ...t and pull out the left part Disassemble the unit 1 Switch off the power 2 Remove the trim ring 3 Insert the removal keys straight back until they lock then pull the unit out 4 Disconnect all the wire...

Страница 17: ...reen Gray Black White Black Purple Black Green Black Front Left 15A Front Right Gray White Purple Green Gray Black White Black Purple Black Green Black 4 Speaker system 2 Speaker system or Rear Right...

Отзывы: