background image

DRZ9255

17

English

16

DRZ9255

English

Operations Common to Each Mode

Selecting the sampling frequency
(SAMPLING)

About the sampling frequency

You can switch between 96 kHz and 48 kHz as
the sampling frequency.

When the sampling frequency is set to 96 kHz,
high band spread, depth of tones and
transparency of sound are improved.

The factory default setting is "

fs=96 kHz

".

1. Press the [

ADJ

] button.

2. Press the [

] or [

] button to select

"

SAMPLING

".

3. Press the [ ] or [ ] button to select

"

fs=96kHz

" or "

NORMAL

" (fs=48kHz).

4. Press the [

ADJ

] button to return to the

previous mode.

Selecting the audio mode (MODE)

The factory default setting is "

STANDARD

".

Standard mode <STANDARD>/Multi mode

<MULTI>

This is used to make various sound adjustments
for playback. For details, see "About the
Standard mode and Multi mode" (page 18)

Direct mode <DIRECT>

This is used to playback tones as they are
without adjusting the tones of this unit. The
configuration of the speaker system becomes
"front (2ch) + rear (2ch) + non-fader (2ch)."

1. Press the [

ADJ

] button.

2. Press the [

] or [

] button to select

"

MODE

".

3. Press the [ ] or [ ] button to select

"

STANDARD

", "

DIRECT

" or "

MULTI

".

4. Press the [

ADJ

] button to return to the

previous mode.

Adjusting the filter (FILTER/X-
OVER)

The filter can be adjusted for each speaker. For
details, see "About filter settings" (page 18).

The filter can be adjusted when the Audio mode is
the Standard mode or the Multi mode.

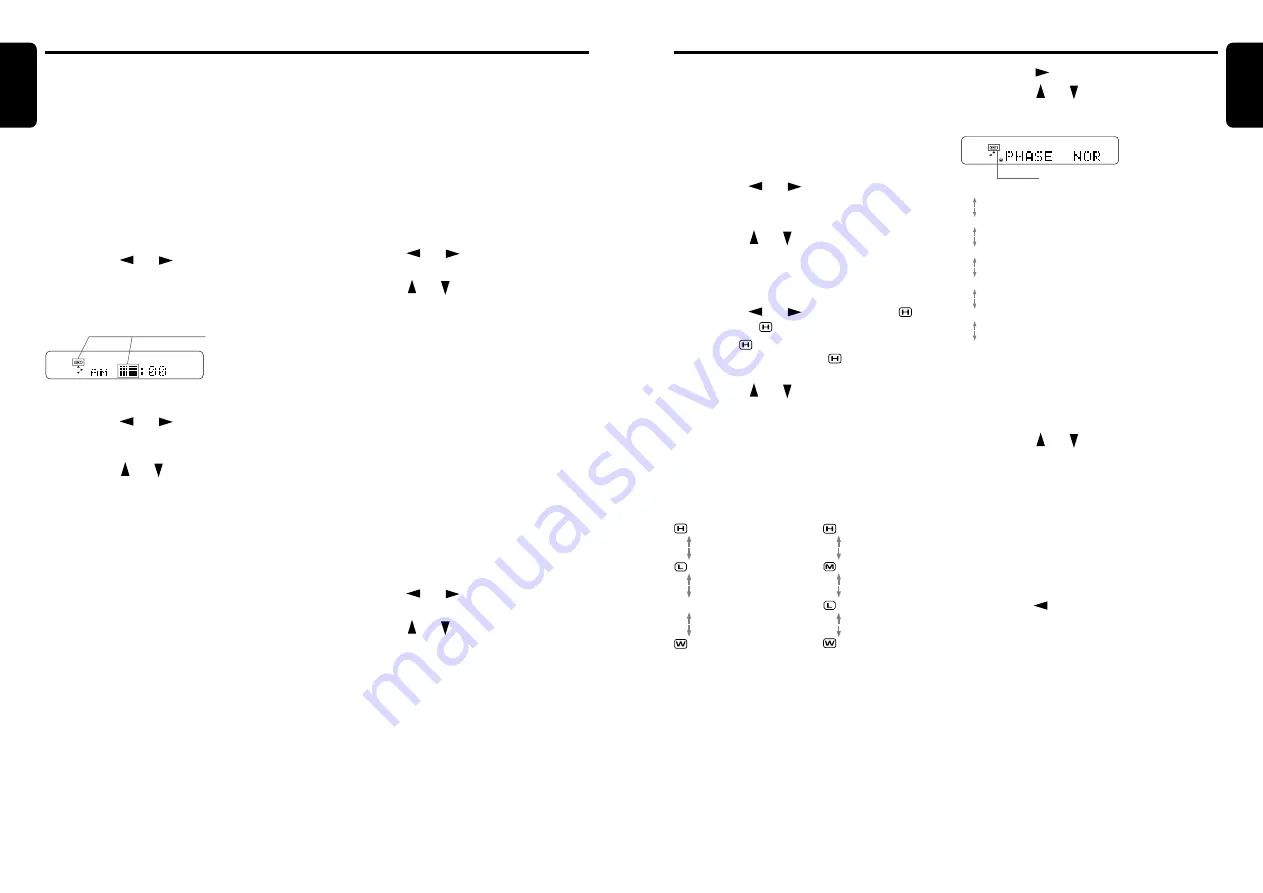
1. Press the [

ADJ

] button.

2. Press the [

] or [

] button to select

"

SOUND

".

3. Press the [

s

] button.

4. Press the [ ] or [ ] button to select

"

FILTER

" or "

X-OVER

".

Select "

FILTER

" when the Audio mode is the

Standard mode, and "

X-OVER

" when the

Audio mode is the Multi mode.

5. Press the [

] or [

] button to select "

FRONT

" or "

 HIGH

".

Select "

 FRONT

" when the Audio mode is

the Standard mode, and "

 HIGH

" when the

Audio mode is the Multi mode.

6. Press the [ ] or [ ] button to select the

speaker to adjust.

The mute function of a selected speaker can
be turned ON/OFF by pressing the [

ROTARY

]

knob while the speaker is selected.

Each press of the buttons switches the setting
as follows:

In the Standard mode:

  FRONT

  FRONT

REAR

  SUB-W

Setting the clock

This unit displays the time when the car engine
is running (ACC ON).
The clock is displayed in 12-hour format.

• When a navigation system is connected, the

clock cannot be adjusted as clock data is sent
from the navigation system.

1. Press the [

ADJ

] button. The previously

adjusted item "

CLOCK

", for example, is

displayed on the title display, and the mode
changes to the Adjust mode.

2. Press the [

] or [

] button to select

"

CLOCK

".

3. Press the [

s

] button. The time at

adjustment (e.g. "PM 2:20") is displayed, and
the mode changes to the Clock setup mode.

* The clock is not adjusted if you press any

other button while you are setting the clock.

4. Press the [

] or [

] button to select hours

or minutes. Items that are blinking can be
adjusted.

5. Press the [ ] or [ ] button to set the setting

for the item.

6. Press the [

s

] button.

You will hear a short high-pitched sound, and
the clock will be set.

Note:

• You cannot set the clock when it is displayed with

the power turned OFF.

• Set the clock again if you remove the battery for

inspection or repairs.

7. Press the [

ADJ

] button to return to the

previous mode.

Operations Common to Each Mode

Blinking

7. Press the [

] button.

8. Press the [ ] or [ ] button to select the

speaker adjustment item. Each press of the
buttons switches the adjustment item.

fc LPF (filter frequency of low-pass filter)*

SLP LPF (filter slope of low-pass filter)* 

fc HPF (filter frequency of high-pass filter)*

SLP HPF (filter slope of high-pass filter)*

G (gain)*

PHASE (phase)*

* Sometimes this is not displayed depending on the

selected speaker.

9. Press the [

s

] button. The setting value

blinks.

10.Press the [ ] or [ ] button to adjust the

setting.

For details of the adjustment ranges of each
adjustment item, see "About filter settings"
(page 18).

11.When you have finished the adjustment,

press the [

s

] button to return to the

screen in step 8. This sets the setting value.

12.Repeat steps 8 to 11 to adjust the

adjustment items for the selected speaker.

13.When you have finished the adjustment,

press the [

] button to return to the screen

in step 6.

14.Repeat steps 6 to 13 to adjust the filter of

each speaker.

15.Press the [

ADJ

] button to return to the

previous mode.

Blinking

In the Multi mode:

  HIGH

  MID

  LOW

  SUB-W

Содержание DRZ 9255

Страница 1: ...ted in Japan Imprimé au Japon Impreso en Japón 2004 5 Abe K PE 2628B 280 8093 00 Clarion Co Ltd HIGH FIDELITY AM FM CD PLAYER LECTEUR AM FM CD HAUTE FIDELITE REPRODUCTOR DE CD CON AM FM DE ALTA FIDELIDAD Owner s manual Mode d emploi Manual de instrucciones ...

Страница 2: ... Display Items 8 5 REMOTE CONTROL 9 Inserting the Batteries 9 Functions of Remote Control Unit Buttons 10 6 OPERATIONS 11 Basic Operations 11 Radio Operations 13 CD Operations 14 Operations Common to Each Mode 16 7 OPERATIONS OF ACCESSORIES 25 CD Changer Operations 25 TV Operations 27 8 IN CASE OF DIFFICULTY 29 9 ERROR DISPLAYS 30 10 SPECIFICATIONS 30 APPENDIX TIME ALIGNMENT LIST 32 MEMO SOUND SET...

Страница 3: ...ing Compact Discs Use only compact discs bearing the or mark Do not play heart shaped octagonal or other specially shaped compact discs Some CDs recorded in CD R CD RW mode may not be usable Handling Compared to ordinary music CDs CD R and CD RW discs are both easily affected by high temperature and humidity and some of CD R and CD RW discs may not be played Therefore do not leave them for a long ...

Страница 4: ... volume is changed from 1db steps to 0 5db steps Q button Eject a CD when it is loaded into the unit CD SLOT CD insertion slot SCN button Perform scan play for 10 seconds of each track while in the CD mode RPT button Repeat play while in the CD mode RDM button Perform random play while in the CD mode DIRECT buttons Store a station into memory or recall it directly while in the radio mode buttons S...

Страница 5: ... volume is changed from 1db steps to 0 5db steps Q button Eject a CD when it is loaded into the unit CD SLOT CD insertion slot SCN button Perform scan play for 10 seconds of each track while in the CD mode RPT button Repeat play while in the CD mode RDM button Perform random play while in the CD mode DIRECT buttons Store a station into memory or recall it directly while in the radio mode buttons S...

Страница 6: ...ing Compact Discs Use only compact discs bearing the or mark Do not play heart shaped octagonal or other specially shaped compact discs Some CDs recorded in CD R CD RW mode may not be usable Handling Compared to ordinary music CDs CD R and CD RW discs are both easily affected by high temperature and humidity and some of CD R and CD RW discs may not be played Therefore do not leave them for a long ...

Страница 7: ...eries CR2025 making sure that they face the directions shown in the figure 3 Press in the cover until you hear it click into place Notes Using batteries improperly can cause them to explode Take note of the following points When replacing batteries replace both batteries with new ones Do not short circuit disassemble or heat batteries Do not dispose of batteries into fire or flames Dispose of spen...

Страница 8: ... the desired display Each time you press the DISP button the display switches in the following order Once selected the preferred display becomes the display default When a function adjustment such as volume is made the screen will momentarily switch to that function s display then revert back to the preferred display several seconds after the adjustment Main display Sub display Clock display Main ...

Страница 9: ...he display You can turn the display ON OFF by holding the A M button down for at least one second You can also turn the display ON by pressing the DISP button while the display is OFF Adjusting the tone Press the A M button and select the item to adjust Each time you press the A M button the item changes in the following order BASS and TREB are displayed when BASS TREB are selected at EQ SELECT Wh...

Страница 10: ...eload 8 cm CDs are not auto reloaded Be sure to remove it when ejected Selecting a track Track up 1 Press the D button to move ahead to the beginning of the next track 2 Each time you press the D button the track advances ahead to the beginning of the next track Track down 1 Press the A button to move back to the beginning of the current track 2 Press the A button twice to move to the beginning of...

Страница 11: ...tandard mode FRONT FRONT REAR SUB W Setting the clock This unit displays the time when the car engine is running ACC ON The clock is displayed in 12 hour format When a navigation system is connected the clock cannot be adjusted as clock data is sent from the navigation system 1 Press the ADJ button The previously adjusted item CLOCK for example is displayed on the title display and the mode change...

Страница 12: ...ency set on the high pass filter 20kHz Frequency band played back mainly by the speaker to 20 kHz Frequency set on the low pass filter Operations Common to Each Mode 80Hz 500Hz 2kHz Frequency band played back mainly by SUB W to 80 kHz Frequency band played back mainly by LOW 80 kHz to 500 Hz Frequency band played back mainly by MID 500 Hz to 2 kHz Frequency band played back mainly by HIGH 2 kHz on...

Страница 13: ... be adjusted in about 7 cm steps by holding down the or buttons For details see Appendix Time Alignment List page 32 10 When you have finished the adjustment press the s button to return to the screen in step 7 This sets the setting value 11 Press the button to return to the screen in step 6 12 Repeat steps 6 to 11 to adjust the position of each speaker 13 Press the ADJ button to return to the pre...

Страница 14: ... 2kHz 2 0dB 1 2kHz 2 0dB 1 BAND5 8kHz 2 0dB 1 8kHz 2 0dB 1 1 Select from range 50 Hz to 20 kHz 2 Select from range 630 Hz to 20 kHz Saving the filter setting time alignment setting P EQ setting MEMORY Three groups of adjustment settings made to suit your car can be saved for both the Standard mode and Multi mode P EQ settings are not saved when the Equalizer mode is set to BASS TREB 1 Press the AD...

Страница 15: ...ress the UP or DOWN button to select the desired disc If a CD is not loaded in a slot of magazine pressing the UP or DOWN buton can not work Setting the input level for portable audio AUX SENS This unit is provided with two AUX input lines The input level for third party portable audio connected to each of these lines can be set The factory default setting is MID 1 Press the ADJ button 2 Press the...

Страница 16: ...ch time you press the D button the track advances ahead to the beginning of the next track Track down 1 Press the A button to move back to the beginning of the current track 2 Press the A button twice to move to the beginning of the previous track Fast forward fast backward Fast forward Press and hold the D button for 1 second or longer Fast backward Press and hold the A button for 1 second or lon...

Страница 17: ...re to the power antenna lead one by one If the amplifiers turn off before all wires are attached use an external relay to provide remote on voltage excessive current required Press the reset button for about 2 seconds with a thin rod 8 IN CASE OF DIFFICULTY Reset button Auto store Auto store selects 6 TV stations automatically and stores each one into preset memory If there are not 6 stations with...

Страница 18: ...5 µV CD Player System Compact disc digital audio system Usable Discs Compact disc Frequency Response 1 dB 5 Hz to 20 kHz Signal to Noise Ratio 1 kHz 112 dB Dynamic Range 1 kHz 100 dB Harmonic Distortion 0 003 20Hz to 20kHz Audio Bass Control Action 50 Hz 12 dB Treble Control Action 10 kHz 12 dB Line Output Level CD 1 kHz Vol 0dB 4V Vol 6dB 8V Max DSP DAC A D conversion 24 bit 64x oversampling Σ A ...

Страница 19: ... 27 686 490 9 14 29 687 491 6 14 31 688 492 4 14 33 689 493 1 14 35 690 493 8 14 38 691 494 5 14 40 692 495 2 14 42 693 495 9 14 44 694 496 6 14 46 695 497 4 14 48 696 498 1 14 50 697 498 8 14 52 698 499 5 14 54 699 500 2 14 56 700 500 9 14 58 701 501 7 14 60 702 502 4 14 63 703 503 1 14 65 704 503 8 14 67 705 504 5 14 69 706 505 2 14 71 707 505 9 14 73 708 506 7 14 75 709 507 4 14 77 710 508 1 14...

Страница 20: ...equency fo Hz BAND3 Gain dB Q Center frequency fo Hz BAND4 Gain dB Q Center frequency fo Hz BAND5 Gain dB Q P EQ LEFT RIGHT Multi Mode MEMO SOUND SETUP MEMO MEMORY1 MEMORY2 MEMORY3 HPF Filter frequency fc Hz Slope dB oct Gain dB Phase NOR REV NOR REV NOR REV LPF Filter frequency fc Hz Slope dB oct Gain dB Phase NOR REV NOR REV NOR REV HPF Filter frequency fc Hz Slope dB oct Gain dB Phase NOR REV N...

Отзывы: