background image

En
g

lish

En
g

lish

O

w

n

e

Ma
n

u

a

l

O

w

n

e

Ma
n

u

a

l

58

59

CMS5 

CMS5 

Phone Operation

Placing a Call from Contact List

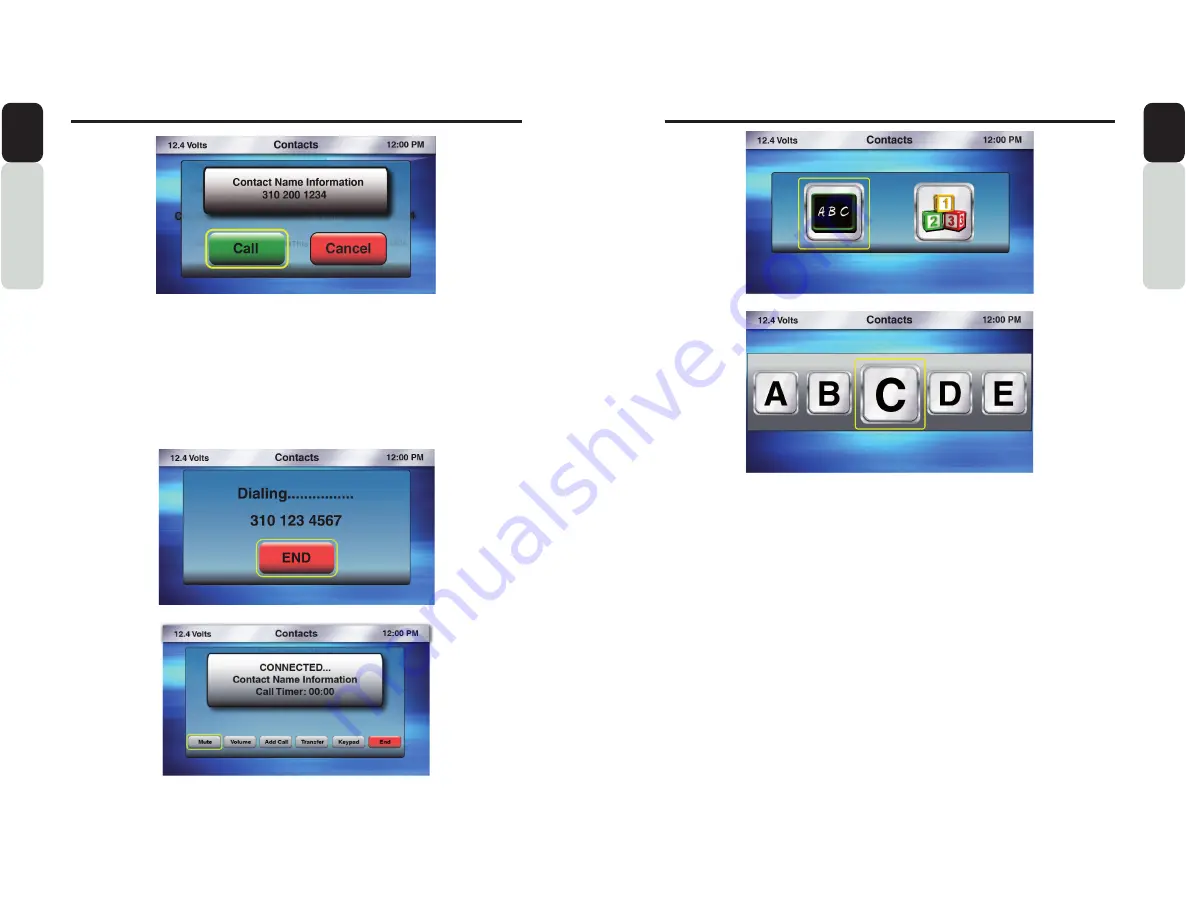
1. While in list of contacts, use the volume knob to scroll through your list of Contacts.
2. When the Contact Person’s Information is in the middle of the screen, press in & release the volume

knob to place a call to that Contact.

3. A pop-up window will appear saying: Would you like to call: with option YES and CANCEL. If you

select YES, the call will be placed and the display will show “Dialing....”, then CONNECTED”.

4. With the phone call in place, the display will show the Caller ID, Timer and a Add Call, Transfer,

Mute, Keypad and END CALL Button.

5. When the call is ended, you will go back to the last played source.

Phone Operation

Contact Search by ABC or 123

1. From the main Phone Screen, Press the 

MENU Button.

2. Use the volume knob to scroll through options until the Contacts Icon is in the middle of the carousel.
3. Press in & release the volume knob to select Contacts.
4. The list of your Contacts will now appear.
5. Press the 

MENU Button.

6. Now a pop-up window will appear with two options to choose from: “ABC” or “123”.


- “ABC” is search by Letter.


- “123” is search by Number.

7. Use the volume knob to toggle between the two options by moving the halo around the ABC icon.
8. Press in & release the volume knob to select “ABC” or “123”.
9. Now a pop-up window will appear with Letters/Numbers in icons.
10. Use the volume knob to scroll through the Letters/Numbers until the Letter/Number you want is in the

middle of the carousel.

11. Press in & release the volume knob to select that Letter/Number.
12. You will now see a list of Contacts.
13. Use the volume knob to scroll through the list of Contacts.
14. When the Contact you would like to call is in the middle of the screen.
15. Press in & release the volume knob to dial that Contact.
16. A pop-up window will appear with options to place a CALL or CANCEL.
17. If you select CALL, the call will be placed and the display will show “Dialing....”, then “CONNECTED”.
18. With the phone call in place, the display will show the Caller ID, Timer and END CALL Button.
19. When the call is ended, you will go back to the last played source.
Note: In all search option (for all source option), Searching is restricted to starting Alphabet/Number only

All manuals and user guides at all-guides.com

Содержание CMS5

Страница 1: ...CMS5 OWNER S MANUAL ENGLISH MARINE BLACK BOX SOURCE UNIT WITH J1939 All manuals and user guides at all guides com...

Страница 2: ...l Cool down the interior before use Note If devices such as MW4 or MW1 are disconnected when a function is running please make sure the entire unit s is restarted after connecting the remote devices f...

Страница 3: ...Mute Press In and Release Volume Knob to Mute Unmute and Rotate the Volume Knob to Un Mute the Audio SRC Source Button Press SRC button to display the Main Menu Use Volume Knob to Scroll through Sourc...

Страница 4: ...th device from the CMS5 will display a pop up saying Device Disconnected Adjusting the Volume 1 Rotate the Volume Knob Clockwise to increase the volume level 2 Rotate the Volume Knob Counter Clockwise...

Страница 5: ...to all in one place Get over 140 channels including commercial free music plus the best sports news talk comedy and entertainment Welcome to the world of satellite radio A SiriusXM Vehicle Tuner and S...

Страница 6: ...ect Channel Tuning 1 From the SiriusXM Play Screen Press the MENU Button 2 Use the volume knob to scroll through options until the Direct Icon is in the middle of the carousel 3 Press in release the v...

Страница 7: ...sXM menu screen and select Categories icon list to return to Category list and channel selections Note Find a Channel by Category will auto exit if left uninterrupted for more than 12 seconds Note All...

Страница 8: ...Note If a user selects a locked channel Channel Locked will display After 2 seconds the screen for unlocking the channels will be displayed The screen will not time out Screen will remain displayed u...

Страница 9: ...s Playlist Tracks Search can be done in each level 17 Now you will return to the iPod Play Screen and the selected song in the Playlist will start playing Note If there is no result matching to the se...

Страница 10: ...habet number No Match Found pop up message will be displayed iPod Audio Operation Genre 1 From the iPod Play Screen Press the MENU Button 2 Use the volume knob to scroll through options until the Genr...

Страница 11: ...from the Composer will start playing Note If there is no result matching to the searched alphabet number No Match Found pop up message will be displayed iPod Audio Operation Podcasts 1 From the iPod...

Страница 12: ...8 Use the volume knob to scroll though the list of tracks 9 When the Track you want to listen to is in the middleof the screen press in and release the volume knob to select that track 10 The Track w...

Страница 13: ...1 of Harness 3 Select Video 1 From the iPod Video Play Screen press the Menu Button 2 You will now see the following options Music Returns you back to the iPod Audio Play Screen and leaves iPod Video...

Страница 14: ...n each level 17 Now you will return to the iPod Video Play Screen and the selected Movie will start playing iPod Video Operation TV Shows 1 Select TV Shows from the list of Menu Options from the iPod...

Страница 15: ...like to select is in the middle of the screen press in release the volume knob to select that artist 15 Once selected you will see the list of Albums corresponding to the selected Artist When an Album...

Страница 16: ...appear with Letters Numbers in icons 10 Use the volume knob to scroll through the Letters Numbers until the Letter Number you want is in the middle of the carousel 11 Press in release the volume knob...

Страница 17: ...rough options until the Repeat Icon is in the middle of the carousel 3 Press in release the volume knob to select Repeat 4 Now a pop up window will appear with Repeat options Song Repeats current Song...

Страница 18: ...in the middle of the carousel 11 Press in release the volume knob to select that Letter Number 12 You will now see a list of Songs If there is no match found for the selected alphabet number then pop...

Страница 19: ...ENU Button 2 Use the volume knob to scroll through options until the selected focus is set 3 Press in release the volume knob to select Bookmark 4 Now a pop up window will appear with Bookmark options...

Страница 20: ...ubwoofer Phase Volume Frequency Source Volume Zone Volume Zone 1 Zone 2 All Zones Master Volume USB Player Attribures 4GRGCV 4CPFQO 5JWH G NGCTU VJG 5 QH KPG 6CIU UVQTGF Last selected channel is set t...

Страница 21: ...The halo will automatically shift to Month 9 With the halo around the Month rotate the volume knob to adjust to the correct Month 10 Press in release the volume knob to set the Month 11 The halo will...

Страница 22: ...G FGXKEG KU 10 13 When the CMS5 has found a Bluetooth Device you will see a pop up window appear asking you to QP TO VJG 2 0 PHQTOCVKQP HTQO VJG 5 VQ VJG GXKEG QP TO VJCV VJG 2 0 0WODGT QP VJG UETGGP...

Страница 23: ...e now transferred Bluetooth Connection and you will return back to the Bluetooth Settings Screen 19 If you select NO then you will return back to the Bluetooth Settings Screen Bluetooth Phone Operatio...

Страница 24: ...e The Bluetooth Microphone is an optional accessory and is not included with this unit 2 Zone Operation 2 Zone ON OFF 1 Press the Source Button SRC 2 Use the volume knob to scroll through the sources...

Страница 25: ...d in Front or Rear Zones Turn OFF 2 Zone to select source 1 Two USB sources cannot be played simultaneously in the front and rear If selected there will be a pop up telling Source cannot be selected 2...

Страница 26: ...to adjust or change 5 To return back to viewing the Camera Image place the switch to the ON position Refer to the Installation Guide for wiring a switch with or without using a SPDT Relay Page 88 Blue...

Страница 27: ...s current song All Repeats All songs Off Turns OFF the Repeat Feature 5 After your choice has been made you will see the Repeat Icon appear on the Bluetooth Audio Play Screen Bluetooth Audio Operation...

Страница 28: ...and move the halo until it is around Switch to This Device 3 Press in release the volume knob to switch Bluetooth Connection to this device 4 0QY C RQR WR YKPFQY YKNN CRRGCT CUMKPI QW VQ QP TO QPPGEV...

Страница 29: ...ooth Audio Operation Speaker 1 While in the main Phone Screen 2 Press the Menu Button 3 You will now see the Phone Menu Options 4 Use the volume knob to move the halo until it is around the Speaker Ic...

Страница 30: ...a pop up window will appear with two options to choose from ABC or 123 ABC is search by Letter 123 is search by Number 7 Use the volume knob to toggle between the two options by moving the halo aroun...

Страница 31: ...N VJG number you had entered 10 If you select YES the phone call will be placed 11 If you select CANCEL you will return back to the Phone Menu Screen Phone Operation Phone Call History 1 From the main...

Страница 32: ...it is around Switch To This Device 3 Press in release the volume knob to switch Phone Connection to this device 4 0QY C RQR WR YKPFQY YKNN CRRGCT CUMKPI QW VQ QP TO QPPGEVKQP VQ VJKU GXKEG 5 Use the v...

Страница 33: ...been completed you will return to the source you are currently using Phone Operation Make a second Incoming Call Call Waiting 1 When you are in the Active call and you want to have a second incoming c...

Страница 34: ...Fader Level adjust met slider 7 Rotate the volume knob to adjust the Fader Level Front Center Rear 8 When you have completed adjusting the Fader level Press in release the volume knob 9 Press the Back...

Страница 35: ...the middle 3 Press in release the volume knob to select 2 Zone 4 Rotate the volume knob to adjust the volume level 10 to 10 for Zone 1 Zone 2 5 You will see the halo around the Zone 1 volume adjustme...

Страница 36: ...will be displayed after 25 seconds of no action OFF Default Large Clock will not be displayed Font Color Change the Font Color White Yellow Red and Black 5 Selection of Reverse White option changes th...

Страница 37: ...PWODGT RQUKVKQP QW would like to save the Phone Contact to 5 Press in release the volume knob to save the Contact in the Favorite numbered position 6 HVGT QW CTG PKUJGF UCXKPI QWT CXQTKVG QW YKNN TGVW...

Страница 38: ...is muted Low Battery Voltage Warning This screen will appear when the Battery Voltage drops to or below 10v The audio will stop until voltage increases to 10 4v or above then the audio will resume Thi...

Страница 39: ...or Ground Vessel battery switch is OFF Blown Fuse Bad Grounding Point Verify Power Connector to CMS5 is connected properly Verify Battery Switch is ON Check in line fuse and vessel accessory radio Fu...

Страница 40: ...a if the cable is damaged SiriusXM products are available at your local audio retailer or online at www shop siriusxm com Subscription Updated The radio has detected a change in your SiriusXM subscrip...

Страница 41: ...All manuals and user guides at all guides com...

Страница 42: ...on Corporation of America All Rights Reserved Copyright 2015 Clarion Corporation of America Printed in China Imprim au Chine Impreso en China 2015 07 V 4 CMS5 All manuals and user guides at all guides...

Отзывы: