En
g
lish
En
g
lish
O
w
n
e
r
s
Ma
n
u
a
l
O
w
n
e
r
s
Ma
n
u
a
l
48
49
CMS5
CMS5
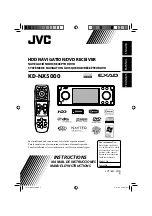
2-Zone Operation
2-Zone (Front Source)
1. Press the
Source Button (SRC).
2. Use the volume knob to scroll through the sources.
3. When the 2-Zone Icon is in the middle of the carousel, Press in & release the volume knob to select
2-Zone.
4. Once in 2-Zone, rotate the volume knob until the halo is around Front Source.
5. Press in & release the volume knob to select Front Source.
6. You will now see the Main Source Menu with a prompt to select the Front Source.
7. Use the volume knob to scroll through the Sources you would like to use for the Front Source.
8. Once you select a source for the Front Source (Zone 1), you will be taken to the 2-Zone Menu to
make a Source selection for the Rear Source (Zone 2).
2-Zone (Rear Source)
1. Press the
Source Button (SRC).
2. Use the volume knob to scroll through the sources.
3. When the 2-Zone Icon is in the middle of the carousel, Press in & release the volume knob to select
2-Zone.
4. Once in 2-Zone, rotate the volume knob until the halo is around Rear Source.
5. Press in & release the volume knob to select Rear Source.
6. You will now see the Main Source Menu with a prompt to select the Rear Source.
7. Use the volume knob to scroll through the Sources you would like to use for the Rear Source.
8. Once you select a source for the Rear Source (Zone 2), you will return to the Play Screen for the
Front Source.
9. If you want to change the volume level for Front/Rear Source, You need to press Source Button and
select the Front/Rear source. Now change the volume in the playscreen.
(In audio setting 2-Zone icon will be deactivated when the 2-Zone featre is active).
Note:
While 2-Zone setting is Turned ON and if you press any other source than (excluding FRONT
Source or REAR source) 2-Zone Source, System Settings, Camera there will be a pop up as
Source was not selected in Front or Rear Zones. Turn OFF 2-Zone to select source.
1. Two USB sources cannot be played simultaneously in the front and rear. If selected, there will be a
pop up telling Source cannot be selected.
2. Phone cannot be selected in the Rear (Phone will never come in the middle of the carousel in the
rear source selection menu), it can only be selected in Front Source Setting.
3. Camera cannot be selected in front or rear.
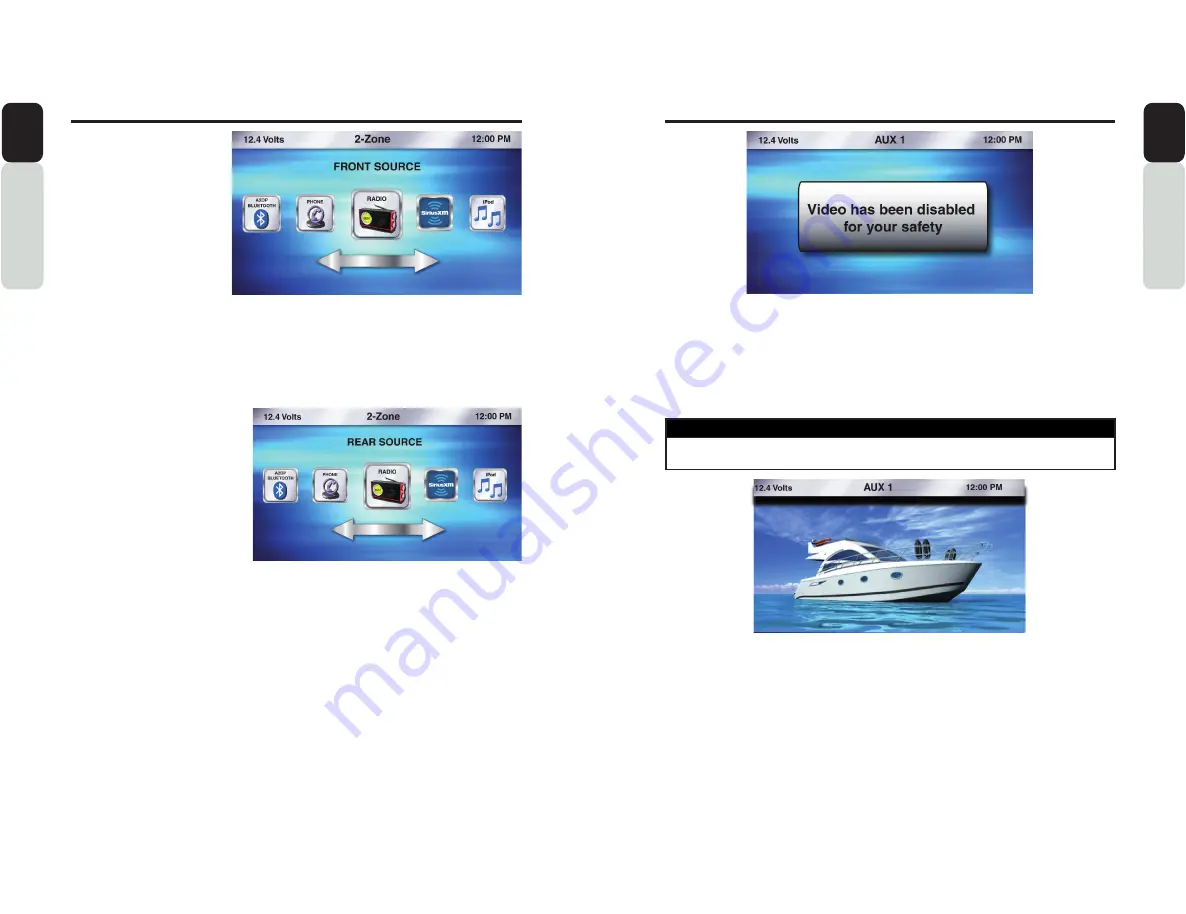
AUX 1 and AUX 2 Operation
AUX 1 and AUX 2 (Audio)
1. Press the
Source Button (SRC).
2. Use the volume knob to scroll through the sources.
3. When the AUX 1 or AUX 2 Icon is in the middle of the carousel.
4. Press in & release the volume knob to select AUX 1 or AUX 2.
5. You can now listen to the device that has been connected to the AUX 1 or AUX 2 RCA Inputs.
** If you have a device that plays Audio and Video and you are not seeing the video image, please check
the video input on the CMS5 has been connected to the video output from your Audio and Video
Device.
WARNING
VIEWING A VIDEO SIGNAL ON ANY DASH MOUNTED MONITOR WHILE IN MOTION IS
PROHIBITED BY LAW.
AUX 1 and AUX 2 (Video)
1. Press the
Source Button (SRC).
2. Use the volume knob to scroll through the sources.
3. When the AUX 1 or AUX 2 Icon is in the middle of the carousel.
4. Press in & release the volume knob to select AUX 1 or AUX 2.
5. You can now watch video from the device that has been connected to the AUX 1 or AUX 2 RCA Inputs.
** If you have a device that plays Audio and Video and you are not seeing the video image, the video
input on the CMS5 has been connected to the video output from your Audio and Video Device.
** Verify the Video Interlock Wire has been connected and the correct sequence has been followed.
Note:
When the video signal is detected in AUX1/AUX2, then the status bar would appear displaying the
battery voltage, Source name (AUX1/AUX2) and the clock for 3 seconds and then disappear.
For Video watching (either AUX1 or AUX 2), the yellow line of the CCA750 cable needs to be
connected for Video 1- In Line only.
All manuals and user guides at all-guides.com
Содержание CMS5
Страница 41: ...All manuals and user guides at all guides com...