background image

Clarion AutoPC Owner’s Manual

96

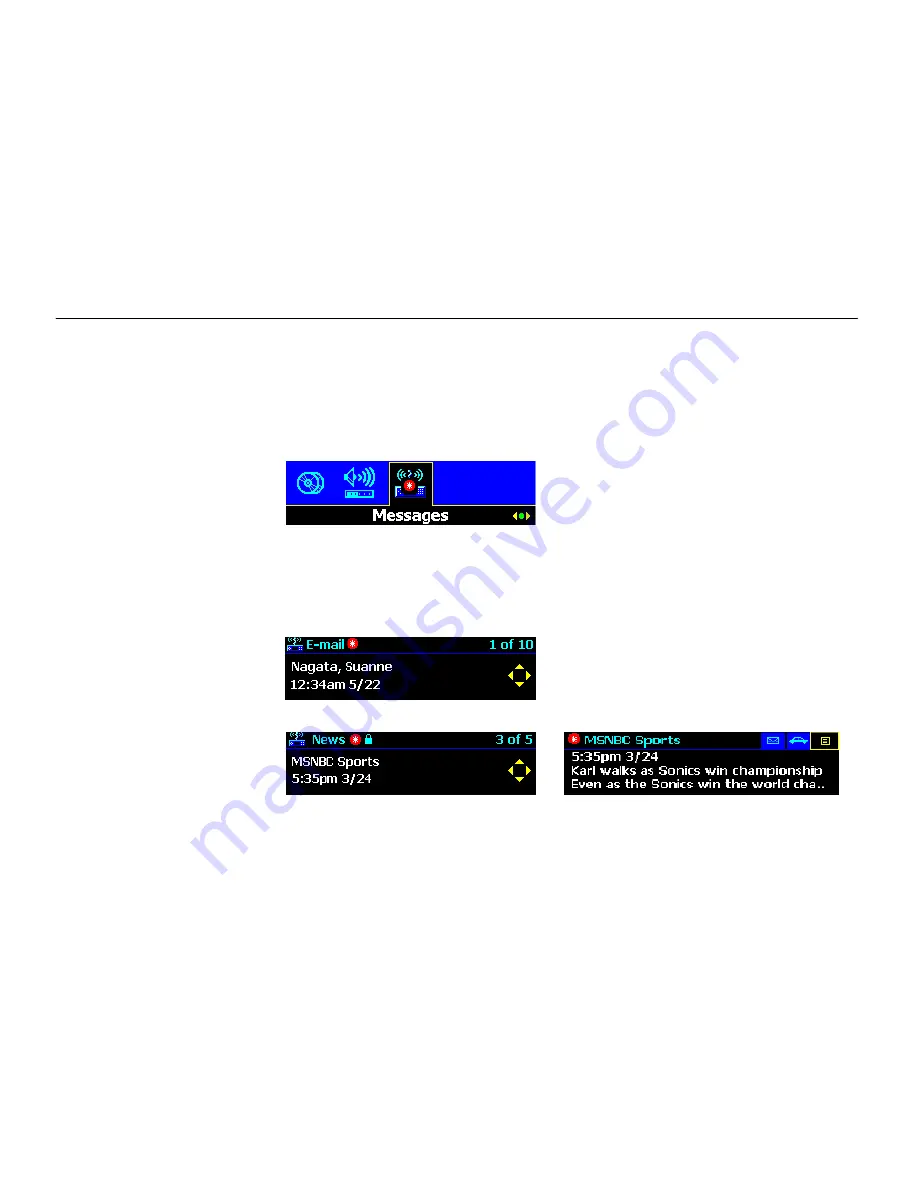
Reviewing Messages

When you receive a message, Messages alerts you with a tone (if audible
notification is on), and with an asterisk over its icon on the Start menu.

The summary information shown on the selection list is different for each
type of message. For E-mail, you see who it’s from. For Traffic, you see
the area the traffic alert affects, and, for News, you see the title.
Messages that haven’t been read have an asterisk (*) by them.

E-mail Message Listing


News Message Listing

News Message Text

Содержание AUTOPC 310C

Страница 1: ... CLARION CO LTD 1998 All Rights Reserved Clarion AutoPC 310C Owner s Manual ...

Страница 2: ...n parts of this system while driving can distract your attention away from the road and possibly cause an accident or other serious consequences Do not change system settings or enter data non verbally using your hands while driving Stop the vehicle in a safe and legal manner before attempting these operations This is important since while setting up or changing some functions you might be require...

Страница 3: ...d crystal display and are not malfunctions Handling Detachable Control Panel Also special care should be taken when handling and storing the Detachable Control Panel DCP Note The terms control panel and DCP are used interchangeably in this document to refer to the same thing Fully close DCP holder after DCP removal It is dangerous to keep the DCP holder at an angle once the DCP is removed Be sure ...

Страница 4: ...to cover the CF Card insertion slot with the cover when the slot is not being used Inserting the CF Card The Clarion AutoPC System will accept CF Cards from most manufacturers Warning CF Card can be inserted one way only Make sure to insert the CF Card with the manufacturer s label and arrow FACING RIGHT of the unit as shown to the right 1 CompactFlash is a trademark of SanDisk Corporation Make su...

Страница 5: ...nel as illustrated below Note If the CD is not manually removed within approximately 10 seconds after the eject button is pressed the CD will be automatically loaded back into the CD Player CD ROM Installation The vehicle should be parked at a level location when a higher version of OS or CD ROM software is installed Note If a vehicle starts up or cranks up or if the ACC accessory is turned on or ...

Страница 6: ...ding the Auto PC system on behalf of Clarion The only warranty provided by Clarion to the purchaser is that contained in Clarion s published limited warranty for the Auto PC system All other purported warranties and representations regarding the quality performance or the suitability of the Auto PC system are disclaimed Serial Number Place the serial number sticker for your Clarion AutoPC system h...

Страница 7: ...e controls 2 Detachable Control Panel DCP 6 General Operations 10 Chapter 2 Using Speech Commands 15 Getting help with speech commands 17 Chapter 3 Getting Ready 19 Display layout 20 Using Speech to go to a program 21 Using keys to go to a program 22 Navigating within programs 24 ...

Страница 8: ...ech Commands 31 Chapter 4 Using the Radio 35 Chapter 5 Using the CD Player 43 Chapter 6 Audio Adjustments 51 Chapter 7 Using Address Book 55 Address Book command words and keys 56 Add edit or delete a contact 61 Transfer a contact 66 Browsing Contacts 67 Protecting Address Book information 68 Chapter 8 Using Directions 69 ...

Страница 9: ...74 Commands to enter a destination point 82 Calculating the route 87 Driving the route 90 Chapter 9 Using Messages 93 Messages command words and keys 94 Reviewing Messages 96 Saving Messages 99 Changing message storage options 100 Chapter 10 Using Voice Memo 103 Recording voice memos 104 Deleting voice memos 109 Chapter 11 Customizing Your Auto PC 117 ...

Страница 10: ...ons 129 Speech factors you can change 130 To disable or enable the Wakeup word 133 Changing Timeouts 136 Chapter 12 Backup Restore 139 Using the CF Card for backup and restore 140 Chapter 13 Adding Removing Software and Hardware 143 Chapter 14 Tips and Troubleshooting 145 Tips 145 Troubleshooting 151 Specifications 157 ...

Страница 11: ...Clarion AutoPC Owner s Manual xi Glossary 159 Index 163 ...

Страница 12: ...Clarion AutoPC Owner s Manual xii ...

Страница 13: ...rtainment system for people on the go and integrates a compelling graphical user interface with voice control that keeps your hands on the wheel and eyes on the road CAUTION OPERATE THIS SYSTEM ONLY WHEN SAFE Taking your attention away from the road while driving can cause a serious accident This manual is designed to be used in two ways 1 As a general learning tool for you as you begin to operate...

Страница 14: ...nual 2 Locating the controls Detachable Control Panel DCP α Selector DCP release MUTE Display Keys Volume up Volume down IrDA Infrared Port BACK POWER HELP MENU Start Key Voice Memo ASSIST CompactFlashTM CF Card insertion slot ...

Страница 15: ...tachable Control Panel DCP Removable for security BACK Closes the currently displayed option Keys Use for dialing entering letters numbers and radio presets IrDA Infrared Port Transfer data between Windows CE based devices CompactFlash TM CF card insertion slot Use CF card to backup and restore data Volume down Touch once to decrease by 1 step Press and hold for greater decreases ASSIST Press to r...

Страница 16: ...eadth of information on your Auto PC Glance at the first few chapters noticing key words in the bolded headings Peruse the Index as that will be your primary reference when you need to find specific information on a topic Third study the Using Speech Commands and Getting Started chapters then move into using the Radio and CD Player to learn the basics of Auto PC Fast track to learning and using yo...

Страница 17: ...he α selector as shown in the figure CAUTION DO NOT TAKE YOUR EYES OFF THE ROAD UNLESS IT IS SAFE TO DO SO 2 To select the up down direction or the left right direction tilt the α selector in the corresponding direction 3 To select enter push directly inward on the middle element with the white dot α α Selector Operation Manually manipulating this selector should only be carried out for so long as...

Страница 18: ...tore it in the protective case provided We recommend taking it with you when leaving the vehicle 1 Turn the power off 2 Be sure that the control panel is fully closed Press the DCP release button as illustrated on the right 3 Pull the DCP toward you and to the left to remove it as shown on the right NOTE Using force to remove the DCP will damage the unit Removing the DCP ...

Страница 19: ...r the DCP to its fully open position 3 With your left index finger find the release button as shown in the drawing Push upward on the release button and pull the DCP toward you and to the left 4 For your safety return the DCP holder to the fully closed position the vertical position Detaching the DCP in lowered position Release button ...

Страница 20: ...The DCP can easily be damaged by shock After removing it be careful not to drop it or subject it to strong shock After detaching the control panel store it in the protective case provided 2 The connector connecting the source unit and the DCP is extremely important Do not press on it with fingernails screwdrivers etc Doing so may result in unit malfunction or damage DCP lowered positions ...

Страница 21: ...hing the DCP 2 Examine the back of the DCP and notice that there is a locking hook on the back of the DCP and that the hook must go into the receptacle on the holder 3 Slide the locking hook on the back of the DCP into the receptacle and press inward Attaching the DCP Receptacle Locking hook ...

Страница 22: ...out running the car s engine Draining the car s battery will prevent you from starting the car and may possibly shorten the life of the battery The clock is displayed when the ignition key is turned to the ACC accessory or IGN ignition on positions even if power to the unit is off In some cars the clock display may momentarily disappear when the ignition key is turned to the START starter engage p...

Страница 23: ...re available to adjust volume see the Using Speech Commands chapter When you press the Push To Talk button PTT Auto PC will listen for voice commands This is the same as saying the words Auto PC to wakeup Auto PC Backup Battery is not charged in shipment condition and it will start charging as soon as the Auto PC is connected to your car s power source Main Battery When the Backup Battery is charg...

Страница 24: ...e the Detachable Control Panel see Removing the DCP 4 Lower the DCP holder as shown in the picture Remove the battery holder by placing the tip of the flathead screwdriver on the exposed edge and pulling the holder outward Installing or replacing Coin Cell Battery Small flathead screwdriver ...

Страница 25: ...ual 13 5 Place CR2032 Coin Cell Battery with plus side up in the battery holder as shown 6 Install the battery by pushing the holder into the unit as shown Return the DCP holder to the fully closed position the vertical position ...

Страница 26: ... keys Getting Ready chapter To Do this See Help Tips for the current program screen Press the HELP key on the DCP Hear which speech commands are currently available Say Auto PC What can I say Hear speech command Help and find out how to use the commands that are currently available Say Auto PC Help Where to find information To get help from Auto PC ...

Страница 27: ...rom the wheel Auto PC doesn t listen for speech commands all of the time If you want to give commands to your Auto PC you must first wake it up Also only a few commands called global commands are available all of the time Many speech commands are specific to a program and so are called program commands Auto PC recognizes command words more effectively when you speak them decisively as in a command...

Страница 28: ...noise 6 You may need to train Auto PC to understand how you say one or more speech commands For more information see the section To train or add a custom command word in the chapter Customizing Your Auto PC If you don t know what commands you can say just say What can I say and Auto PC will tell you which speech commands it is listening for You can also say Help if you want to know what you can do...

Страница 29: ... voice command with another different tone You see both the commands and tones represented on the Auto PC HELP display For example speaking Auto PC along with other voice commands will appear as follows on the display Auto PC Radio FM Note that represents the start of a voice command and signifies the end of a voice command Other conventions used in Auto PC HELP are explained in this diagram Auto ...

Страница 30: ...ands 1 When you wake up Auto PC you ll hear the awake tone and see a green speech command timeout bar on the bottom of the screen 2 When Auto PC hears you you ll hear a short heard tone 3 When Auto PC stops listening you hear the sleep tone and the listening timeout bar green color disappears For examples of how to use speech commands see the Getting Ready chapter Tones that help you give speech c...

Страница 31: ... on the screen 2 Through voice synthesis Auto PC reads status information or other requested information You can control Auto PC using the keys on the DCP or you can use speech commands which are single words or short phrases that provide shortcuts to commonly used functions Small pictures called icons give you a quick look at what you can do Two ways Auto PC gives you information Screen based ico...

Страница 32: ...IT IS SAFE TO DO SO Do not look at the green bar longer than is safe The blue bar appears across the bottom of the display only when Auto PC is talking While talking Auto PC does not accept voice commands Program icons 1 2 Current icon number Green bar shows how much listening time remains Blue bar shows when Auto PC is talking Address Book icon Green bar Auto PC is listening or Blue bar Auto PC i...

Страница 33: ...gram names available as default global commands are Radio CD Player Directions Address Book and Messages For information on changing which program names are available see Changing Speech Command Options in the chapter Customizing Auto PC To go to a program that isn t selected as a global command use the keys as described in the next section To Say You ll hear Wake up Auto PC speech recognition Aut...

Страница 34: ...u can eliminate current program name feedback See Customizing Your Auto PC Speech feedback Go to CD Player program CD Player speech command heard Using keys to go to a program Auto PC has a Start menu that you can use to go to programs The Start menu has an icon for each program installed on your Auto PC Example Start menu ...

Страница 35: ...he program s shortcut number1 0 9 The program s main screen note press then 0 9 if display is not at Start menu 1 To go to the program whose icon is two icons to the right of the current icon press 2 To go to the program whose shortcut number is 3 press 3 1 The first ten programs installed on the Auto PC have shortcut numbers assigned to them To reassign the shortcut numbers see To reorder the Sta...

Страница 36: ...gram by pressing the MENU key on the DCP For example under Radio you may change the Audio Settings Radio icon This is the first of two radio options Press enter to go into Audio Settings Press up or down to select another radio option Current option displayed is Audio Settings You are here ...

Страница 37: ...ening tone say Radio wait for the heard tone say AM and wait for Voice commands and equivalent manual commands shown side by side Voice Manual Comment Auto PC Directions to highlight Directions then Access Directions program Many Setup function must be manually carried out DO NOT ATTEMPT THESE FUNCTIONS WHILE THE VEHICLE IS MOVING Manual Stop your vehicle to do manual steps Comment Press Start and...

Страница 38: ...ment Press Start then to highlight Setup and press Highlight the Setup program and enter it Press to select Clock and press Select Clock and enter the first option screen Press to choose an interval from 10 Sec up to 5 min or leave the setting at Never default Chose a time interval at which the clock will be automatically displayed or choose Never display Press to select Adjust for DST and then to...

Страница 39: ... set press BACK Return to Set Date screen Manual Press to select Set Time and press Select and enter Set Time Press to change the Hour press to move to next edit box When the time is set press BACK Return to Set Time screen Manual Comments Press to highlight Time Zone Select Time Zone Press to change the zone Examples Pacific Central When the zone is set press BACK Set the date Set the time Set th...

Страница 40: ...ect and enter Regional Setup Change the Regional styles and formats as shown in the table below To change this Press to highlight And then press Currency Currency Date style Date style Distance Distance Time style Time style Time format Time Format Fuel measurement Fuel Regional setup ...

Страница 41: ... sections show you some tasks you can do using global commands Have Auto PC tell you what speech commands you can say Have Auto PC tell you the time Change the volume You can change which global commands are available in Setup For more information see Changing Speech Command Options in the chapter Customizing Your Auto PC Voice Comments Auto PC To wake up Auto PC if necessary What can I say Auto P...

Страница 42: ...ls on the DCP of the Auto PC or by using the voice commands shown here There are 3 levels of volume adjustment each of which have default presets that you may customize Voice Default preset value Auto PC Volume Quiet 5 Auto PC Volume Normal 12 Auto PC Volume Loud 20 Auto PC adjusts the volume to the specified level You can change the volume level presets using the Audio program see the Audio Adjus...

Страница 43: ...n accomplish using program commands Go to a radio station preset Listen to a CD and change tracks Review directions while driving Dial a telephone number from Address Book Listen to an e mail message NOTE Additional optional hardware may be required to accomplish some of these program commands For example to make Auto PC dial your cell phone you need the cell phone cradle connected to the Universa...

Страница 44: ...ustments Recorded a name for example Classical for the preset For more information on recording a named preset see the chapter Using the Radio Voice Comment Auto PC Radio Preset preset name Auto PC goes to the preset station NOTE You can also go to a preset station by saying Preset and then saying the preset number 0 9 Requirements to use radio presets To go to a preset radio station ...

Страница 45: ...inserted an audio CD For more information see the chapter Using the CD Player Voice Comment Auto PC CD Player Auto PC goes to the CD player program and starts playing the CD Next Auto PC goes to the next track on the CD To listen to a CD and change tracks ...

Страница 46: ...Clarion AutoPC Owner s Manual 34 ...

Страница 47: ...dio program in Auto PC gives you access to most common radio functions using speech commands Using speech commands you can 1 Go between AM and FM 2 Seek forward or backward for the next station 3 Read the current station frequency and preset label if any 4 Go to 20 preset stations ten each for AM and FM For each preset you can assign a number key and a text label as well as record the station name...

Страница 48: ...nual Stop your vehicle to do manual steps Comments Auto PC Radio Press Start then to highlight Radio then To select the Radio program AM to get AM If FM is highlighted press to get AM FM If AM is highlighted say FM to listen to FM With radio on FM press to switch to AM press again to turn radio Off Sequence is FM AM OFF When radio is off Off shows on the display to turn radio on and set it to FM W...

Страница 49: ...h the radio is currently set The frequency used in this next example is FM 94 7 or substitute any working station in your area and you will identify this station as Preset 1 Manual Stop your vehicle to do manual steps Press lightly once to scan for station 94 7 FM easiest or Press to incrementally select the specific frequency 94 7 FM Press and hold the number 1 on the Key Pad for 2 seconds Note T...

Страница 50: ...reset 1 2 9 0 for AM Preset 1 2 9 0 for FM Voice Manual Comment Auto PC Radio Press Start then to highlight Radio and press To select the Radio program FM If display reads AM press twice to get back to FM Preset Wait for the heard tone One Press release 1 on the Key Pad Station changes to your preset and Preset 1 appears on screen To listen to a Preset station ...

Страница 51: ...t Radio and then Press MENU then to select Edit Preset Stations Press and the display reads Record Station Name Press to select the Preset number Press and display reads Say Command Word three times at the tone prompt press Record the Command Word ROCK three times when prompted by the tone wait for the understood beep after each repetition Display reads Custom Command successfully recorded for 5 s...

Страница 52: ...e that the Display now reads ROCK in the lower right corner You can use lower case letters if you prefer For example suppose you prefer to see Rock Simply move to an upper case letter then press down once to change the letter from upper to lower case Pressing up will change a lower case letter back to upper case You can also use the numeric Keypad to input or edit letters Refer to Tips and Trouble...

Страница 53: ...the following procedure to adjust audio settings from the Radio program Manual Press Start then to highlight Radio and then Press MENU Press to select Audio Settings for more information see Audio Adjustments chapter Changing Radio Options ...

Страница 54: ...Clarion AutoPC Owner s Manual 42 ...

Страница 55: ...the CD Delete the current track from the tracks played for the current CD Play tracks randomly Go to the next or previous track Go to the next CD if you have the optional CD changer Using the control panel keys you can also fast forward rewind or enter a track number You can also go to the CD Player options menu where you can control which tracks to play and change the display options for the CD P...

Страница 56: ... used in the Auto PC s in dash player 4 inch computer CD ROMs CD ROMS are used by the Directions program to access map data and by the Setup program to install new Auto PC programs For more information see the chapters Using Directions and Customizing Your Auto PC NOTE The Auto PC CD mechanism cannot read Multi session type CD ROMs These CD ROMs are typically used for computer database and data ar...

Страница 57: ...isc into the CD slot Grip the control panel pulling the control panel out outward and downward in one continuous motion as shown to the right 2 Place the DCP in the fully open position as shown below Notice the position of the CD slot and the eject button Before operating the CD Player CD slot Eject button ...

Страница 58: ...e operating the CD Player continued 3 Look to see that the CD will clear the top of the control panel as illustrated on the right 4 Push the disc into the CD slot half way and the drive will pull it in the rest of the way Correct clearance ...

Страница 59: ...er then To select the CD Player program Play Pause Play or pause a track Note Stop has the same effect as Pause Next Previous Play the next or previous track Random to highlight CD Player and MENU to highlight Random Playback to set On or Off Turns Random play on or off Press BACK If Random is On a symbol appears in lower right of CD playback screen Playing CDs ...

Страница 60: ... List to choose the track then to delete or restore it Press BACK to see CD playback screen Manual Comments Press and hold Fast forward or backward within a track Use buttons 0 9 for track number Go to a track examples 1 or 10 or 35 or use one touch to go forward or back one track at a time Delete track Delete or restore tracks Fast forward and backward Go to a track ...

Страница 61: ...tings from the CD Player program Manual Press MENU Press to select Audio Settings for more information see the chapter on Audio Adjustments Manual Comments Illustrations Press and release then button 0 6 for disc number Go to a disc if you have an optional CD changer Press button 0 to use the in dash CD 1 For a six disc CD Changer system Change the CD display options Changing Audio Options Change ...

Страница 62: ...ncrease the diameter of the center hole 6 Do not wipe a CD with alcohol particularly industrial methyl alcohol water conventional record cleaner solution static electricity prevention agent or similar liquids 7 Keep fingerprints oil and dust off of a CD 8 If the CD is dirty wipe it with a soft cloth Do not use a silicon cloth When wiping always wipe from inside to outside 9 Never force a CD into o...

Страница 63: ... programs or from the Audio program in the Start menu Voice Manual Stop your vehicle to do manual steps Comments Illustrations Auto PC Audio Press Start then to highlight Audio Highlight the Audio program to see first Audio Option to adjust Bass level Adjust level to zero or to a plus or minus value to select Treble to adjust level Adjust level to zero or to a plus or minus value Making audio adju...

Страница 64: ...lect the preset you want to change Press then to change the setting to select another frequency To rename the Preset press until Rename is shown Note Rename is an optional step and if not desired press BACK to return to Eq screen Press and edit the name press to return to the Eq Edit screen To change an equalizer preset ...

Страница 65: ...left or right side to select Fade to adjust front or back Right adjusts fade to the front and left adjusts it to the back to select Loudness to set On or Off Select Loudness On to increase bass with low volume levels to select Volume Presets then to adjust level Right is louder left is quieter to select Normal Preset and to adjust level to select Loud Preset and to adjust level ...

Страница 66: ... Player programs Voice Manual Comments Illustrations Auto PC Radio Press Start then to highlight Radio then To select the Radio program Menu Then Auto PC CD Player Press Start then to highlight CD Player then Select the CD Player program Menu Then Access Audio from Radio program Access Audio from CD Player program ...

Страница 67: ...h family friends and business contacts Address Book stores work and home addresses phone fax and pager numbers and e mail addresses to give you quick access when and where you need it Contacts are listed in alphabetical order Above is a sample display of Address Book showing the first name listed under the letter A ...

Страница 68: ...C Address book Press Start then to highlight Address Book then To select the Address Book program Letter T List To hear all names in the Address Book starting at T Press to stop Next or Previous To highlight a contact To go to the next letter tab Select To open contact information Read To read the current name Locate custom command word To find a contact with previously recorded custom command wor...

Страница 69: ...t then to highlight Address Book then To select the Address Book program Letter P To go to a specific letter tab Example the letter P Next or Previous or Highlights an entry finds next entry steps through alphabet Select Displays phone number Read Auto PC reads the number Next or Previous Goes to Next or Previous number for this entry and reads it to you Dial Press MENU then to select Dial then Th...

Страница 70: ...AutoPC Owner s Manual 58 Dialing a phone number continued Voice Manual Comments Yes or No to select Yes or No then If Yes the display shows Dialing with the associated number BACK To return to Address Book List ...

Страница 71: ...rd Contact Name Display reads Say Command Word three times at the tone prompt Record Marvin Adams three times when prompted by the tone wait for the understood beep after each repetition Display reads Custom Command successfully recorded for 5 seconds followed by The quote marks to the right of Address Book List indicate a Custom Command Word now exists for this entry Example 2 Recording a custom ...

Страница 72: ...Adams Dial The unit asks if you want to dial the number example Work phone is Preferred Phone Yes or No If Yes the display shows Dialing with the associated number If you say No you may still choose from other phone numbers by saying Next or Previous and the unit will read another number such as Pager or Mobile phone BACK To return to Address Book List Example 3 Using a custom name to dial ...

Страница 73: ...k is similar as is seen in the following example Manual Comments Press Start then to highlight Address Book then To select the Address Book program and see the Address Book List MENU and select New Entry and then To select the New Entry function and see then press to enter the first letter of the first name then to move to the next spaces and enter more letters Example of partially entered first n...

Страница 74: ...e times when prompted by the tone Wait for the understood beep after each repetition 2 Then the display reads Custom Command successfully recorded 3 Then the display reads Preferred Phone Work to select alternative Alternatives are Work Home and Mobile Example You see enter mobile phone then to enter the number then Example You see Mobile 555 3456 BACK You see name added to Address Book for 3 seco...

Страница 75: ...ed if you want to edit or add to all contact fields Press BACK Display example shows the contact with three icons representing 3 types of information Phone Work and Home Use and to edit or add information Use to choose the type of information to add or edit Use to choose the field with the type of information To start and stop editing BACK When done entering press to accept To cancel changes press...

Страница 76: ...4 Bday 15 Anvrsry 16 Mr Ms 17 First 18 Middle 19 Last 20 Company 21 Address 22 Addr2 23 Addr3 24 Addr4 25 City 26 State 27 Postal 28 Country Home 1 First 2 Middle 3 Last 4 Address 5 Addr2 6 Addr3 7 Addr4 8 City 9 State 10 Postal 11 Country 12 Home 13 Fax 14 Email 15 Spouse 16 Web 17 Bday 18 Anvrsry 19 Assist 20 Assist 21 Mr Ms Data field options for phone Data field options for work Data field opt...

Страница 77: ...n Be sure to check that the correct contact is being deleted Manual Comments Press Start then to highlight Address Book then To select the Address Book program and then To select a contact MENU and select Preferred Phone To select the Preferred Phone function to highlight Work Home Mobile or Pager then BACK Select Work Home Mobile or Pager as the preferred phone You can establish a Preferred Phone...

Страница 78: ...ghlight Address Book then To select the Address Book program and then To select a contact to send This step is not required for receive MENU then to highlight Send or Receive then To send or receive a contact Set your mobile device to receive or send contacts via the infrared port Align your mobile device s infrared port with your Auto PC s infrared port and hold until Auto PC confirms the contact...

Страница 79: ...r Auto PC Browsing Contacts You can browse addresses using command words or the keys Voice Manual Comment Auto PC Address book List Auto PC starts reading names beginning from the tab A B C selected To stop All other keys except ASSIST will also stop Read To read one name Voice Comment Auto PC Address book Locate custom command word To find a pre recorded contact name To have Auto PC read names To...

Страница 80: ...cts Protecting Address Book information If you have phone numbers and addresses in Auto PC that you don t have backed up on another mobile device you may want to back up the information in case it is lost or corrupted You also may want to password protect your data to prevent unauthorized access For more information see Add or Change a Password in the chapter Customizing Your Auto PC and the chapt...

Страница 81: ... the features of the Windows CE for the Auto PC system which can require manual non verbal set up Attempting to perform such set up or insert data while driving can seriously distract your attention and could cause an accident Stop the vehicle in a safe and legal manner before attempting these operations Do not rely on the navigation system to route you to emergency services Ask local authorities ...

Страница 82: ...e for you to take and gives you turn by turn directions on screen and reads the directions to you Maps used by this system may be inaccurate because of changes in roads traffic controls or driving conditions Always use good judgment and common sense when following the suggested routes Auto PC can guide you using a map data CD Enter a starting point and a destination Potential Map Inaccuracy ...

Страница 83: ... destinations points As described in the Address Book Chapter you can transfer addresses from a Windows CE based mobile device such as a Handheld or Palm size PC through the infrared port to the Address Book To use Auto PC s Directions you need a compact disc that contains map data for the region in which you are traveling For a list of Clarion partners offering map CDs supported by Auto PC go to ...

Страница 84: ...ram Press 1 or use to select Set Start then Create a new route Step 1 Set Start Point Press 2 or use to select Set Destination then Create a new route Step 2 Set Destination Point Go Press 3 or to select Get Directions then Create a new route Step 3 Calculate Directions Next or Previous Go to next or previous turn Read Read the current turn Hold Go to the first or last turn List Hear the remaining...

Страница 85: ... Point of Interest POI Yes2 Yes2 5 Intersection Yes2 Yes2 6 Address Book Yes Yes 7 Pocket Streets3 via IrDA Yes Yes How to enter the different types of start and destination points is explained on the following pages 1 Only with optional GPS 2 Input from map CD 3 In order to use Pocket Streets input and import addresses from a hand held device you must use MS Pocket Streets V2 51 and Microsoft Win...

Страница 86: ... the navigation initialization CD and follow the directions Then insert the map data CD Manual Comment Illustration Press Start then to highlight Directions then Select Directions program Use to highlight Set Start then Select Set Start function Use to highlight Last Destination then Display example shows for 5 seconds then automati cally shows Set Destination Insert map data CD Last destination ...

Страница 87: ...n the pages which follow in the description of Street Address Manual Comment Illustration Press Start then to highlight Directions then Select Directions program Use to highlight Set Start then Select Set Start function Use to highlight Street Address then Pick the Start type and the Display shows state directory Use to select the state then Use and to highlight the city of your choice then Use an...

Страница 88: ...play example shows for 5 seconds then automati cally shows Set Destination Manual Comment Illustration Press Start then to highlight Directions then Select Directions program Use to highlight Set Start then Select Set Start function Use to highlight Point of Interest then Pick the Start type and the Display shows city directory Display example Point of Interest ...

Страница 89: ... Display shows directory of that POI type Example Business Use and to highlight the POI of your choice then Display shows confirmation of Start Point for 5 seconds then automatically shows Set Destination Manual Comment Illustration Press Start then to highlight Directions then Select Directions program Use to highlight Set Start then Select Set Start function Use to highlight Intersection then Us...

Страница 90: ...e then Use to highlight the Cross Street of your choice then Display shows confirmation of Start Point for 5 seconds then automatically shows Set Destination Manual Comment Illustration Press Start then to highlight Directions then Select Directions program Use to highlight Set Start then Select Set Start function Use to highlight Address Book then Address Book ...

Страница 91: ...tration Use and to highlight the contact of your choice then Display shows the contact Use and to go to the home or work address of the contact Refer to the briefcase or home icons to choose desired address Display shows confirmation of Start Point for 5 seconds then automatically shows Set Destination ...

Страница 92: ...am Press 1 or use then Select Set Start function Select Pocket Streets then Display shows Looking for IR device You must use MS Pocket Streets V2 51 and Microsoft Windows CE V2 0 Align your mobile device s infrared port with your Auto PC s infrared port Display shows example Hold in aligned position Hold until Address Received appears on your Auto PC Display shows confirmation of Start Point for 5...

Страница 93: ...o highlight Directions then Select Directions program Use to highlight Set Start then Select Set Start function Use to highlight GPS then Select GPS Display shows confirmation of Start Point for 5 seconds then automatically shows Set Destination GPS Requires optional GPS receiver ...

Страница 94: ...s Press to select Set Destination Type then use to highlight Street Address then Display example shows Use and to highlight the city of your choice then Use and to highlight the street of your choice then Use or number keys to enter street number then Display shows confirmation of Destination Point for 5 seconds then automatically shows Get Directions Street Address ...

Страница 95: ...e city of your choice then Display shows the first of many destination POI types Example ATM Use to highlight Destination POI Type then Display shows directory of that POI type Example Banks Use and to highlight the tab e g B then Example You want an ATM at a Bank of America Use and to highlight the address of the POI of your choice then Display shows confirmation of Destination Point for 5 second...

Страница 96: ...to highlight Intersection then Use and to highlight the city of your choice then Display example shows Use and to highlight the Destination Street of your choice then Use to highlight the Cross Street of your choice Press Display shows confirmation of Destination Point for 5 seconds then automatically shows Get Directions Intersection ...

Страница 97: ...hlight Address Book then Use and to highlight the contact of your choice then Display shows the contact Use and to find the home or work address of the contact Refer to the briefcase or home icons to choose desired address Press Display shows confirmation of Destination Point for 5 seconds then automatically shows Get Directions Address Book ...

Страница 98: ... Display shows Looking for IR device You must use MS Pocket Streets V2 51 and Microsoft Windows CE V2 0 Align your mobile device s infrared port with your Auto PC s infrared port Display shows Receiving address from name Hold in aligned position Hold until Address Received appears on your Auto PC Press Display shows confirmation of Destination Point for 5 seconds then automatically shows Get Direc...

Страница 99: ...ections navigation system is only an aid Make your driving decisions based on your observations of local conditions and existing traffic regulations This feature is not a substitute for your personal judgment Any route suggestions made by this system should never replace any local traffic regulations or your personal judgment or knowledge of safe driving practices Let Your Judgment Prevail ...

Страница 100: ... and confirmed Display shows Press MENU to see Set Route Preference screen Display shows Preference Fastest Use to select Fastest or Local Roads Fastest includes freeways in the route Use to select Display Safety Warning screen and to select Yes or No Display shows Show Warning Yes Press BACK to return to Get Directions You are now ready to request a route as shown on the next page To set route pr...

Страница 101: ...oint has already been selected and confirmed Display shows Press 3 key or Display shows Depending on the distance traveled and the complexity of the route this calculation may take up to several minutes When the calculation is done the display shows example To request a route ...

Страница 102: ... must evaluate whether it is safe to follow the suggested directions Once your route is set you can move the directions forward with voice commands as you drive Voice Manual Comment Next or Previous Advance or go back one turn Each turn is read to you aloud by Auto PC Upon reaching the destination Auto PC announces that You have reached your destination and the display reads example Voice Comment ...

Страница 103: ...nt Auto PC Directions Press Start then to highlight Directions then Select Directions program Press MENU then use to highlight Backtrack then Select Backtrack and Display shows When the calculation is done the display shows example To backtrack a route ...

Страница 104: ...Clarion AutoPC Owner s Manual 92 ...

Страница 105: ...from Auto PC Messages depends on your content provider but can include Traffic News and E Mail If you re interrupted while reviewing your messages Messages remembers where you were and comes back to the message for you to continue where you left off Message alert lets you know when you ve received a message To turn the message alert tone on or off see Changing Auto PC Sounds in the Customizing You...

Страница 106: ...tart then to highlight Messages then Highlight and select Messages program E mail Loads your e mail or pages News Loads your news stories Traffic Loads traffic alerts Back BACK Return to Messages main screen Next or Previous Go to next or previous message Delete or press MENU then to select Delete then Delete current message MENU select Delete All then Delete all messages Read Open selected messag...

Страница 107: ...ges you need to set up wireless services so you can receive e mail news and traffic content for the Messages program To receive messages you need to Install the Auto PC FM wireless receiver hardware Sign up with an information provider Sign up with a network carrier Choose the information you want to receive on your Auto PC For more information see the documentation provided by your wireless recei...

Страница 108: ...k over its icon on the Start menu The summary information shown on the selection list is different for each type of message For E mail you see who it s from For Traffic you see the area the traffic alert affects and for News you see the title Messages that haven t been read have an asterisk by them E mail Message Listing News Message Listing News Message Text ...

Страница 109: ...then to highlight Messages then To select Messages program Traffic or News or E mail To switch between Traffic News or E mail Pages are included under E mail Next or Previous To select the message you want Read If you want to see more of a message to scroll down To listen to a message ...

Страница 110: ...News or E mail To switch between Traffic News or E mail Pages are included under E mail Next or Previous To select the message you want Delete or press MENU then to select Delete then Delete current message Yes or to highlight Yes then To select Yes when asked to confirm the deletion No to highlight No then or BACK To cancel deletion To delete a message ...

Страница 111: ...d you may lock email news or traffic messages Voice Manual Comments Auto PC Messages Press Start then to highlight Messages then To select Messages program Press MENU then to select Lock Unlock To select the Lock Unlock function To lock a message or to unlock a previously locked message To lock unlock a message ...

Страница 112: ...nual Comments Press Start then to highlight Setup then To access Setup program Note there is no voice command for the Setup program to select Message Storage then To access the Message Storage parameter To select the percentage of available storage memory you want allocated for message content Note Unless you have locked older messages when the storage limit is reached Auto PC automatically delete...

Страница 113: ... highlight Setup then To access Setup program to select Messages then To select the Messages parameters to select Storage Full Alert To select the Storage Full Alert parameter to select On or Off To turn Storage Full Alert to On or Off To change the message storage alert ...

Страница 114: ...Clarion AutoPC Owner s Manual 102 ...

Страница 115: ...f currently stored voice memos and to select a voice memo for playback or deletion While you are recording a voice memo Speech Recognition is turned off When you stop recording it will be re enabled If you push the PTT button during recording this will stop the recording process and re enable speech recognition Speech recognition is turned off during voice memo recording ...

Страница 116: ...ess V MEMO listen for the record tone then start talking Use the V MEMO button while in any of the Auto PC programs to launch the Voice Memo program and start recording Press to stop recording Press to play back Optional Test Voice Memo recording using a firm speaking voice then listen to play back If play back is to loud or too soft see Adjusting Microphone Gain near the end of this chapter NOTE ...

Страница 117: ...or off Manual Comments Press Start then to highlight Voice Memo then To highlight and select Setup Press MENU then to highlight Mute On Play then use to select On or Off Turn Mute on Play on or off You can use VMEMO to record a short portion of something playing on the radio or CD Player and add your comments To do this set Mute On Record to Off and follow the recording procedures in this chapter ...

Страница 118: ... Press Start then to highlight Voice Memo then To highlight and select the Voice Memo program and enter it Record Press V MEMO Listen for the record prompt tone then begin recording a memo Press to stop recording To end recording You will hear a tone and also see the message Updating that acknowledges receipt of your memo ...

Страница 119: ...ing List then the list of memos Example Vmemo1 15 s 84kB 15 seconds requiring 84 thousand bytes Read Reads the name date time of the first memo in the list of memos Next Previous The unit reads the next or previous message name to select a memo Manually select next or previous message Play Plays the currently loaded memo Press to advance or rewind a memo Opening and playing a memo Advance or rewin...

Страница 120: ...al order Name and Descending In reverse alphabetical order Manual Comments Press Start then to highlight Voice Memo then To select the Voice Memo program Press MENU and to OPEN The unit displays the list of memos Press Enter the Open program Press MENU and to highlight the type of sort Sort by Name Sort Ascending Note the default sort settings are Sort by Date and Sort Descending Press to run the ...

Страница 121: ...aused say Play or press Stop Press if paused Used to stop playback and to set play back indicator to beginning of memo Deleting voice memos Voice Manual Comments Auto PC Voice Memo Press Start then to highlight Voice Memo then To select the Voice Memo program Delete Press MENU and to Delete then Initiates deletion of currently loaded voice memo Note A Locked memo will not be deleted Playing pausin...

Страница 122: ...oice Manual Comments Auto PC Voice Memo Press Start then to highlight Voice Memo then To select the Voice Memo program Press MENU and to Delete All then Initiates deletion of all voice memos Note The Delete All function deletes all memos except locked memos Yes or No to select Yes or No then to delete memo Unit asks if you want to delete all memos You can respond with either a voice or manual comm...

Страница 123: ...of time memos will be kept in the memo store Memos will be automatically deleted after this period Manual Comments Press or press MENU and to select Lock Select the Lock function Press Lock the memo The memo appears on screen with a lock icon Press or press MENU and to Unlock Select the Unlock function Press Unlock the memo The memo appears on screen without the lock icon Deleting memos after sele...

Страница 124: ...he new name to the memo The memo appears on screen with the new name Manual Comments Press MENU and to Export then Select the Export function The display reads Export To Memory Card and shows the current name of the memo and WAV a form of audio file You can change the name or simply store the audio file on the Memory Card with its current name If there is no Memory Card present the screen will pro...

Страница 125: ...pt CF Cards from most manufacturers Warning the CF Card can be inserted one way only Be sure to insert the CF Card with the manufacturer s label and arrow FACING RIGHT of the unit as shown below Inserting the CF Card for export Make sure label and arrow are facing right ...

Страница 126: ...ge the memo store size for Voice Memo Manual Comments Press Start then to highlight Voice Memo then To select the Voice Memo program Press MENU and to Microphone Gain and to change it Adjust gain record volume from 10 lowest to 10 highest Note Very high gain can distort sound very low gain can make recorded messages hard to hear Press Makes change take effect Changing memo store size for Voice Mem...

Страница 127: ...o set On or Off This setting determines whether other audio sources will be muted during Voice Memo playback Example Radio Manual Comments Press MENU and to About Voice Memo Select the About Voice Memo function to see data Provides software version number and copyright information BACK To return to Voice Memo screen Muting other audio sources About Voice Memo ...

Страница 128: ...Clarion AutoPC Owner s Manual 116 ...

Страница 129: ...tion and entertainment needs on the road Auto PC allows you to customize the screen for the way you use it The order of the programs on the Start menu can be rearranged to put the programs you use the most first where you can use the number keys for quick access You can also change the contrast of the backlighting on the Auto PC screen Change the Display ...

Страница 130: ... you want the program icon To go to the rest If you have more than 10 programs you can have number shortcuts assigned to the programs you use the most up to 10 0 1 9 Manual Comments Press Start then to highlight Setup then To access Setup program to select Contrast then To select the Contrast parameters to select Level 5 to 5 To increase or decrease the contrast To reorder the Start menu To change...

Страница 131: ...r mobile device powered by Windows CE try adjusting the Infrared transfer speed Manual Comments Press Start then to highlight Setup then To access Setup program to select Infrared then To select the Infrared parameters to select Slow or Fast To increase or decrease the transfer speed Adjusting the Infrared transfer speed ...

Страница 132: ...en To highlight and access Setup program to select Password then To select Password parameter Press To enter the Password edit screen Use the Keys to enter up to 4 numbers then Use the number keys on right side of DCP The numbers will become your password Re enter 4 digit password then Re enter your password to confirm Press then record custom command word three times To record a voice password Di...

Страница 133: ...hing a new password if you have forgotten your password Also if your car battery fails or the unit s coin battery fails the system will re start in shipment status 1 Address Book 2 Remove Program 3 Backup Restore 4 Custom Commands Speech Commands 5 Password to change 6 Voice Memo 7 Messages 8 Directions from Address Book Backup is strongly recommended Areas protected by Password ...

Страница 134: ...ds Provide password Enter current password up to 4 numbers then to highlight Change Password Current password allows you access to clear current password or change to a new password to select Change Password To select Change Password parameter Press twice After the first press the display reads Confirm After the second press the display reads Password cleared for 5 seconds To clear a password ...

Страница 135: ...d or change to a new password to select Change Password To enter the Password edit screen Use the Keys to enter up to 4 numbers then Use the number keys on right side of DCP The numbers will become your password Re enter your password then Re enter your password to confirm Press then record custom command word three times To record a voice password Display reads Custom Command successfully recorde...

Страница 136: ...racking remote door unlock as well as operator assisted directions and points of interest services ASSIST functions are optional services which require both the GPS Receiver and the Universal Serial Bus USB Cellular Telephone Modem interface options Please ask your Clarion dealer for more details and how to sign on to the additional services or go to www autopc com Optional services and interface ...

Страница 137: ...Sounds program to enter Computer Voice Use to set Computer Voice Volume lower or higher Left for lower volume Right for higher volume Then to select Pitch and to select lower or higher Left for lower pitch Right for higher pitch Then to select Speed and to select slower or faster Left for slower speaking right for faster speaking Then to Test Voice and to hear test message Hear test message Make f...

Страница 138: ...select Key Click and for Loud Soft or Off Most users prefer an audible key click to Alert and to turn the Alert sound On or Off An Alert sound may tell you that you have just received a message Press to hear the Alert sound Helps you identify the Alert sound when you hear it later to Button Hold and for On or Off press to hear Button Hold sound to Default and for On or Off press to hear Default so...

Страница 139: ...ed Begin sound To Infrared End and for On or Off press to hear Infrared End sound to Infrared Interrupt and for On or Off press to hear Infrared Interrupt sound to Message Box and for On or Off press to hear Message Box sound Question and for On or Off press to hear Question sound to Speech Active and for On or Off press to hear Speech Active sound Exclamation sound on off Infrared sounds on off M...

Страница 140: ... and for On or Off press to hear Speech Inactive sound to Startup and for On or Off press to hear Startup sound Press BACK to return to Scheme Auto PC to Speech Feedback and to select More or Less More Auto PC s response to a wakeup word or PTT is the awake tone and the program name Less Auto PC s response is only the awake tone Additional adjustments to sound Startup sound on off Speech feedback ...

Страница 141: ...he unit will then recognize two wakeup words yours and Auto PC Controls whether the unit listens for the Auto PC or other custom wakeup word If you set this option to Off then you need to press the Push to Talk PTT button to wake up Auto PC Allows you to choose the command words that Auto PC is listening for all of the time Examples of default Global Commands are Volume What can I say and Help Alt...

Страница 142: ...ay Speech factors you can change Auto PC will not listen for the wakeup word while you are engaged in making changes to speech commands You can however press the PTT button get Auto PC to respond to voice commands Controls how much the volume of any audio output such as the radio playing is lowered when Auto PC is listening for command words Can turn off global commands Auto PC will not listen dur...

Страница 143: ...etup then To select the Setup program to Speech Commands then Select Speech Commands program to select Audio Mute Controls how much the volume of any audio output such as the radio is lowered when Auto PC is listening for command words to choose Partial Full or None To change the audio mute level ...

Страница 144: ...ts Illustrations Press Start then to highlight Setup then Select the Setup program to select Speech Commands and Select the Speech Commands program to select Record New Command and Select the Record New Command program Display shows Locate Command Word Display shows Choose Custom Command and the directory of command words Use and to select command word to record then press press again to start rec...

Страница 145: ... highlight Setup then Select the Setup program to select Speech Commands and Select the Speech Commands program to select Wakeup Word and to choose On or Off Controls whether the unit listens for the Auto PC or other custom wakeup word If you set this option to Off then you need to press the PTT button to wake up Auto PC ...

Страница 146: ... 10 default Global Commands in the unit shipment state They are listed below to select an Alternative Global Command word There are 5 Alternative Global Command words in the unit shipment state plus the None They are listed below You can select up to 10 Global Commands from a set of 15 commands Global Commands defaults 1 What can I say 2 What time is it 3 Volume 4 Help 5 Radio 6 CD Player 7 Addres...

Страница 147: ...lect Speech Commands and Select the Speech Commands program to select Global Commands and Select Global Commands program to select Volume and to select None Auto PC will no longer recognize Volume as a Global Command to select Directions and to select Mute You have chosen Mute as an alternative and it will no longer appear as an alternative to select Messages and to select Clock You have chosen Cl...

Страница 148: ...nd wakeup and menus Manual Comments Illustrations Press Start then to highlight Setup then Select the Setup program to select Timeouts and Select Timeouts program to select Hold keys for and to choose a time Determines how long a key must be pressed and held to take effect Example of use press and hold a number key to set a radio preset Each timeout is explained on the following page To change a t...

Страница 149: ...put in a program s options menu before returning to the previous screen Start menu 5 10 20 30 or Always For input in the Start menu before it returns to the previous screen NOTE When you say Auto PC or use PTT Auto PC listens for speech commands and a green bar appears across the bottom of the display The green bar gradually disappears as the listening timeout expires A blue bar appears across the...

Страница 150: ...Clarion AutoPC Owner s Manual 138 ...

Страница 151: ...ing Backup or Restore Use the Backup Restore program to protect the data you have stored on your Auto PC Backup Restore protects all data customized by the user including the following Radio presets Address book entries Auto PC settings such as regional and wireless settings Installed third party programs ...

Страница 152: ...k up important data regularly 2 Back up the data before having maintenance or upgrades done on the system including changing a Backup Battery 3 Back up the data before changing the Coin Cell Battery 4 Be sure that your customized files such as contacts and radio presets are the way you want them to be before doing a back up 5 Be sure to protect the CF Card insertion slot with the cover when the sl...

Страница 153: ...tart then to highlight Setup then Select the Setup program to Backup Restore then Select the Backup Restore program to Backup then to perform Backup Note If a CF Card has not been inserted you will see a warning Insert PC Card to proceed Record Date Time on CF Card label Manually record this information NOTE Backing up important data on a CF Card is strongly recommended Backing up data ...

Страница 154: ...up Restore then Select the Backup Restore program to Restore then to see verification message Auto PC asks for verification of manual command Reboot and replace data on system to select Yes or No then Note If you selected Yes and a CF Card has not been inserted you will see a warning message Insert PC Card to proceed NOTE After doing restore you will need to set the Date and Time See the Getting R...

Страница 155: ...ically For most external devices Auto PC uses the Universal Serial Bus USB Controller to sense when these devices are attached or detached Caution Do not drive or turn off the ignition while doing installation of programs using CD or CF Card Insert the program s installation CD or CF Card into the Auto PC Follow the instructions that the installation program displays Installed programs automatical...

Страница 156: ...ghlight Setup then to see first Setup option To select and enter the Setup program to Remove Program then to select the program you want to remove Unit will ask you to confirm the deletion Press to confirm the deletion Auto PC allows you to add new hardware such as a cellular phone CD changer or GPS unit Contact your dealer to have upgrades or maintenance done on your system To remove a program In...

Страница 157: ...tion Use the following tips to say command words so that Auto PC understands Say one command word at a time and wait for the listening tone For an introduction to Auto PC s listening tone and other audible feedback see the Using Speech Commands chapter Speak from your normal driving position the microphone is designed to understand commands at this distance Be sure that the microphone has been ins...

Страница 158: ... your important information You can set a password that must be entered before you are allowed to access sensitive programs like the Address Book To set a password go to Setup and choose Password You can enter both a 4 number password and a custom command word Choose a password that s easy to remember If you forget it you must perform a full reset to use your system again which will erase all of y...

Страница 159: ...ed with tall trees To obtain information on GPS follow these procedures Manual Comment Press Start then to highlight Setup then Select Setup program Use to highlight GPS then Display reads Finding GPS receiver One of two things happen now 1 Six types of GPS data become available for viewing see Types of GPS data below 2 No GPS receiver detected is displayed Either this option is not installed or m...

Страница 160: ...ites are required for accurate GPS data Latitude 33 654o Current location Longitude 117 746o Current location Altitude 50 Feet Relative to system locale Time 3 45 11 PM GPS atomic clock DOP 4 400 Dilution Of Precision relates to precision of known satellite position which influences communication error rate Types of GPS data ...

Страница 161: ...Keypad to input or edit letters in the Radio and Address Book programs Press a number key repeatedly to cycle through the number and the letters according to the following chart 1 2 A B C 3 D E F 4 G H I 5 J K L 6 M N O 7 P Q R S 8 T U V 9 W X Y Z delete 0 add space To enter a B using the number keys press the 2 key three times Entering Information using the Number Keys Example ...

Страница 162: ...ust reset the date and time See the Getting Started Chapter If you are unable to locate the information you need in this chapter please consult the following sources of additional information 1 Your most important contact for information related to the operations upgrades and maintenance of your Auto PC is your Clarion Dealer 2 The web site for the Clarion AutoPC system also contains valuable info...

Страница 163: ... and left Allowable distance apart ranges from a minimum of 2 inches to a maximum of 2 feet 60 centimeters Make sure nothing is between the two infrared ports 3 Different Handheld PCs and Palm size PCs transfer data at different speeds If they are go to Setup select Infrared and change the speed of the IR transfer 4 If you can receive data on the AutoPC but not transmit data or vice versa you may ...

Страница 164: ...data Data discs examples computer CD ROMs or the Navigation data discs should not be placed in the CD changer If data discs are placed in the changer with no audio discs the changer will continuously cycle between the data discs To stop this cycling remove the data discs Avoid using data discs with CD changer ...

Страница 165: ...lways try the Warm reboot first as described on the next page 4 If Warm reboot does not bring the system back to operational status then try Cold reboot NOTE This procedure will initialize all data to the shipment condition To recover your customized data you will need to restore the backup data See the Backup Restore chapter for further information 5 NOTE Press switches gently switches can be dam...

Страница 166: ...boot Push and hold Reset Switch 2 first with a thin wire and simultaneously push Reset Switch 1 with the tip of a ball point pen Release Reset Switch 1 first and after two seconds release Reset Switch 2 NOTE This procedure will initialize all data to the shipment condition Backing up the necessary data on a CF Card is strongly recommended Warm reboot Cold reboot Reset Switch 1 CD eject button Rese...

Страница 167: ...ment Press Start then to highlight Setup and press Highlight the Setup program and enter it Press to scroll through the next level options until you see Setup at the top of the screen then press Find the top level option with the problem Press to scroll through the options until you see Find the lower level option with the problem Press Based on what the status message s is telling you take the ap...

Страница 168: ...nter it See Setup in the first screen About Auto PC then press Auto PC is the top level program with the problem Press to scroll through the options until you see About Auto PC at the top of the screen and Power Find the lower level option with the problem Press The status message reads Main Battery Good Backup Battery Good Coin Cell Battery Very low Backup the data in your Auto PC and then replac...

Страница 169: ...z Frequency Range 530 kHz to 1710kHz Usable Sensitivity 28dBµ System Compact disc digital audio system Frequency Response 10Hz to 20kHz 1dB Signal to Noise Ratio 95dB 1kHz IHF A Dynamic Range 85dB 1kHz Maximum Output 40W x 4 Rated Output 14Wx4 20Hz to 20kHz 1 4Ω Bass Control Action 50Hz 12dB Treble Control Action 10kHz 12dB Line Output CD 2V Applicable Impedance 4Ω 4 to 8Ω FM Tuner AM Tuner CD Pla...

Страница 170: ... Consumption Less than 10A External Dimensions Source unit 7 width x 2 Height x 6 1 Depth 178 W x 50 H x 156 D mm External Dimensions Tuner Amp unit 7 width x 1 4 Height x 8 5 Depth 178 W x 36 H x 215 D mm including battery Weight Source unit 4 lb 1 8kg Weight Tuner Amp unit 2 4 lb 1 1kg including battery General ...

Страница 171: ...t Windows CE 2 0 is the Operating System of Auto PC Cold Reboot Returns your Auto PC to shipment state WARNING You will lose all information Backing up your data on a CF Card is strongly recommended CF Card Compact Flash Card can be inserted into the slot and used in Backing up and Restoring data as well as adding software Coin Cell Battery The backup battery of Auto PC D Detachable Control Panel ...

Страница 172: ...uto PC to listen to your commands Performs the same function as command AutoPC S Setup This Auto PC program can be used to customize your Auto PC settings according to your personal preferences Speech Commands Voice commands you can use to drive your Auto PC such as What Time it is Start Menu Displays the programs available on your Auto PC Press Start button to access this menu U USB Universal Ser...

Страница 173: ... PC Sounds 93 125 Clock display 10 26 Coin Cell Battery 12 156 CompactFlashTM card 3 140 Controls 2 D Daylight Savings Time 26 DCP 3 6 7 9 12 159 DCP release 3 6 Delete a contact from Address Book 65 Deleting a message 98 Deleting a voice memo 109 110 Dialing phone from Address Book 57 58 Directions command words and keys 72 Directions calculating the route 87 Directions commands to enter a destin...

Страница 174: ...9 S Saving Messages 99 Set the date 27 Set the region 28 Set the time 27 Set the time zone 27 Specifications 157 Speech Command options 129 Speech Commands getting help 17 Speech Commands how shown in manual 25 Speech Commands tones that help 18 Speech Commands using 4 11 15 16 145 Speech Commands using to go to a program 21 Speech factors you can change 130 Start Key 3 T Transfer contacts from mo...

Отзывы: