


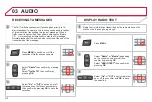


03
215
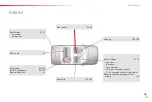
AUDIO
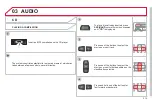
AUXILIARY SOCKET (AUX)
AUXILIARY JACK SOCKET
Connect the portable device to the auxiliary Jack socket using
a suitable cable (not supplied).
The auxiliary Jack socket permits the connection of a portable
device.
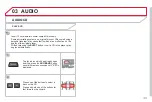
Press the
SRC/BAND
button
successively and select
"AUX"
.
First adjust the volume on your portable device.
Then adjust the volume of the audio
system.
The display and management of controls is on the
portable device.
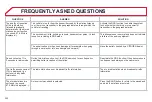
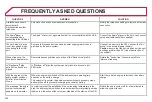
Содержание 2012 C-ELYSEE
Страница 1: ......
Страница 75: ...73 4 Fittings Boot fittings 1 Boot lamp 2 Storage box see details on a following page...
Страница 160: ...158 Checks TOTAL CITRO N...
Страница 174: ...172 Technical data Dimensions in mm...
Страница 176: ...174 Technical data...
Страница 233: ......
Страница 234: ......
Страница 236: ...CR ATIVE TECHNOLOGIE 2012 DOCUMENTATION DE BORD 4Dconcept Diadeis Edipro 12ELY 0040 Anglais...


