background image

22

User Guide

Chapter 4

Configuration

Remote Router Access

Remote  Management 

To  permit  remote  access  of  the  

,  from  outside  the  local  network,  select 

Enable

 . 

Otherwise, keep the default setting, 

Disable

 .

Management  Port 

Enter  the  port  number  that  will  be 

open to outside access .

Use  HTTPS 

HTTPS  uses  SSL  (Secured  Socket  Layer)  to 

encrypt  data  transmitted  for  higher  security .  To  enable 

HTTPS, select the check box .

NOTE:

   When you are in a remote location and 

wish to  manage the  , enter 

http://<Internet 

IP Address>: port or https://<Internet IP Address>: 

port

,  depending  on  whether  you  use  HTTP  or 

HTTPS .  Enter  the    ’s  specific  Internet  IP 

address  in  place  of 

<Internet  IP  Address>

,  and 

enter the Administration Port number in place of 

the word 

port

 .

UPnP

Universal  Plug  and  Play  (UPnP)  allows  Windows  2000, 

XP and Vista to automatically configure the   for 

various Internet applications, such as gaming and video 

conferencing .

UPnP 

If you want to use UPnP, keep the default setting, 

Enable

 . Otherwise, select 

Disable

 .

When you have finished making changes to this screen, 

click 

Save Settings

 to save the changes, or click 

Cancel 

Changes

  to  undo  your  changes .  Help  information  is 

available on the right side of the screen . 

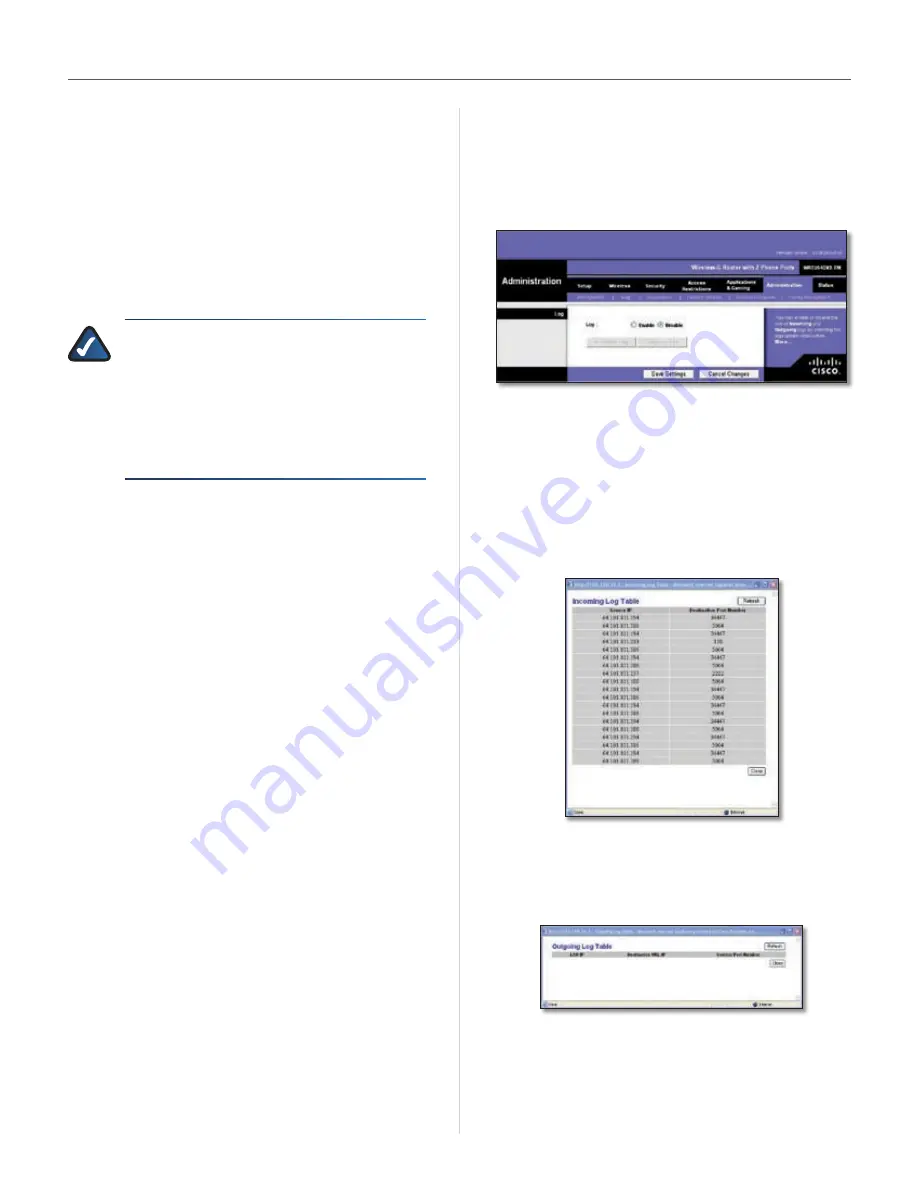
Administration > Log

When  you  click  the  Administration  tab,  you  will  see  the 

Log

  screen .  It  provides  you  with  a  log  of  all  incoming 

and  outgoing  URLs  or  IP  addresses  for  your  Internet 

connection .

Administration > Log

Log

Log 

To access activity logs, select 

Enable

 . With logging 

enabled,  you  can  choose  to  view  temporary  logs .  Click  

Disable

 to disable this function .

Incoming Log 

The Incoming Log will display a temporary 

log  of  the  source  IP  addresses  and  destination  port 

numbers for the incoming Internet traffic . 

Log > Incoming Log

Outgoing Log 

The Outgoing Log will display a temporary 

log of the local IP addresses, destination URLs/IP addresses, 

and service/port numbers for the outgoing Internet traffic .

Log > Outgoing Log

Click 

Refresh

 to update the log . 

When you have finished making changes to this screen, 

click 

Save Settings

 to save the changes, or click 

Cancel 

Changes

  to  undo  your  changes .  Help  information  is 

Содержание T-Mobile HIPORT+

Страница 1: ......

Страница 2: ...reless Basic Wireless Settings 13 Wireless Wireless Security 13 Wireless Wireless MAC Filter 15 Wireless Advanced Wireless Settings 16 Security Firewall 17 Security VPN 17 Access Restrictions Internet Access 18 Applications Gaming Port Range Forward 19 Applications Gaming Port Triggering 19 Applications Gaming DMZ 20 Applications and Gaming QoS 20 Administration Management 21 Administration Log 22...

Страница 3: ...endix D Regulatory Information 32 FCC Statement 32 Industry Canada Statement 32 User Information for Consumer Products Covered by EU Directive 2002 96 EC on Waste Electric and Electronic Equipment WEEE 33 Appendix E Software Licensing Agreement 37 Software in Linksys Products 37 Software Licenses 37 ...

Страница 4: ...on indicates a noteworthy website address or e mail address Online Resources Most web browsers allow you to enter the web address without adding the http in front of the address This User Guide will refer to websites without including http in front of the address Some older web browsers may require you to add it Resource Website Linksys www linksys com Linksys International www linksys com interna...

Страница 5: ...r the network Phone 1 2 Blue This LED lights up blue when a SIM card is correctly installed and registered This LED flashes blue if the HiPort has received voice mail Internet Green The Internet LED lights up when there is a connection made through the Internet port The LED flashes when there is traffic Back Panel Reset The Reset button serves two purposes You can restore its factory default setti...

Страница 6: ...lity to enable Media Access Control MAC address filtering The MAC address is a unique series of numbers and letters assigned to every networking device With MAC address filtering enabled wireless network access is provided solely for wireless devices with specific MAC addresses For example you can specify the MAC address of each computer in your home so that only those computers can access your wi...

Страница 7: ...coin and the cover will open 2 Open SIM Card Cover Slide a SIM card into a slot with the T facing up 3 Place SIM Card into Slot Press the SIM card securely into the slot 4 SIM Card Inserted SIM Card Cover Closed Slide the cover back into place 5 If you have an additional SIM card insert it the same way into the second slot SIM Card Removal To remove follow steps 1 and 2 to open the cover then pull...

Страница 8: ...nection Connect a standard RJ 11 phone cable to the HiPort s 4 Phoneport ThisportshouldcorrespondtotheSIMslot into which the SIM card was installed Then connect the other end to a telephone If you have a second telephone you can connect it through the HiPort s other phone port Connecting the RJ 11 cable IMPORTANT Do not connect the Phone port to a telephone wall jack Make sure you only connect a t...

Страница 9: ...s not responsible for damages incurred by insecure wall mounting hardware Follow these instructions Determine where you want to mount the HiPort 1 Make sure that the wall you use is smooth flat dry and sturdy Also make sure the location is within reach of an electrical outlet Drill two holes into the wall Make sure the holes are 2 123 mm 4 84 inches apart Insert a screw into each hole and leave 3 ...

Страница 10: ...address 192 168 29 1 in the Address field Press the Enter key Internet Explorer Address Bar A screen will appear asking you for your User name and Password Enter admin in the User Name field Enter admin in the Password field Then click OK Login Screen Make the necessary changes through the Utility When you have finished making changes to a screen click Save Settings to save the changes or click Ca...

Страница 11: ...y re establish your connection as soon as you attempt to access the Internet again To use this option select Connect on Demand In the Max Idle Time field enter the number of minutes you want to have elapsed before your Internet connection terminates The default Max Idle Time is 5 minutes Keep Alive Redial Period If you select this option the HiPort will periodically check your Internet connection ...

Страница 12: ...ption select Connect on Demand In the Max Idle Time field enter the number of minutes you want to have elapsed before your Internet connection terminates The default Max Idle Time is 5 minutes Optional Settings Some of these settings may be required by your ISP Verify with your ISP before making any changes Optional Settings Router Name Some ISPs require these names as identification You may have ...

Страница 13: ...S 1 3 The Domain Name System DNS is how the Internet translates domain or Website names into Internet addresses or URLs Your ISP will provide you with at least one DNS Server IP Address You can enter up to three DNS Server IP Addresses here The HiPort will use these for quicker access to functioning DNS servers WINS The Windows Internet Naming Service WINS converts NetBIOS names to IP addresses If...

Страница 14: ...king changes to this screen click Save Settings to save the changes or click Cancel Changes to undo your changes For more information click Help Setup MAC Address Clone Every computer hardware device including the network adapter of your computer has a unique code called a MAC address Some Internet Service Providers ISPs require you to register this address with them in order to access the Interne...

Страница 15: ... To create a static route alter the following settings Select Set Number Select the number of the static route from the drop down menu Delete This Entry To delete a route select its number from the drop down menu and click this button Enter Route Name Enter a name for the static route using a maximum of 25 alphanumeric characters Destination LAN IP The Destination LAN IP Address is the address of ...

Страница 16: ...ettings to apply your changes or click Cancel Changes to cancel your changes Wireless Wireless Security The Wireless Security settings configure the security of your wireless network There are six wireless security mode options supported by the HiPort WPA Personal WPA Enterprise WPA2 Personal WPA2 Enterprise RADIUS and WEP WPA stands for Wi Fi Protected Access which is a security standard stronger...

Страница 17: ...ared Key of 8 63 characters Group Key Renewal Enter a Group Key Renewal period which instructs the HiPort how often it should change the encryption keys The default Group Key Renewal period is 3600 seconds WPA2 Enterprise This option features WPA2 used in coordination with a RADIUS server This should only be used when a RADIUS server is connected to the HiPort Security Mode WPA2 Enterprise WPA Alg...

Страница 18: ...0 hex digits or 128 bits 26 hex digits The default is 64 bits 10 hex digits Passphrase Enter a Passphrase to automatically generate WEP keys Then click Generate Key 1 4 If you did not enter a Passphrase enter the WEP key s manually Click Save Settings to apply your changes or click Cancel Changes to cancel your changes Wireless Wireless MAC Filter Wireless access can be filtered by using the MAC a...

Страница 19: ...t to the HiPort in an environment with heavy 802 11b traffic This function boosts the HiPort s ability to catch all Wireless G transmissions but will severely decrease performance Beacon Interval The default value is 100 Enter a value between 1 and 65 535 milliseconds The Beacon Interval value indicates the frequency interval of the beacon A beaconisapacketbroadcastbytheHiPort tosynchronize the wi...

Страница 20: ...this feature Filter IDENT Port 113 This feature keeps port 113 from being scanned by devices outside of your local network Select Enable to filter port 113 or Disable to disable this feature When you have finished making changes to this screen click Save Settings to save the changes or click Cancel Changes to undo your changes Help information is available on the right side of the screen Security ...

Страница 21: ...dress or IP address You can also enter a range of IP addresses if you want this policy to affect a group of PCs After making your changes click 5 Save Settings to apply your changes or Cancel Changes to cancel your changes Internet Access Policy List of PCs Click the appropriate option 6 Deny or Allow depending on whether you want to block or allow Internet access for the PCs you listed on the Lis...

Страница 22: ...be able to access Enable Click the Enable check box to enable the applicationsyouhavedefined Thisisdisabled unchecked by default When you have finished making changes to this screen click Save Settings to save the changes or click Cancel Changes to undo your changes Help information is available on the right side of the screen Applications Gaming PortTriggering This screen instructs the HiPort to ...

Страница 23: ...address in the field provided When you have finished making changes to this screen click Save Settings to save the changes or click Cancel Changes to undo your changes Help information is available on the right side of the screen Applications and Gaming QoS Quality of Service QoS ensures better service to high priority types of network traffic which may involve demanding real time applications suc...

Страница 24: ...e Voice over IP VoIP video streaming and interactive gaming If you have other devices on your wireless network that support WMM keep the default Enable No Acknowledgement This feature prevents the HiPort from re sending data if an error occurs To use this feature select Enable Otherwise keep the default setting Disable Click Save Settings to apply your changes or click Cancel Changes to cancel you...

Страница 25: ...the default setting Enable Otherwise select Disable When you have finished making changes to this screen click Save Settings to save the changes or click Cancel Changes to undo your changes Help information is available on the right side of the screen Administration Log When you click the Administration tab you will see the Log screen It provides you with a log of all incoming and outgoing URLs or...

Страница 26: ...wish to test and click Traceroute The Traceroute screen will then display the test results Click Close to return to the Diagnostics screen Administration Traceroute Test Help information is available on the right side of the screen Administration Factory Defaults The Factory Defaults screen allows you to restore the HiPort s configuration to its factory default settings Administration Factory Defa...

Страница 27: ...eld provided enter the name of the extracted firmware upgrade file or click Browse to locate the file Upgrade After you have selected the appropriate file click this button and follow the on screen instructions Help information is shown on the right hand side of the screen Administration Config Management Administration Config Management Backup Configuration Click this button to backup the current...

Страница 28: ...ic IP connections DNS1 3 Shown here are the DNS Domain Name System IP addresses currently used by the HiPort MTU Shown here is the MTU Maximum Transmission Unit setting for the HiPort DHCP Release Available for a DHCP connection click this button to release the current IP address of the device connected to the HiPort s Internet port DHCP Renew Available for a DHCP connection click this button to r...

Отзывы: