S e n d d o c u m e n t c o m m e n t s t o n e x u s 3 k - d o c f e e d b a c k @ c i s c o . c o m
2-17
Cisco Nexus 3000 Series Hardware Installation Guide
OL-25338-04
Chapter 2 Installing the Cisco Nexus 3000 Series Switches
Starting the Switch
Caution
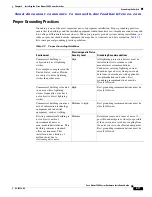
For safety, periodically check the resistance value of the antistatic strap. The measurement should be
between 1 and 10 megohm (Mohm).
Starting the Switch
This section provides instructions for powering up the Cisco Nexus 3000 Series switch and verifying the
component installation.
Note
Do not connect the Ethernet port to the LAN until the initial switch configuration has been performed.
For instructions on configuring the switch, see the
Cisco Nexus 3000 Series CLI configuration guides.
For instructions on connecting to the console port, see the
“Connecting to the Console Port” section on
page 3-2
.
Warning
When installing or replacing the unit, the ground connection must always be made first and
disconnected last.
Statement 1046
To power up the switch and verify hardware operation, follow these steps:
Step 1
Verify that empty power supply slots have filler panels installed, the faceplates of all modules are flush
with the front of the chassis, and the captive screws of the power supplies, fan module, and all expansion
modules are tight.
Step 2
Verify that the power supply and the fan modules are installed.
Note
Depending on the outlet receptacle on your power distribution unit, you may need the optional
jumper power cord to connect the switch to your outlet receptacle. See the
“Jumper Power Cord”
section on page C-8
.
Step 3
Ensure that the switch is adequately grounded as described in the
“Grounding the Switch” section on
page 2-10
).
Step 4
If you are installing a switch with an AC power supply, connect the power supply to an AC power source
as follows:
a.
Verify that the AC power source is turned off at the circuit breaker.
b.
Plug the power cable into the power receptacle on the power supply.
c.
Attach the other end of the power cable to the AC power source.
d.
Turn on the power at the circuit breaker.
e.
Verify that the power supply is functioning by making sure that the OK LED turns green and the
FAULT LED is off.


