background image

5

Send documentation comments to [email protected]

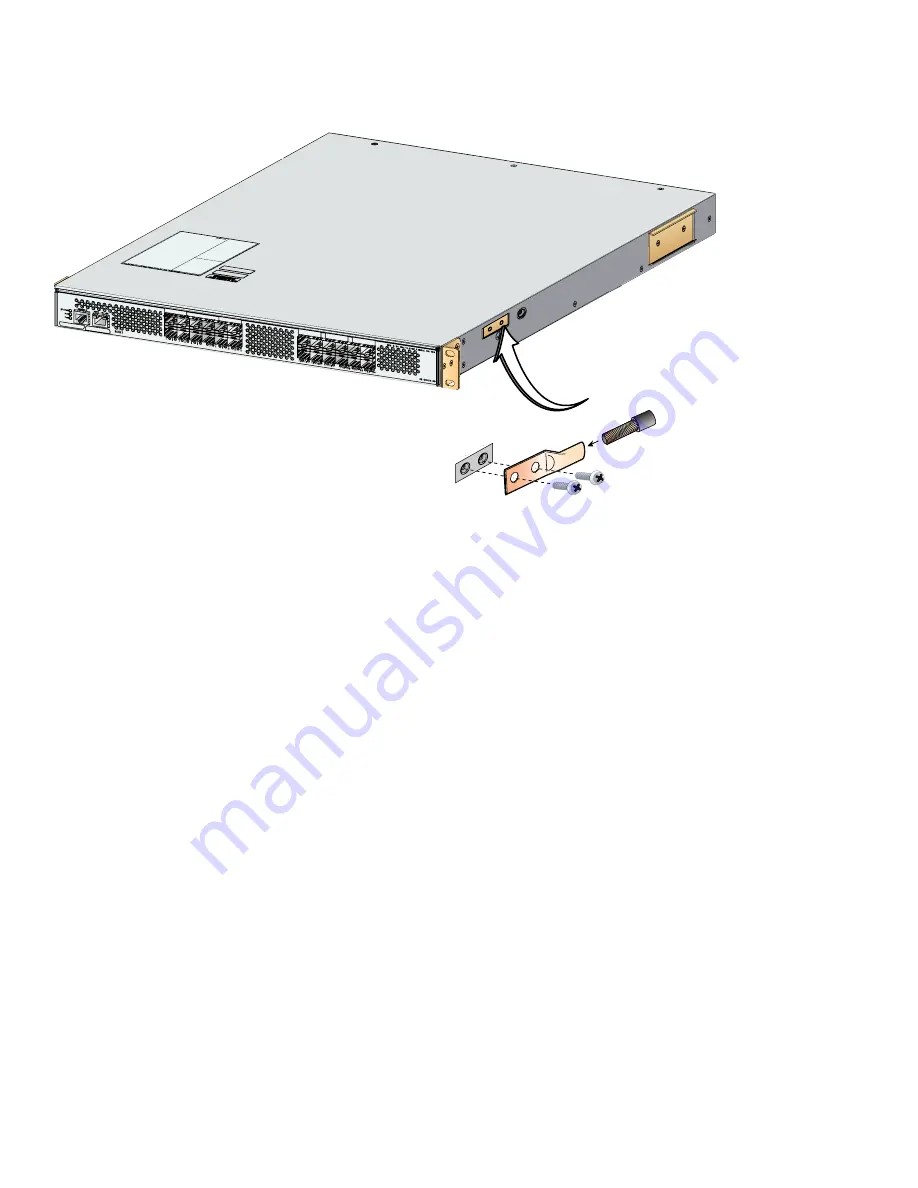
Figure 5

Switch Ground

1

81544

Grounding 

lug

System grounding pad

Wire

Screws (M4)

Grounding
pad location 

Step 2

Connect the power cable to the AC power receptacle, and then plug it in (see 

Figure 6

).


The Cisco MDS 9148 Switch supports only AC power supply. The power supply status is indicated on a front panel 
LED.


The Cisco MDS 9148 Switch includes a front panel reset button that resets the switch without cycling the power. 

Step 3

Power up the switch (see 

Figure 6

).

Содержание MDS 9148

Страница 1: ...Guide Date February 2010 Text Part Number OL 21517 01 1 Overview 2 Verifying Your Shipping Contents 3 Installing the Switch 4 Installing the SFPs 5 Powering Up the Switch 6 Setting Up a Network 7 Connecting Devices 8 Installing Cisco Device Manager 9 Using the Quick Config Wizard 10 Creating VSANs 11 Need Help ...

Страница 2: ... SANs VSANs security features and quality of service QoS Consistency with NX OS The front of the Cisco MDS 9148 Switch contains the LEDs the console and management ports and 48 8 Gbps Fibre Channel Ports See Figure 1 Figure 1 Front View of the Cisco MDS 9148 Switch 1 2 3 4 5 6 7 8 9 10 11 12 13 14 15 16 17 18 19 20 21 22 23 24 25 26 27 28 29 30 31 32 33 34 35 36 37 38 39 40 41 42 43 44 45 46 47 48...

Страница 3: ...s and connectors Any optional items ordered 3 Installing the Switch Install the switch in one of the following enclosures An open EIA rack A perforated or solid walled EIA cabinet A two post Telco rack For an example of a rack mount see Figure 3 Figure 3 Example Rack Mount 181543 Note Before you install the switch in a rack you will need to install the rack mount support brackets on the switch ...

Страница 4: ...SFP FC8G SW A Fibre Channel Long wavelength 1 2 4 or 8 Gbps SFP transceiver part number DS SFP FC8G LW A Fibre Channel Short wavelength 1 2 or 4 Gbps SFP transceiver part number DS SFP FC4G SW For SFP installation see Figure 4 Figure 4 SFP Installation 13 14 15 16 17 18 19 20 21 22 23 24 181666 5 Powering Up the Switch To power up the switch follow these steps Step 1 Ground the switch as shown in ...

Страница 5: ...ion Step 2 Connect the power cable to the AC power receptacle and then plug it in see Figure 6 The Cisco MDS 9148 Switch supports only AC power supply The power supply status is indicated on a front panel LED The Cisco MDS 9148 Switch includes a front panel reset button that resets the switch without cycling the power Step 3 Power up the switch see Figure 6 ...

Страница 6: ...Mgmt0 port is connected to the management network Step 2 Ensure that the console port is connected to the PC serial port or to a terminal server as shown in Figure 7 For example on a Windows PC used as a terminal emulator you can use HyperTerminal The default baud rate on the console port is 9600 Figure 7 Connection to Terminal Emulator Teminal emulator 181541 Console port Note See Figure 1 for th...

Страница 7: ...s Step in the Setup Utility Continue with Out of band mgmt0 management configuration yes no yes Mgmt0 IPV4 address 209 165 200 225 Mgmt0 IPV4 netmask 255 255 255 224 c Set up the default gateway Note The switch is now ready to be managed via the Mgmt port using Telnet or Device Manager or Fabric Manager 7 Connecting Devices To connect devices follow these steps Step 1 Connect a server to the switc...

Страница 8: ...ollow these steps Step 1 Enter the IP address you assigned to your switch in your Address field of you browser to begin the Cisco Device Manager installation Step 2 Click the Device Manager link shown in Figure 9 Figure 9 Cisco Device Manager Installation Step 3 Follow the onscreen instructions to install Cisco Device Manager ...

Страница 9: ...ce Manager Login Step 4 Click FC and then choose Quick Config Step 5 Enable two ports by checking the two corresponding check boxes in the Enable column as shown in Figure 11 Figure 11 Enable Zone Ports Step 6 Select one of the two enabled ports that you want in a zone by checking its check box in the Ports Zoned To area When you check this check box the second enabled port automatically becomes c...

Страница 10: ...h can be created with the Quick Config Wizard Note For more information about installing Cisco Device Manager and using the Quick Config Wizard see the Cisco MDS 9000 Family Fabric Manager Configuration Guide 10 Creating VSANs To create VSANs follow these steps Step 1 Click the Device Manager icon on your desktop to log in Step 2 Enter a password in the Password field see Figure 13 Step 3 Click th...

Страница 11: ...ate VSAN General dialog box to create a VSAN as shown in Figure 14 Figure 14 VSAN Creation Step 7 Click Finish to save your changes Step 8 Repeat Step 6 and 7 to create more VSANs Note For more information on how to create VSANs see the Cisco MDS 9000 Family CLI Configuration Guide This completes the installation of your Cisco MDS 9148 The switch is now ready to use ...

Страница 12: ...t have a valid Cisco service contract contact your reseller Cisco Technical Support and Documentation Website The Cisco Technical Support and Documentation website provides online documents and tools for troubleshooting and resolving technical issues with Cisco products and technologies The website is available 24 hours a day at this URL http www cisco com techsupport Access to all tools on the Ci...

Страница 13: ...13 Send documentation comments to mdsfeedback doc cisco com ...

Страница 14: ... Capital Cisco Capital Design Cisco Financed Stylized Cisco Store Flip Gift Card and One Million Acts of Green are service marks and Access Registrar Aironet AllTouch AsyncOS Bringing the Meeting To You Catalyst CCDA CCDP CCIE CCIP CCNA CCNP CCSP CCVP Cisco the Cisco Certified Internetwork Expert logo Cisco IOS Cisco Lumin Cisco Nexus Cisco Press Cisco Systems Cisco Systems Capital the Cisco Syste...

Отзывы: