background image


© 2004 Boson Software, Inc.  All Rights Reserved. 


44


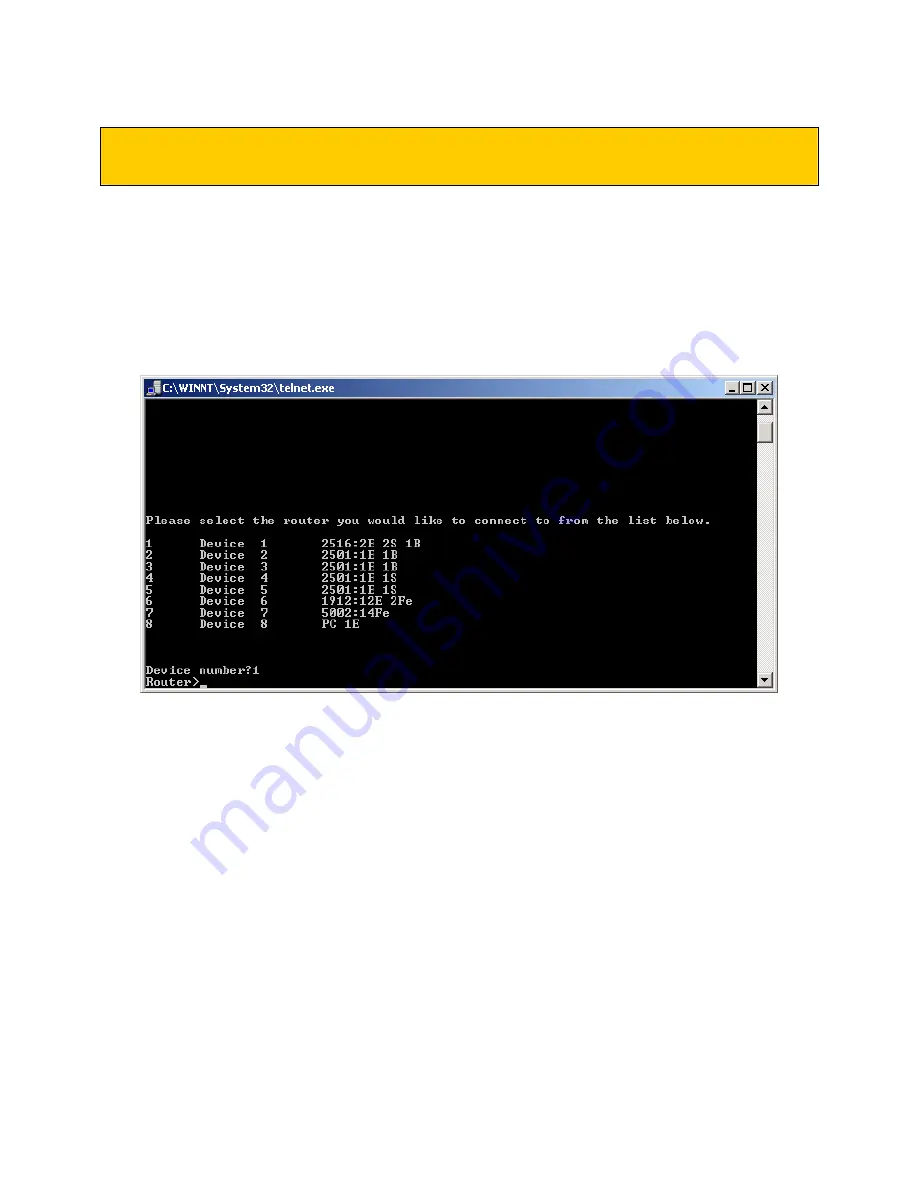
Virtual Terminal Server


The Virtual Terminal Server permits you to virtually attach to simulated devices and cycle between them 
without the need for separate telnet sessions. 
 
During any Telnet session to any Device (Router, Switch, Station), you can access the Virtual Terminal 
Server by using the Hotkey combination: 

CTRL-Q

.  Hold down the Control key while at the same time 

you press Q (CONTROL-Q). 
 
The example below shows Device 1 forming a session: 


The Virtual Terminal Server 


Содержание CCNA NETWORK SIMULATOR

Страница 1: ......

Страница 2: ... DESIGNER BOSON CERTIFIED LABS BOSON NETWORK SIMULATOR BOSON NETWORK EMULATOR BOSON CLASS IN A BOX BOSON ESWITCH BOSON EROUTER and BOSON ESTATION are trademarks or registered trademarks of Boson Software Inc in the United States and certain other countries Other Trademarks Cisco Cisco Systems CCDA CCNA CCDP CCNP CCIE IOS CCSI the Cisco Systems logo and the CCIE logo are trademarks or registered tr...

Страница 3: ... 925 0700 Updates http www boson com netsim cp Credits Boson Software Inc Project Leaders Chief Architect John Swartz CCIE 4426 Senior Programmer Chad Altman CCNP CCDP Application Design Documentation David Rajala CCNP CCDP Technical Consultants Stephen Marcinek CCIE 7225 Jonathan Van Vuren CCNP CCDP Beta Testers Barry Gursky CCIE 7208 Jeff Poole CCIE 4298 Steve McQuerry CCIE 6108 Wendell Odom CCI...

Страница 4: ... FEATURES 19 Using Telnet 20 Step 1 Load the Simulator 20 Step 2 Set Advanced Mode Telnet 20 Step 3 Lab Navigator Utility 22 Step 4 Different Methods for Telnet 24 Step 5 Configuring Router 1 with Telnet 27 Step 6 Self Grade Your Lab 28 FEATURE OVERVIEW 31 Control Panel main menus 32 File Menu 33 View Menu 35 Devices Menu 36 Tools Menu 37 Ordering Menu 38 Window Menu 39 Help Menu 40 Control Panel ...

Страница 5: ...etween Devices 63 Connecting Serial PPP Between Devices 64 Selecting DCE DTE 65 Connecting ISDN Between Devices 66 Connecting Multipoint Serial Between Devices 67 Removing Connectors 69 Clearing the Network Map Topology 70 Saving a Custom Topology 71 Opening Loading a Custom Topology 72 Printing the NetMap Topology 73 APPENDICES 74 Appendix A Tested 3rd Party Firewalls 74 Zone Alarm 74 Norton Pers...

Страница 6: ... the configuration of routers and switches in a variety of scenarios After completing a lab you can ask the Cisco CCNA Network Simulator to self grade the lab to determine if it was done correctly As you progress the 100 labs the skills needed to be a CCNA are learned and mastered With the ability to guide and self grade the Cisco CCNA Network Simulator can actually be more helpful than using real...

Страница 7: ...g from the Cisco published objectives Basically learning Cisco routers involve two fundamental tasks learning and mastering the theory of routers and switches and the hands on practical implementation of that theory by configuring the routers in a network and testing them in the lab The theory portion of the education can be taught by reading books or listening to an instructor The purpose of the ...

Страница 8: ... 2004 Boson Software Inc All Rights Reserved 3 ...

Страница 9: ...ator and how they interoperate Advanced features and more functionality will be covered later Simulator Components The Simulator is actually a suite of programs that interact to provide a total learning experience The primary components are Lab Navigator Network Designer optional Network Simulator Lab Grader The purpose of the Lab Navigator is to allow you to view select and begin the lab of your ...

Страница 10: ...e basic parts are 1 Use the Lab Navigator to load the lab then 2 Use the Network Simulator to configure the Devices Routers Switches Stations and 3 Use the Lab Grader tool to check your lab answers configs See diagram All three basic parts described above will now be covered in detail ...

Страница 11: ...am click the play button on the video window This will show a short movie that will introduce you to all components of the program and describe how to use the program The next couple of pages will further elaborate on the topics covered by the video Introduction Video Note The Advanced Labs are broken out as the CCNA INTRO Labs and the CCNA ICND Labs within the simulator ...

Страница 12: ...Connecting to a Router lab Lab Navigator Click on the lab to bring up the Select your lab screen There will be a brief overview of the lab and you will be given the option to view the chapter view the lab load the lab or cancel Each of the buttons help you with the individual lab Starting a Lab ...

Страница 13: ...ight from the Cisco CCNA Certification Library also published by Cisco Press This will provide the theory and explanation necessary to understand the lab View Lab The View Lab button will load the lab that you selected This will open up in Adobe Acrobat You can choose to print the lab out here or just follow along ...

Страница 14: ...ad Lab button you will be asked if you would like to load the corresponding topology into the Simulator Selecting yes to this option will display the Simulator in the background creating new windows where each one represents a new device eg a router switch or pc Proceed to Part 2 ...

Страница 15: ...2004 Boson Software Inc All Rights Reserved 10 Part 2 The Network Simulator Once the lab is loaded you will see the screen below After this device prompt screen is displayed we are ready to begin the lab ...

Страница 16: ...We will now follow the lab 1 If you have not done so already click on the Routers button located at the top of your screen and select Router1 The Router1 window will open and the text Press Enter to Start will appear as follows Note the mouse pointer ...

Страница 17: ... key to get started you are now connected to Router1 and are at the usermode prompt The prompt is broken down into two parts the hostname and the mode Router is the Router1 s hostname and means you are in usermode Your input would be as follows Press RETURN to get Started Router Follow along in the lab ...

Страница 18: ... 2004 Boson Software Inc All Rights Reserved 13 3 Next type the command enable e to get to the privileged mode prompt Your input would be as follows Router enable Router ...

Страница 19: ...ved 14 4 Last to get back to the user mode simply type disable From the usermode type logout or exit to leave the router Your input would be as follows Router disable Router Router exit Router con0 is now available Press RETURN to get started ...

Страница 20: ...ed 15 You have now completed all the steps in this introductory lab To grade your lab select the Grade Me button on the Lab Navigator as follows Starting the Grade Lab tool from within the Lab Navigator Finally proceed to Part 3 The Lab Grader ...

Страница 21: ...mining if you have completed the tasks as defined in the lab This is a useful tool to ensure you are mastering the skills required for the CCNA Scrolling through the list of labs to grade The three basic steps to use the Lab Grader Select the lab you have completed Tell the program to grade your lab Review the results ...

Страница 22: ...row to the right of the drop down box and select the lab you are working on Selecting a Lab to Grade Grade the Lab After you have select the lab click the Grade Me button The program will then begin an analysis of your current router and switch configurations and compare that to the expected configuration of the devices ...

Страница 23: ...u have completed all necessary commands to complete the lab s objectives and are now ready to move on to the next lab If not you need to go back and fix the problems and grade the lab again At this point you have completed the basic features overview and are ready to move on to the advanced lab tutorial in the next section ...

Страница 24: ... 2004 Boson Software Inc All Rights Reserved 19 ...

Страница 25: ... the real world Otherwise you can complete this lab using the Basic functionality of the simulator as described in the previous section Step 1 Load the Simulator To get started launch the Cisco CCNA Network Simulator Select Lab 2 from the Stand Alone Labs option within the Lab Navigator When the lab description screen loads click the Load Lab button to launch Step 2 Set Advanced Mode Telnet From w...

Страница 26: ... TAB between your network diagram and the other Cisco CCNA Network Simulator components The default NetMap for the lab is shown below The NetMap Viewer showing your Current Network Diagram Color legend as defined in the Cisco CCNA Network Designer Blue is Ethernet Red is ISDN Dialup or PRI Black is Serial PPP White is Serial Frame ...

Страница 27: ...s so you can ALT TAB between the labs and multiple telnet windows The easy way to load the Lab Navigator utility Within the Lab Navigator you can access the included labs by selecting a section which is illustrated by use of tabs and then by selecting one of your lab choices from within the labs list that appears Tips The labs are organized into sections to match the Lab Navigator content bar as s...

Страница 28: ...ued For the purpose of this lab walkthrough tutorial please select the Stand Alone labs selection which will show all of the labs found in that category Next select Lab 2 The Basics This is the lab we will use for use this tutorial Lab 2 from the Stand Alone Labs ...

Страница 29: ...torial or try experimenting with all four methods The first step of this lesson s lab is simply to connect using telnet to Router1 Telnet Method 1 of 4 Directly from within the NetMap viewer Right Click on Router1 or any Device and select Configure Note that if you Double Click on the Device instead of right clicking a Device statistics window will appear instead of telnet The moment you select Co...

Страница 30: ...urrently configured within the existing NetMap Topology The moment you select Router 3 your default Telnet will connect to the selected Router 3 Telnet Method 3 of 4 Select Devices from the Control Panel pull down menu and then expand Routers by simply running the mouse over it and finally select Router 3 The moment you select Router 3 your default Telnet will connect to the selected Router 3 ...

Страница 31: ... the Remote Control button within the Control Panel horizontal toolbar The easy way to re launch the Remote Control vertical toolbar From the Remote Control vertical toolbar click on the Telnet to Router button to receive a list of Routers currently configured within the existing NetMap Topology The moment you select Router 3 your default Telnet will connect to the selected Router 3 ...

Страница 32: ...ve just learned select Router 1 Carry out the instructions in Lab 2 When you have completed step 8 which is the last step in that particular lab you would have been shown how to log off of the router When you type exit you will effectively logoff the Router however telnet will still be open Default Telnet window attached to Router 1 showing the result at the end of Lab 2 DO NOT close telnet exe ye...

Страница 33: ...b Navigator select the Grade Lab button at the top of the screen The Grade Lab feature can verify your router configs for the included labs Once you left click on the Grade Lab menu selection the Self Grading utility will launch and default to the Lab in the drop down list that you last loaded ...

Страница 34: ...lab configuration to function properly This means that if you are practicing labs that are not the included within the Cisco CCNA Network Simulator labs then this feature must first be configured to expect the correct lab input From within the Grade My Lab screen use the pull down menu to select Lab 2 and then click the Grade Me button You should see the results as shown here ...

Страница 35: ...rror it would be displayed in the box below the Grade Me button You may now close your telnet program to do so in the normal Windows fashion click on the standard upper right hand corner X button the standard close window button Congratulations You have completed the Advance Lab Tutorial Walkthrough ...

Страница 36: ... 2004 Boson Software Inc All Rights Reserved 31 ...

Страница 37: ...simply press ALT Underlined letter in the menu bar i e ALT F brings up the File menu You can then use the arrow keys to display the rest of the menu bar When you find the option you would like to choose move until it is highlighted and press ENTER The first part of this feature overview will cover the main pull down menus from left to right The second part of the feature overview will cover severa...

Страница 38: ...into the active router Load Single Device Config Merge Keeps your current Device configuration and loads the Device configurations stored in your previously saved configuration files filename rtr This is NOT how to load a new Network Designer top file into the Cisco CCNA Network Simulator To do that select the Load NetMap menu option under the File pull down menu Load Single Device Config Overwrit...

Страница 39: ...s currently loaded in the Cisco CCNA Network Simulator and allow you to save ALL of your Device configs to disk at once In effect this is like making a TFTP config backup of all Devices routers switches and stations on your entire network with the click of a button Note This will save one RTR file for each Device currently loaded in the Cisco CCNA Network Simulator This will also save one NWC netw...

Страница 40: ... as the Lab Navigator and NetMap This view will bring up a different Telnet window for each device you would like to configure When you are finished configuring the device you can just close the Telnet window The Simulator also has a built in method of switching between devices inside of one Telnet window When you are ready to connect to a different device you can also use the hotkey CTRL Q press ...

Страница 41: ...ng tables protocols and interfaces eSwitches The Emulated Switches used in the Cisco CCNA Network Simulator are designed to replicate real switches by simulating commands bridge tables protocols and interfaces eStations The Emulated Stations are simulated personal computers running the Boson Operating System Simulator BOSS command line interface The Stations are comprised of non descript PC s with...

Страница 42: ...ish to check for updates or you are behind a firewall that restricts the update utility then you can also use the more traditional manual update method of downloading a product update file for later installation Update files can be manually downloaded for a period of 90 days from the date of registration and activation from http www boson com netsim cp Available Commands Clicking on this feature w...

Страница 43: ...ion should never be used unless instructed to do so by Boson technical support This option will permanently remove your Unique Serial Number license key from your computer and generate a special unique removal code You should keep a copy of the removal code and your correspondence with Boson s technical support instructing you to do so for your own records CAUTION This function is used to remove t...

Страница 44: ...for ease of use The features of the Remote Control include buttons for quick launching of the Telnet to Router Telnet to Switch Telnet to Station Lab Navigator or NetMap You can also switch views or hide the main screen Cascade Clicking on Cascade will layer the all of the currently open windows on top of each other displayed within the Cisco CCNA Network Simulator unless the window is minimized a...

Страница 45: ...Open Help File The Help File contains information and tutorials for both the CCNA Simulator and Network Designer User Guide The User Guide is the product manual which is designed to assist the Cisco CCNA Network Simulator user understand the features and operations of the program It is the document you are reading now Tech Support Cisco Press 800 East 96th Street 3rd Floor Indianapolis IN 46240 Ph...

Страница 46: ...ted Tutorial Walkthrough of the 3 basic concepts required to completing a lab in the Cisco CCNA Network Simulator as further described in the Basic Simulator Features section of this document Telnet Setup Wizard This Wizard will test and configure your default Telnet application for use with the Cisco CCNA Network Simulator Telnet Tutorial Wizard This tutorial wizard is fully scripted and automate...

Страница 47: ...es the Cisco CCNA Network Simulator Lab menu system permitting the selection of numerous included labs Clicking on the Net Map button shows a current network topology diagram of all Devices currently loaded Clicking on the Switch Views button toggles between the Window in Window WiW interface and the industry standard Telnet interface Clicking on the Hide Main Screen button has a different affect ...

Страница 48: ... the Network Designer in a read only mode as further shown and described below The NetMap Viewer displays a current snapshot of all Devices currently loaded There are 2 ways to access this topology screen 1 Click on the NetMap button on the Control Panel horizontal toolbar 2 Click on the NetMap button on the Remote Control vertical toolbar Note You can right click on any Device for a quick config ...

Страница 49: ...cycle between them without the need for separate telnet sessions During any Telnet session to any Device Router Switch Station you can access the Virtual Terminal Server by using the Hotkey combination CTRL Q Hold down the Control key while at the same time you press Q CONTROL Q The example below shows Device 1 forming a session The Virtual Terminal Server ...

Страница 50: ...ts Reserved 45 Simulated Workstations When you telnet to the Station the Boson Operating System Simulator BOSS command window will open Type for a list of available BOSS commands or help for an overview Simulated Workstation Interface ...

Страница 51: ... 46 Changing TCP IP settings on the BOSS Station Unlike other actual operating systems the BOSS Station permits you to directly modify its TCP IP settings directly within the WINIPCFG utility launched from the command line as shown below WINIPCFG ...

Страница 52: ...te the Lab Navigator button on the toolbar in the Simulator To launch the Network Simulator locate the shortcut on either you desktop or within your Start menu When the Lab Navigator is launched you will see that the interface is fairly well organized The topics from which you ll locate your labs are laid out in a tab format The yellow highlighted tab indicates that the tab is the current topic at...

Страница 53: ...hese chapters The lab manual is also stored in digital format requiring a PDF viewer and can be viewed by clicking on the View Lab button It is here that you will find the text to lead you on your way to performing these labs View the lab PDF and load the lab into the Network Simulator To do this you ll click on the Load Lab button Figure 2 Select Your Lab screen ...

Страница 54: ...ddon Labs screen provides easy organization with sections and will not save your changes until you return back to the Lab Navigator Making edits and changes are simple too the interface is fairly easy to understand To add a section click on the Add Section button This will allow you to enter information into the Section box at the top Click Save Section to save it Then after you ve created your fi...

Страница 55: ...e an efficient networking experience Unless you save your topology you cannot stop shutdown the program and then just restart a new later lab and expect the instructions to carry you from the first step In the case you shutdown the Simulator before you ve completed them make sure you save your work If you don t save you ll end up need to repeat quite a few steps depending on what area you are work...

Страница 56: ...on disabled on the left and when it s enabled on the right Figure 6 Grade My Labs The Grade Lab button is not available until you start looking at the labs It is fairly smart too as it will select the current lab that you ve loaded or the current lab that you ve selected But say if you want to select a different lab to grade That s fine you have a drop down list to use to select the labs If you pa...

Страница 57: ... Make sure that all devices and connections are properly configured Whenever the Grade My Lab feature runs on your lab it will check the lab in question against your configurations Any configuration errors in your lab will result in inaccurate results on the part of the Grade My Lab feature 5 Name and Save your configurations 6 Open the Completed Labs folder 7 Copy your NWC and RTR files into the ...

Страница 58: ...e pre created and require no additional configuration to complete as is The two primary concepts involved are 1 Network Designer NetMap Topology files TOP format are the PHYSICAL layout of your network as seen in the NetMap Viewer The ONLY way to add or delete Devices within your physical NetMap Topology or load save TOP files is by using the Network Designer 2 Topology files are unrelated to the ...

Страница 59: ...etwork Designer and return to the Simulator 6 From under the File menu select Load NetMap Network Designer File 7 Point at the topology filename top file you created in the steps above 8 Using the Simulator you can then configure the Device configs Notes The Network Designer makes it possible to design your own custom network topologies and then configure them with the Cisco CCNA Network Simulator...

Страница 60: ... is located in the lower left had portion of the Network Designer right below the Devices and Connectors box This box will only refresh when you click on a specific Device under the Devices and Connectors on the left hand side of the program It s primarily used for showing you stats of the Device BEFORE you add them to your NetMap Topology The information for the device selected will be presented ...

Страница 61: ...tMap Topology worksheet Double Click the device within the worksheet Device Stats Interfaces Window The Connect This Interface button allows for connections to be made by selecting an interface from the Disconnected Interfaces box Selecting this option will close the Device statistics window and automatically launch you directly to the correct step in the Add Connector Wizard ...

Страница 62: ...2 series of switches the Catalyst 1900 and 2900 series To add a Switch to the layout area simply follow the steps below 1 Left Click the plus sign next to Available Switches 2 After the type has been selected the option expands to show all available Switch series 3 Left Click on the plus sign next to the Switch series to reveal all available models 4 While holding the left mouse button down Drag a...

Страница 63: ...ll then guide you through the following selection and configuration process Select the Device Router Switch Station that you would like to add Depending upon your selection the screen options will change If adding a Router there are 2 ways for how you would like to find the interfaces you require Method 1 of 2 The Find By Model Number selection which lists Devices based on router series and model ...

Страница 64: ...lection lists Devices based on the checkboxes you select which automatically lists supporting Routers If adding a Switch simply select the model number from the list Each Switch model has not only different interfaces but also a slightly different command set Note If adding a Station simply click Finish to add the device as there are no configurable options to pick from in the Wizard ...

Страница 65: ...hysical layout window 1 Left click the Device you want to terminate 2 Choose Delete Device from the pop up menu 3 The Network Designer will remove the selected Device from the NetMap Topology layout window and automatically delete all associated Connectors If there are any connections to the device they will be terminated and removed ...

Страница 66: ...ctions 2 After Available Connections has been selected the option expands to show all available Connections 3 Left Click on the plus sign next to the selected Connection Type 4 Drag n Drop the selected Connection Type to the NetMap Topology physical layout window A note on Fast Ethernet connections Fast Ethernet does not have its own connection item in the tree view If a device has Fast Ethernet c...

Страница 67: ...th default values However if you wish to change these values and set the interface connection parameters yourself you can do so during this step Alternatively after the fact you can 1 Right click on the Frame Relay not ISDN icon in the NetMap Topology physical layout window 2 Click the Set Parameters option from the pop up menu 3 The Set Parameters window will appear 4 After making changing parame...

Страница 68: ...guided through the process 1 Left Click on the Ethernet connection to add 2 The New Connection box will appear listing all Devices that have Ethernet ports correlating to the Ethernet connection type that was selected 3 Select a Ethernet capable Device to connect from the Available Devices box 4 Select an Ethernet interface from the Interfaces box 5 Repeat process for other devices 6 Click Finish ...

Страница 69: ...s 1 Left Click on the Serial connection to add 2 Select the Point to Point Serial connection serial cable option 3 The New Connection box will appear listing all Devices that have Serial ports correlating to the Serial connection type that was selected 4 Select a Serial capable Device to connect from the Available Devices box 4 Select a Serial interface from the Interfaces box 5 Repeat process for...

Страница 70: ...r Selecting DCE DTE Before the Serial connection can be completed one router must be designated as the DCE side of the connection It is important to remember that the DCE device will need to have its clock rate manually set Note Frame Relay is configured separately ...

Страница 71: ...k on the ISDN connection to add 2 The New Connection box will appear listing all Devices that have ISDN ports correlating to the ISDN connection type that was selected 3 Select a ISDN capable Device to connect from the Available Devices box 4 Select an ISDN interface from the Interfaces box 5 Repeat process for other devices 6 Click Finish when done Note PRI interfaces are also supported see the S...

Страница 72: ...d Connector Wizard select the Serial Interface then Multi Point option to be guided through the process Select the Point to Multi Point Serial Connection for Frame Relay 1 Select Serial from the Available Connections list 2 The Network Designer will ask what type of serial connection you would like to make 3 Select Point to Multi Point Serial Connection Frame Relay continued ...

Страница 73: ...ting a Router will cause the Ports list to be populated with all available serial ports for the selected router 6 After selecting the serial port that will be used click the AddÆ button to place the Device and selected interface in the Selected Devices box 7 When you are finished adding Devices click the Connect button to complete the connection Do this for each router included in the Frame Relay ...

Страница 74: ...m within the NetMap Topology physical layout window 1 Left click the Connection you want to terminate 2 Choose Remove Connection from the pop up menu 3 Select the connection to disconnect 4 The connection will be removed from the NetMap Topology layout window This action will not modify the associated Devices ...

Страница 75: ...signer Clearing the Network Map Topology Clearing deleting the NetMap Topology physical layout 1 Click on the File menu item 2 Select menu option New and you will be asked to confirm Wipe Out the Entire Network 3 The current topology will be erased and cleared ...

Страница 76: ... 1 Click the Save option 2 A window will appear to verify that you have chosen to save the topology 3 Click the OK button 4 Name the file and browse to the location you would like to save the topology 5 Click the Save button After the Topology is saved you can then load it with the CCNA Simulator Note Physical NetMap Topology files are saved as filename top ...

Страница 77: ...n 2 Click the Open option 3 Browse to the location of your topology file remember the default file extension for topology files is top 4 Select the file you would like to open 5 Click the Open button Re load your saved custom Topology for additional editing in the Network Designer Note Physical NetMap Topology files are saved as filename top ...

Страница 78: ... NetMap Topology Printing your NetMap Topology physical layout for future reference 1 Click the Print button from with in the File menu 2 Here you will be able to select which printer you want to send your image to and you can click on Preferences to adjust the printing options ...

Страница 79: ...s licensors licensees partners affiliates and or publishers Zone Alarm Upon launching the Cisco CCNA Network Simulator a warning message box from ZoneAlarm if installed might appear with a similar window to this one You must permit Telnet sessions to loopback IP 127 0 0 1 ZoneAlarm shows this as IP 0 0 0 0 for the Simulator to function properly Click on the check box Remember this answer the next ...

Страница 80: ...o this program on all ports pull down option and then click the Ok button This will give the program access to establish Telnet sessions If you desire to play with the Manually configure Internet access option you must configure to permit loopback IP 127 0 0 1 on Telnet port 23 The above third party programs were tested only so far as basic compatibility for use with the advanced features of the C...

Страница 81: ...iation with Boson Software its licensors licensees partners affiliates and or publishers Absolute Telnet No problems found Telnet 2000 No problems found NetTerm No problems found Koala Term No problems found Tiny Term No problems found The above third party programs were tested only so far as basic compatibility for use with the advanced features of the Cisco CCNA Network Simulator No other testin...

Страница 82: ...04 0 0 2 1 2500 2505 0 1 2 0 2500 2507 0 1 2 0 2500 2509 0 1 8 0 2500 2511 0 1 16 0 2500 2513 0 1 2 0 2500 2514 0 2 2 0 2500 2515 0 0 2 0 2500 2516 0 1 2 1 2500 2520 0 1 4 1 2500 2521 0 0 4 1 2500 2522 0 1 10 1 2500 2523 0 0 10 1 Series Model Fast Ethernet Ethernet Serial ISDN 800 801 0 1 0 1 800 802 0 1 0 1 800 803 0 1 0 1 800 804 0 1 0 1 800 805 0 1 1 0 800 808 0 2 0 0 1000 1003 0 1 0 1 1000 100...

Страница 83: ...1604 1 1s 1b 1600 1605 1 1s 1b 1700 1720 2 1s 2s 1b 1e 1700 1721 2 1s 2s 1b 1e 1700 1750 2 1s 2s 1b 1e 1700 1751 2 1s 2s 1b 1e 1700 1760 2 1s 2s 1b 1e 2600 2610 2 1s 2s 1b 2600 2611 2 1s 2s 1b 2600 2620 2 1s 2s 1b 2600 2621 2 1s 2s 1b 3600 3620 2 1e 4e 1e 1s 2e 1s 1f 1f 1b 1f 2b 4s 4b 3600 3640 4 1e 4e 1e 1s 2e 1s 1f 1f 1b 1f 2b 4s 4b 4500 4500 3 2e 6e 1f 2s 4s 4b 8b Legend e Ethernet s Serial e E...

Страница 84: ...CNA Network Simulator Support Stations The Emulated Stations are simulated personal computers running the Boson Operating System Simulator BOSS command line interface The Stations are comprised of non descript PC s with 1 Ethernet connection From within the command window type for a list of available commands or help for an overview See the Simulated Workstations section for more assistance ...

Страница 85: ...ied topology RTR Router Switch Configuration This file is the saved running config of an individual router or switch device within the physical network map topology Things like individual device TCP IP addresses are stored in this file TOP Topology Configuration This file is generated by the Network Designer and is used to describe the physical network map topology Things like ISDN Serial and Ethe...

Страница 86: ...ltiple software items such as Boson s Practice Tests and the Boson NetSim for CCNP are permitted in your single half off Shopping Cart software order Other items such as Training Bootcamps Study Guides CDROM s etc are not included in this offer To take advantage of this limited time offer simply use your 9 digit Unique Serial Number included with the Cisco CCNA Network Simulator as a Coupon in the...

Страница 87: ...ATOR BOSON NETWORK DESIGNER BOSON CERTIFIED LABS BOSON NETWORK SIMULATOR BOSON NETWORK EMULATOR BOSON CLASS IN A BOX BOSON ESWITCH BOSON EROUTER and BOSON ESTATION are trademarks or registered trademarks of Boson Software Inc in the United States and certain other countries Other Trademarks Cisco Cisco Systems CCDA CCNA CCDP CCNP CCIE IOS CCSI the Cisco Systems logo and the CCIE logo are trademark...

Страница 88: ... 2004 Boson Software Inc All Rights Reserved 83 ...

Отзывы: